
Subscribe to Our Youtube Channel
Related Manuals for Clarke CEPG1


Summary of Contents for Clarke CEPG1
- Page 1 AIRLESS PAINT GUN MODEL NO: CEPG1 PART NO: 3090120 INSTRUCTIONS FOR USE ORIGINAL INSTRUCTIONS GC06/23...
-
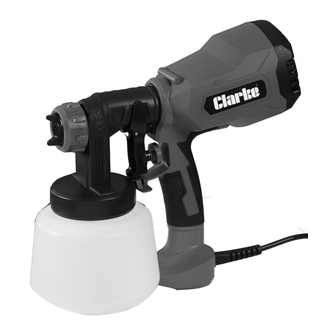
Page 2: Specification
INTRODUCTION Thank you for purchasing this CLARKE Paint Gun. Airless spraying reduces the mist associated with compressed air spraying and therefore reduces paint loss. Your sprayer may be used with various mediums, including water-based paints, varnishes, wood preservatives, masonry paints. -
Page 3: General Safety Precautions
GENERAL SAFETY PRECAUTIONS WORK AREA 1. Keep the work area clean and well lit. Cluttered and dark areas invite accidents. 2. Keep children and bystanders away while operating a power tool. Distractions can cause you to lose control. ELECTRICAL SAFETY 1. - Page 4 Check for any condition that may affect the paint guns operation. Any damage should be properly repaired or the part replaced. If in doubt, DO NOT use. Consult your local CLARKE dealer. 6. When necessary, have your paint gun serviced or repaired by a qualified person using identical replacement parts.
-
Page 5: Electrical Connections
ELECTRICAL CONNECTIONS WARNING! READ THESE ELECTRICAL SAFETY INSTRUCTIONS THOROUGHLY BEFORE CONNECTING THE PRODUCT TO THE MAINS POWER SUPPLY. Before switching the product on, make sure that the voltage of your electricity supply is the same as that indicated on the rating plate. This product is designed to operate on 230VAC 50Hz. - Page 6 OVERVIEW Motor housing Output stop knob Air vent with filter Trigger Gun body Power cable Nozzle 3-pin plug Nozzle cap Viscosity cup Collar nut Spare nozzle basket Container mounting Air filter pad Pick-up tube Brush cleaning tool Paint container Nozzle unblocking tool Support Parts &...
-
Page 7: Paint Preparation
PAINT PREPARATION To obtain the best results it is important that you prepare the surface to be sprayed and thin the paint to the correct viscosity before spraying. Always ensure that surfaces to be sprayed are free from dust, dirt and grease. Make sure that you have masked the areas that should not be sprayed, using a good quality masking tape. -
Page 8: Operation
OPERATION OPERATING THE PAINT GUN 1. Unscrew the container from the gun body. 2. Direct the pickup pipe depending on the expected working position: • Rotate the pickup pipe forward when working with flat objects (see Fig. B1). • Turn the pickup backwards when working on overhead surfaces (see Fig. - Page 9 • To change the 2.6 mm nozzle, screw the collar counter-clockwise and remove the 2.6 mm nozzle from the gun body. • Attach the 1.8mm nozzle to the gun. Be sure that the notches or protrusions are properly aligned. • Install the nozzle in the mouthpiece. •...
-
Page 10: Adjusting The Spray Pattern
ADJUSTING THE SPRAY PATTERN Adjustment of the output control will affect the pattern. A poor spray pattern will concentrate the paint in the centre of the spray and give a blotchy finish. A good spray pattern will give even distribution of paint throughout the pattern. -
Page 11: Spraying Technique
SPRAYING TECHNIQUE WARNING: ALWAYS WEAR A SUITABLE RESPIRATOR TO PROTECT THE EYES AND THE RESPIRATORY SYSTEM FROM PAINT MIST OR CHEMICAL VAPOURS. CAUTION: USE THE GUN ONLY IN WELL-VENTILATED OR VENTILATED SPACES. CAUTION: WEAR PROTECTIVE CLOTHING AND GLOVES TO PROTECT SKIN AND CLOTHING FROM DAMAGE AND IRRITATION. - Page 12 When spraying large areas, always use a criss-cross pattern as shown (see fig. H). Keep the nozzle 25 - 30 cm from the surface and spray evenly from side to side or up and down. DO NOT spray at an angle as this will lead to paint runs on the surface.
-
Page 13: Cleaning And Maintenance
CLEANING AND MAINTENANCE CAUTION: ALWAYS DISCONNECT FROM THE POWER SUPPLY BEFORE CLEANING THE SPRAY GUN Continuously satisfactory operation depends upon proper care and regular cleaning. It is essential that the spray gun is cleaned thoroughly after every use. Failure to clean it will almost certainly result in blockages and it may not operate when you next come to use it. -
Page 14: Long Term Maintenance
Worn nozzles will have larger holes and scratches on the internal surfaces. This is likely to cause a poor spray pattern and will eventually require replacing. Replacement parts are available from your CLARKE dealer or the CLARKE International Parts Department. -
Page 15: Changing The Air Filter
CHANGING THE AIR FILTER The filter can be washed in warm water and dried but If it is very dirty you can replace it with the replacement filter supplied. 1. Unscrew the four screws at the rear of the gun with a x-head screwdriver. -
Page 16: Fault Finding
FAULTFINDING Problem Cause Solution Motor hums but does Pick-up pipe not in the Adjust pickup pipe. not spray or spray is right position. irregular Blocked pickup pipe. Clean with water or use thinners for really stubborn Blocked nozzle material. Blocked filter Output control needs Adjust output control to suit adjustment... -
Page 17: Declarations Of Conformity
DECLARATIONS OF CONFORMITY Parts & Service: 020 8988 7400 / E-mail: Parts@clarkeinternational.com or Service@clarkeinternational.com... -
Page 18: Component Parts
COMPONENT PARTS Parts & Service: 020 8988 7400 / E-mail: Parts@clarkeinternational.com or Service@clarkeinternational.com... - Page 19 COMPONENT PARTS ESCRIPTION ESCRIPTION Collar Paint Container Nozzle Cap Trigger Nozzle Washer O-ring Spring Valve Element Setting Screw Lip type Seal Trigger Linkage Valve Element Spring Cylindrical Pin Front Shell Outlet End Cap O-ring Switch Slide Key X-head s/t Screw Slide Key Spring Blower Front Shell Switch...
Need help?
Do you have a question about the CEPG1 and is the answer not in the manual?
Questions and answers