Table of Contents
Advertisement
Quick Links
Advertisement
Table of Contents

Related Manuals for U-Line CDE215F


Summary of Contents for U-Line CDE215F
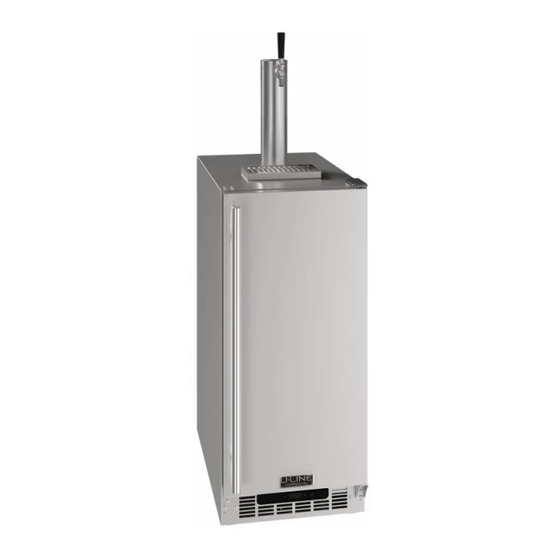
- Page 1 QUICK START GUIDE DISPENSERS • CDE215F (115v) • 1 Tap Beer 30659_B...
- Page 2 ® to preserve the right product, in the right place, at the right temperature. Since 2014, U-Line has been part of the Middleby family of brands. All products are designed, engineered, and assembled in Milwaukee, Wisconsin, USA, and select products are available worldwide.
-
Page 3: Table Of Contents
This Quick Start Guide covers the basics of installation and general use of your product. CONTENTS Safety and Warning Environmental Requirements Electrical Door Swing Door Adjustments General Installation Control Operation First Use Airflow & Product Loading Cleaning Warranty For more details, see the complete User Guide & Service Manual on u-line.com. -
Page 4: Safety And Warning
QUICK START GUIDE USER GUIDE u-line.com u-line.com Safety and Warning NOTICE DANGER Please read all instructions before installing, operating, or servicing the appliance. Service must be done by factory authorized service personnel. Any parts shall be replaced Use this appliance for its intended purpose only and follow with like components. -
Page 5: Environmental Requirements
QUICK START GUIDE 16-1/2" 16-1/2" u-line.com 90° 90° Door Swing Door Swing Environmental Requirements NOTICE Stainless Models Electrical installation must observe all state and Black and White Models local codes. This unit requires connection to a This model is intended for indoor/interior applications only... -
Page 6: Door Adjustments
QUICK START GUIDE u-line.com Door Adjustments REVERSING THE DOOR Location of the unit may make it desirable to mount the HINGE COVER door on the opposite side of the cabinet. Hinge cover included with the literature bag is optional. The hinge hardware will be removed and reinstalled on the opposite side of the cabinet. - Page 7 QUICK START GUIDE u-line.com Remove door by tilting forward and lifting door off Install top hinge and door: bottom hinge. Retain shoulder washers; they will be reused. Use a Philips screwdriver to remove hinge pin and reinstall on the opposite surface of the hinge.
-
Page 8: General Installation
General Installation U-Line Single Tap Kits are designed to work with the U-Line keg refrigerator model CDE215F. Tap kits can be installed directly on top of the keg refrigerator in a free-standing application or through a countertop in a built-in application. The CDE215F is designed to fit one 1/6 barrel. - Page 9 USER GUIDE QUICK START GUIDE u-line.com u-line.com Install Tower on Keg Refrigerator Do not remove the protective film on the stainless exterior until the tower is installed. Remove four screws and lift off cap plug and gasket to reveal mounting hole on top of refrigerator.
- Page 10 USER GUIDE QUICK START GUIDE u-line.com u-line.com Install Tower on Countertop (see template at the end of this section) Use template to drill four mounting holes. Drill 2-3/4" diameter hole through countertop. Remove four Phillips screws (secured with nuts on the inside of the refrigerator) and lift off cap to reveal tower mounting hole.
- Page 11 QUICK START GUIDE USER GUIDE u-line.com u-line.com Template for Countertop Installation Note: Verify template has printed true to scale - double check hole dimensions and placement. 1 Inch 7-1/2“ TO SIDE OF REFRIGERATOR 2-3/4“ HOLE 12-1/2“ TO FRONT FACE OF REFRIGERATOR...
- Page 12 USER GUIDE QUICK START GUIDE u-line.com u-line.com CO2 Connection NOTE: Regulator and CO2 tank not included Attach regulator to CO2 tank. Hand tighten the coupling nut and then use an adjustable wrench for an additional quarter turn. DO NOT OVER TIGHTEN Attach 5/16”...
- Page 13 USER GUIDE QUICK START GUIDE u-line.com u-line.com Beverage Connection NOTE: Coupler not included Attach and clamp beverage tubing to tap coupler. Attach tap coupler to keg. Locate notch and rotate clockwise turn. Press down and rotate clockwise an additional turn.
-
Page 14: Control Operation
If the temperature displayed is different than selected, the unit is progressing towards the selected temperature. Time to reach set point varies based upon ambient temperature, temperature of product loaded, door openings, etc. U-Line recommends allowing the unit to reach set points before loading. - Page 15 QUICK START GUIDE u-line.com Setting CO2 Pressure To minimize foam for most beverages the pressure should be set between 8-12 PSI. • Set the pressure by turning the handle on the front of the regulator counterclockwise until it is all the way out. This will turn the regulator off.
-
Page 16: Airflow & Product Loading
® Polish and Cleaner. Comparable products are acceptable. QUICK START GUIDE Frequent cleaning will remove surface contamination that u-line.com could lead to rust. Some installations may require cleaning weekly. Airflow and Product Loading Do not clean with steel wool pads. - Page 17 USER GUIDE QUICK START GUIDE u-line.com u-line.com Beverage Line and Faucet Cleaning Clean the system using a suitable solution designed for beer- dispensing systems. Beer cleaning kits are also available. Solution and/or kit not included. Close CO tank. Pull pin on coupler to release pressure from keg.
- Page 18 QUICK START GUIDE USER GUIDE u-line.com u-line.com Remove faucet from tower with supplied faucet wrench. Disassemble, and place all the parts in drainage bucket. 10. Add washer and attach cleaning pump connector to tower. Tighten with faucet wrench. 11. Pump all the solution through the beverage line.
- Page 19 QUICK START GUIDE USER GUIDE u-line.com u-line.com DEFROSTING Under normal conditions this unit does not require manual defrosting. Minor frost on the rear wall or visible through the evaporator plate vents is normal and will melt during each cycle. If there is excessive build-up of 1/4” (6 mm) or more, manually defrost the unit.
-
Page 20: Warranty
For products installed and used for normal residential use, material cosmetic defects are included in this warranty, with coverage limited to 60 days from the date of original purchase. All service provided by U-Line under the above warranty must be performed by a U-Line factory authorized servicer, unless otherwise specified by U-Line.
Need help?
Do you have a question about the CDE215F and is the answer not in the manual?
Questions and answers