Advertisement
INTERFACE COMPONENTS
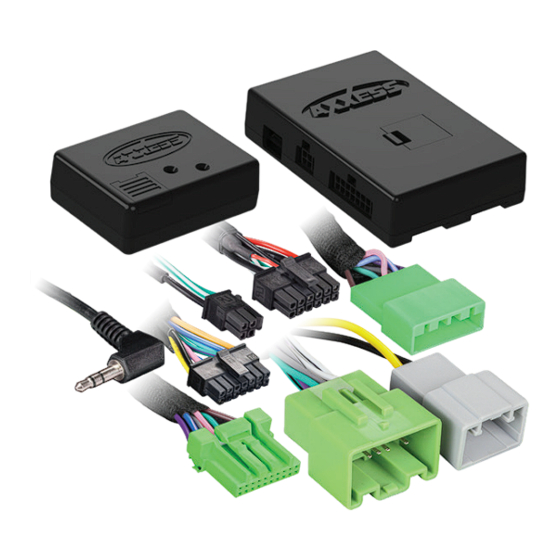
• AX-VL90032 interface
• ASWC-1 interface
• AX-VL90032 harness
• ASWC-1 harness
• Female 3.5mm connector with stripped leads
AxxessInterfaces.com
Volvo XC90 Data Interface with SWC
2004-2014
INTERFACE FEATURES
• Provides accessory power
• Retains R.A.P. (retained accessory power)
• Includes amplifier bypass harness
• Provides NAV outputs (parking brake, reverse, speed sense)
• Retains audio controls on the steering wheel
• Retains balance and fade
• Micro "B" USB updatable
© COPYRIGHT 2019 METRA ELECTRONICS CORPORATION
AX-VL90032
I N S TA L L AT I O N I N S T R U C T I O N S
TABLE OF CONTENTS
Connections To Be Made .......................................2
Installing The Ax-Vl90032 Interface ................. 3-4
Programming The Aswc-1 Interface .....................5
TOOLS REQUIRED
• Wire cutter • Crimp tool • Solder gun • Tape
• Connectors (example: butt-connectors, bell
caps, etc.)
Product Info
REV. 7/25/19 INSTAX-VL90032
Advertisement
Table of Contents

Related Manuals for Axxess AX-VL90032


Summary of Contents for Axxess AX-VL90032
- Page 1 I N S TA L L AT I O N I N S T R U C T I O N S Volvo XC90 Data Interface with SWC TABLE OF CONTENTS Connections to be made ........2 2004-2014 Installing the AX-VL90032 interface ....3-4 Programming the ASWC-1 interface .....5 INTERFACE FEATURES • Provides accessory power • Retains R.A.P. (retained accessory power) •...
- Page 2 CONNECTIONS TO BE MADE From the aftermarket radio to the AX-VL90032 harness: From the aftermarket radio to the ASWC-1 harness: This harness is only to be used if the vehicle is equipped with steering wheel controls. • Connect the Black wire to the ground wire. • Connect the Red wire to the accessory wire.
- Page 3 (Figure B) • Unplug the connector, then plug in the Green male (Figure A) 10-pin connector from the AX-VL90032 harness into the radio display. • Connect the factory male 10-pin connector, into the Green female 10-pin connector from the AX-VL90032 harness.
- Page 4 • Remove (4) screws securing the radio display to the radio frame, then remove the display. (Figure D) (Figure C) (Figure D) • Connect the AX-VL90032 harness to the AX-VL90032 interface. • Connect the ASWC-1 harness to the ASWC-1 interface, and then to the AX-VL90032 interface.
- Page 5 PROGRAMMING THE ASWC-1 INTERFACE • Press and hold the Volume-Up button on the steering wheel. L.E.D. feedback • Turn the ignition on, the L.E.D. in the ASWC-1 interface will start flashing rapidly, which The (18) Red L.E.D. flashes represent what brand radio the ASWC-1 believes it is connected means the ASWC-1 is looking for the vehicle and the radio.
- Page 7 REV. 9/28/2018 INSTAX-VL90032...
- Page 8 AX-VL90032 I N S TA L L AT I O N I N S T R U C T I O N S Having difficulties? We’re here to help. Contact our Tech Support line at: 386-257-1186 ext. 8300 Or via email at: techsupport@metra-autosound.com...
Need help?
Do you have a question about the AX-VL90032 and is the answer not in the manual?
Questions and answers