Advertisement
This manual will walk you through all the required steps to add your new
Yale Assure Lock to your door.
• Remove existing deadbolt
• Double check door measurements
• Install your Assure Lock
• Program your Assure Lock
• Add your Assure Lock to your smart home system or Yale
Access app if purchased with Yale Smart Module or Yale Access
Upgrade Kit
Tools Needed
Tools Needed For New
Doors Or Adjusting Existing Door
Utility
Drill
Knife
Failure to follow these instructions could result in damage to the product, voiding the factory warranty and could lead to failure of the product to provide access.
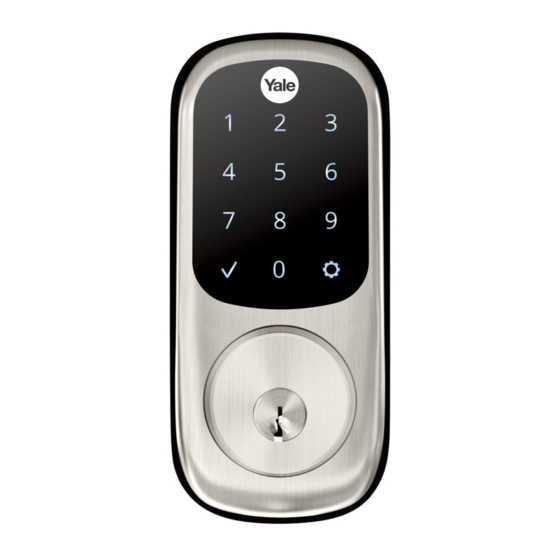
Yale Assure Lock
®
Installation and Programming Instructions
(YRD226/YRD620/YRD622)
Standard
Phillips Head
Screwdriver
Wood
Tape
Pencil
Mortise
Measure
Chisel
P/N YRD226-MNL-0001 Rev J
Touchscreen Deadbolt
®
Before you begin
DOWNLOAD
THE BILT APP
Using the app on your smart
phone, scan this QR for step-by
-step installation instructions & to
register your lock
Level
1
Part of ASSA ABLOY
Advertisement
Table of Contents

Subscribe to Our Youtube Channel
Related Manuals for Assa Abloy Yale Assure Lock YRD620


Summary of Contents for Assa Abloy Yale Assure Lock YRD620
- Page 1 Level Mortise Measure Knife Chisel Failure to follow these instructions could result in damage to the product, voiding the factory warranty and could lead to failure of the product to provide access. P/N YRD226-MNL-0001 Rev J Part of ASSA ABLOY...
-
Page 2: What's In The Box
Mounting Hardware Adjustable Strike Plate Deadbolt (AYRDB-DRIVE Inside Lock Strike Plate Optional Long Through-bolt for Adjustable Drive-In Deadbolt Screws Security 1-3/4" - 2-1/4" available for purchase) Deadbolt Screws Strike Plate Screws Door Thickness P/N YRD226-MNL-0001 Rev J Part of ASSA ABLOY... -
Page 3: Remove Existing Deadbolt
Remove Existing Deadbolt Do not discard old lock hardware until Assure Lock has been successfully installed. Frame P/N YRD226-MNL-0001 Rev J Part of ASSA ABLOY... - Page 4 New Door Marking Template Let's Get Started Install Optional Fire Cup for Fire Rated Openings Only included with select models optional 1 of 3 Inside of Door P/N YRD226-MNL-0001 Rev J Part of ASSA ABLOY...
- Page 5 Pull Press For Strike Plate, optional Actual Size Bolt must be in retracted (unlocked) position. Note horizontal orientation of Backset tailpiece slot and UP orientation of deadbolt latch. optional optional P/N YRD226-MNL-0001 Rev J Part of ASSA ABLOY...
- Page 6 Bolt must be in retracted (unlocked) position. Note horizontal orientation of mechanism. optional 2 of 3 To be used with Fire Cup for Fire Rated openings P/N YRD226-MNL-0001 Rev J Part of ASSA ABLOY...
- Page 7 Install Inside Mounting Plate Actual Size optional 3 of 3 To be used with Fire Cup for Fire Rated openings P/N YRD226-MNL-0001 Rev J Part of ASSA ABLOY...
- Page 8 Attach Cable This Side Up mark Make sure cable is securely attached Use cable hooks for proper routing, when possible. Position wires carefully when not using hook. Do not pinch wire. P/N YRD226-MNL-0001 Rev J Part of ASSA ABLOY...
- Page 9 Install Inside Lock Actual Size Make sure thumbturn is vertical. If thumbturn does not move freely, refer to "Hardware Troubleshooting". P/N YRD226-MNL-0001 Rev J Part of ASSA ABLOY...
- Page 10 Test Mechanical Operation If thumbturn operation fails, check the installation beginning with Step 7. P/N YRD226-MNL-0001 Rev J Part of ASSA ABLOY...
- Page 11 Included with select models optional Inside of Door Batteries must not be installed prior to inserting and/or removing Yale Smart module. For more information about Yale Smart modules and smart home features visit US.YaleHome.com/Smart P/N YRD226-MNL-0001 Rev J Part of ASSA ABLOY...
- Page 12 Settings Menu. Refer to page 19 for YRD226 or page 20 for YRD620/YRD622. Congratulations, you've installed the Yale Assure Lock ® ® Touchscreen Deadbolt ( 226/YRD620/YRD622)! Using Your Lock instructions will help you customize your lock. P/N YRD226-MNL-0001 Rev J Part of ASSA ABLOY...
- Page 13 Settings Menu Low Battery All Code Lockout Indicator Indicator Speaker Mechanical Key Backup Entry Method Inside Lock Battery Cover Speaker Inside Notification Light Privacy Button Thumbturn for manual locking and unlocking P/N YRD226-MNL-0001 Rev J Part of ASSA ABLOY...
- Page 14 "Register Master Code. Press the gear key to continue." Press "Enter a 4 to 8 digit Enter 4-8 digit PIN code followed by Master the gear key." Entry Code "Registered." Press P/N YRD226-MNL-0001 Rev J Part of ASSA ABLOY...
- Page 15 Entry Code Press Press Press Enter 4-8 digit Entry Code Press Press Press (code flashes) Adding more *Entry Codes: To end programming: Press Press Enter 4-8 digit Entry Code Press P/N YRD226-MNL-0001 Rev J Part of ASSA ABLOY...
- Page 16 To delete all Entry Codes: To delete one Entry Code, (Does not delete you must enter the Entry Master Entry Code) Code you wish to delete. Enter 4-8 digit Entry Code Enter Press Press P/N YRD226-MNL-0001 Rev J Part of ASSA ABLOY...
- Page 17 Unlocking Door with Entry Codes Enter Entry Code Press Unlocking Door with RFID (YRD620/YRD622 ACC ONLY) See "Customizing YRD620/YRD622 Lock Using Settings Menu", page 20 to configure RFID communication. Touch and hold fob or card to P/N YRD226-MNL-0001 Rev J Part of ASSA ABLOY...
-
Page 18: Setting Definitions
Entry Code, the lock will shut down and not Entry Limit allow operation for sixty (60) seconds. *The Master Entry Code must be created prior to any other programming of the lock. P/N YRD226-MNL-0001 Rev J Part of ASSA ABLOY... - Page 19 Here is an example of how to set Auto Lock to 30 seconds: Master Entry Code *The Master Entry Code must be created prior to any other programming of the lock. **Network Module Setting function appears only with Yale Smart module installed. P/N YRD226-MNL-0001 Rev J Part of ASSA ABLOY...
-
Page 20: Using Settings Menu
*Master Entry Code must be created prior to any other programming of the lock. **If Escape Return Mode is enabled, Auto Re-lock cannot be enabled. ***Configuration will disable locking/unlocking via Entry Codes. P/N YRD226-MNL-0001 Rev J Part of ASSA ABLOY... -
Page 21: Troubleshooting
* When batteries are replaced, Smart Module locks have a real time clock that will be set through the User Interface. It is recommended to verify correct date and time; particularly those locks operating under Daylight Savings Time. P/N YRD226-MNL-0001 Rev J Part of ASSA ABLOY... -
Page 22: Hardware Troubleshooting
1. Remove plate from door frame with a manual screwdriver. (Using an electric driver may strip screw For help with misalignments, watch our door alignment heads or enlarge screw holes.) video: US.YaleHome.com/en/support/yale-assure-lock- faqs/electronic-lock-installation/ P/N YRD226-MNL-0001 Rev J Part of ASSA ABLOY... - Page 23 1-3/8"* - 2" thick doors: L = 3-1/2" (88.8mm) Tailpiece 2" - 2-1/4" thick doors: T = .098" (2.5mm) L = 3-3/4" (95.3mm) W = .2" (5.2mm) *Requires addition of Thin Door Kit. P/N YRD226-MNL-0001 Rev J Part of ASSA ABLOY...
- Page 24 Other products' brand names may be trademarks or registered trademarks of their respective owners and are mentioned for reference purposes only. © Copyright 2020. All rights reserved. Reproduction in whole or in part without the express written permission of Yale Home is prohibited. P/N YRD226-MNL-0001 Rev J Part of ASSA ABLOY...
Need help?
Do you have a question about the Yale Assure Lock YRD620 and is the answer not in the manual?
Questions and answers