Crestron Cameo C2NI-CB Product Manual
Hide thumbs
Also See for Cameo C2NI-CB:
- Operations & installation manual (48 pages) ,
- Operations & installation manual (48 pages)

Subscribe to Our Youtube Channel
Related Manuals for Crestron Cameo C2NI-CB


Summary of Contents for Crestron Cameo C2NI-CB
- Page 1 C2NI-CB Cameo® Keypad - International Version Product Manual Crestron Electronics, Inc.
- Page 2 Intertek Group in the United States and/or other countries. Other trademarks, registered trademarks, and trade names may be used in this document to refer to either the entities claiming the marks and names or their products. Crestron disclaims any proprietary interest in the marks and names of others. Crestron is not responsible for errors in typography or photography.
-
Page 3: Table Of Contents
Contents Overview Specifications Product Specifications Installation In the Box Assembly Mounting Wiring Button Arrangement Configuration Troubleshooting Resources Crestron Support and Training Programmer and Developer Resources Product Certificates Product Manual — Doc. 6626E Contents • iii... - Page 4 iv • Contents Product Manual — Doc. 6626E...
-
Page 5: Overview
White LED indicators provide true feedback of system settings and status. The C2NI-CB integrates with a Crestron control system or Crestron Home® system through a wired Cresnet® connection. -
Page 6: Specifications
Specifications Product specifications for the C2NI-CB. Product Specifications Power Requirements Cresnet Power Usage 0.5 W (0.02 A @ 24VDC) Controls and Indicators Keypad Buttons (2) Columns, each accommodating (1) button strip; Button strips available with a choice of two large buttons, three medium buttons, or one medium and four small buttons;... - Page 7 87 mm (3.42 in.) including bezel Width 87 mm (3.42 in.) including bezel Depth 38 mm (1.49 in.) Weight 5.21 oz (149 g) Compliance Regulatory Model: M202248002 CE, Intertek® listed for US and Canada To search for product certificates, refer to support.crestron.com/app/certificates. Product Manual — Doc. 6626E C2NI-CB • 7...
-
Page 8: Installation
Installation Refer to the following sections for information on how to install and set up the C2NI-CB keypad. This section provides the following information: • In the Box • Assembly • Mounting • Wiring • Button Arrangement 8 • C2NI-CB Product Manual —... -
Page 9: In The Box
In the Box Qty. Description C2NI-CB, Cameo® Keypad - International Version Metal Mounting Plate (2018605) Screw, 4B x 3/4 in., Phillips head (2019088) Screw, 04-40, 1/4 in., Phillips head (2007156) Plastic bezel (2018646) Two-button cap strip (2017989) Three-button cap strip (2017987) Five-button cap strip, left (2042656) Five-button cap strip, right (2042657) Product Manual —... -
Page 10: Assembly
NOTE: Before using the C2NI-CB, ensure the device is using the latest firmware. Check for the latest firmware for the C2NI-CB at Firmware. The firmware is loaded onto the device using Crestron Toolbox™ software. To assemble the keypad, do the following: 1. - Page 11 2. Attach the button strips to the housing assembly according to the program. Align the button strip with the button strip mounting posts, and press the button strip to secure it to the button strip mounting posts. Product Manual — Doc. 6626E C2NI-CB •...
-
Page 12: Mounting
Mounting To mount the keypad: 1. Using a Phillips screwdriver and the two provided 4B x 3/4 in. screws, attach the mounting plate to the electrical box. NOTE: The mounting plate can be rotated 90° if necessary to accommodate the orientation of the electrical box. 12 •... - Page 13 2. Attach the housing assembly to the mounting plate. NOTE: All wiring must be completed before attaching the assembly to the mounting plate. 3. Attach the bezel by placing it in position over the button caps and snapping it in place. Product Manual —...
-
Page 14: Wiring
Wiring The wiring process consists of connecting the unit to the Cresnet® system, connecting a dry contact closure, if any, and attaching the unit to an electrical box. NOTE: Verify there is sufficient Cresnet® power to power the devices. To wire the keypad: 1. -
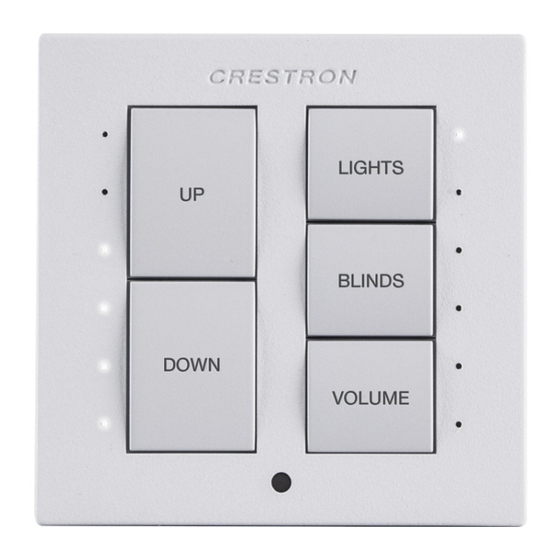
Page 15: Button Arrangement
Button Arrangement Each button cap can cover one or more buttons. When a button cap is pressed, the button activated is determined by the size and placement of the button cap. All buttons are programmable for press, double-press, or press-and-hold functions. The top button in the left column is button 1L, followed by 2L, 3L, and so on. - Page 16 Four Small and One Medium (Bottom) Button Cap Strip Sets (sold separately) 16 • C2NI-CB Product Manual — Doc. 6626E...
-
Page 17: Configuration
To simplify this process, Crestron ships the Cameo keypad with preset values for the three parameters. The preset values have been selected to produce an effect that should be acceptable in many common scenarios. -
Page 18: Troubleshooting
Troubleshooting The following table provides troubleshooting information. If further assistance is required, contact Crestron True Blue support via phone, email, or chat as described at www.crestron.com/Support. TROUBLE POSSIBLE CAUSE(S) CORRECTIVE ACTION The keypad does not The wrong power Use a Crestron power supply. -
Page 19: Resources
Resources The following resources are provided for the C2NI-CB. NOTE: You may need to provide your Crestron.com web account credentials when prompted to access some of the following resources. Crestron Support and Training Cresnet Design Guide Crestron True Blue Support Crestron Resource Library Crestron Online Help (OLH) Crestron Training Institute (CTI) Portal... - Page 20 Crestron Electronics, Inc. Product Manual — Doc. 6626E 15 Volvo Drive, Rockleigh, NJ 07647 08/07/23 Tel: 888.CRESTRON Specifications subject to Fax: 201.767.7656 change without notice. www.crestron.com...
Need help?
Do you have a question about the Cameo C2NI-CB and is the answer not in the manual?
Questions and answers