Table of Contents
Advertisement
Quick Links
Advertisement
Table of Contents

Subscribe to Our Youtube Channel
Related Manuals for Crestron Lutron CNWM-LU12


Summary of Contents for Crestron Lutron CNWM-LU12
-
Page 2: Table Of Contents
Crestron CNWM-LU12 Contents ® Lutron Keypad: CNWM-LU12 Description Functional Description Physical Description Leading Specifications Setup Network Wiring Keypad Installation Identity Code Programming with SIMPL™ Windows CNWM-LU12 Symbol How the Example Program Works Problem Solving Troubleshooting Further Inquiries Return and Warranty Policies... -
Page 4: Lutron ® Keypad: Cnwm-Lu12
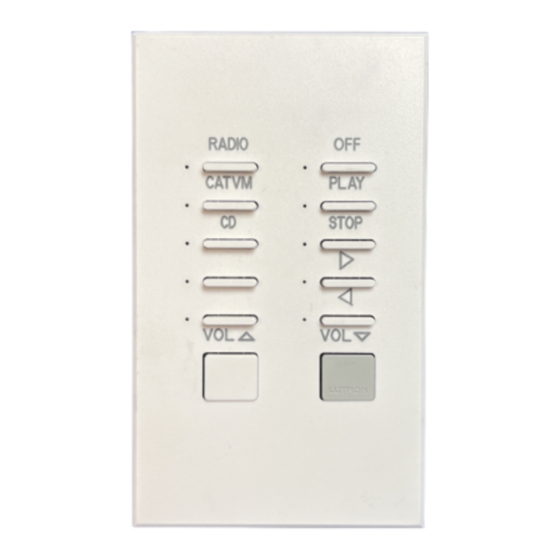
CNWM-LU12 is a standard Cresnet device, may be programmed as desired using SIMPL™ Windows , and does not require a ST-LT interface module. The CNWM-LU12 is used instead of large banks of switches and/or dimmers and is designed for wall-mounting into a 1-gang electrical box (recommended 2.5” depth). - Page 5 ® Lutron Keypad CNWM-LU12 Physical Views LUTRON LUTRON BUTTONS 1-12 FRONT VIEW REMOVABLE FACEPLATE FRAME FACEPLATE ATTACHED TO BUTTON ASSEMBLY EXPANDED SIDE VIEW Lutron® Keypad: CNWM-LU12 LEDs 1-10 CRESTRON SYSTEM ADAPTER CRESNET CONNECTOR Operations & Installation Guide - DOC. 8150...
-
Page 6: Leading Specifications
Crestron CNWM-LU12 Leading Specifications The table below provides a summary of leading specifications for the CNWM-LU12. Dimensions and weight are rounded to the nearest hundredth unit. Leading Specifications of the CNWM-LU12 P o w e r Requirem e n ts... -
Page 7: Setup
If the unit is a home-run from a Crestron system power supply network port, the load factor of that unit is the load factor of the entire run. The length of the run in feet and the load factor of the run should be used in the following resistance equation to calculate the value on the right side of the equation. -
Page 8: Keypad Installation
Crestron CNWM-LU12 Keypad Installation After the Cresnet network wiring has been installed, the CNWM-LU12 is installed into a standard, 1-gang electrical box. The only tools required are a small flat-tip and a Phillips tip screwdriver. To install the keypad, perform the following procedure: NOTE: The CNWM-LU12 may be installed in any orientation. -
Page 9: Identity Code
03 to FE. The NET ID of the keypad must match an ID code specified in the SIMPL Windows program. The NET ID of the CNWM-LU12 is factory set to 4E. The NET IDs of multiple keypads must all be unique and changed from a PC via VisionTools™... -
Page 10: Cnwm-Lu12 Symbol
FTP site. The example SIMPL program for the CNWM-LU12 is shown on the next page as a block diagram. Signal lamp 1 is input to a CNECI-4A for lighting on/off control and feedback is provided to the CNWM-LU12. - Page 11 ® Lutron Keypad Crestron CNWM-LU12 Example CNWM-LU12 SIMPL Program Lutron® Keypad: CNWM-LU12 Operations & Installation Guide - DOC. 8150...
-
Page 12: Operations & Installation Guide - Doc
Further Inquiries If after reviewing this Operations & Installation Guide for the CNWM-LU12, you cannot locate specific information or have questions, please take advantage of Crestron's award winning technical support team by calling: For local support from exclusive Crestron factory-trained personnel call: Operations &... -
Page 13: Return And Warranty Policies
(3) years from the date of shipment to purchaser. Disk drives and any other moving or rotating mechanical parts are covered for a period of one (1) year. CRESTRON warrants all its other products for a period of one year from the defects mentioned above, excluding touchscreen display components which are covered for 90 days.
Need help?
Do you have a question about the Lutron CNWM-LU12 and is the answer not in the manual?
Questions and answers