Table of Contents
Advertisement
Quick Links
Advertisement
Table of Contents

Subscribe to Our Youtube Channel
Related Manuals for Crestron CNX-B12


Summary of Contents for Crestron CNX-B12
- Page 1 Crestron CNX-B2/B4/B6/B8/B12 Single Gang Keypads Operations & Installation Guide...
- Page 2 This document was prepared and written by the Technical Documentation department at: Crestron Electronics, Inc. 15 Volvo Drive Rockleigh, NJ 07647 1-888-CRESTRON All brand names, product names and trademarks are the property of their respective owners. ©2003 Crestron Electronics, Inc.
-
Page 3: Table Of Contents
Industry Compliance...7 Setup...7 Network Wiring ...7 Identity Code ...8 Installation ...12 Programming Software ...14 Programming with Crestron AppBuilder or D3 Pro ...15 Programming with SIMPL Windows...15 Programming with VT Pro-e ...21 Uploading and Upgrading...22 Communication Settings...23 Uploading a SIMPL Windows Program...27 Uploading a VT Pro-e WAV File Project ...28... -
Page 5: Single Gang Keypads: Cnx-B2/B4/B6/B8/B12
Introduction Features and Functions The CNX-B2/B4/B6/B8/B12-series Single Gang Keypads are wall- mounted user interfaces that can be part of a Crestron solution total control system. The keypads are standard Cresnet fingertip control when the control system is properly programmed using SIMPL Windows. - Page 6 NOTE: The CNX-B12 keypad is supplied with 12 blank pushbuttons. As an option, custom-engraved keys can be designed and obtained by using the Crestron Engraver software. Version 2.0.1.5 or later is available from the Downloads | Software Updates section of the Crestron website (www.crestron.com).
-
Page 7: Specifications
Environmental Temperature 1. Temperature accuracy with backlight and indicator LEDs off. 2. Sensor reads temperature in degrees Centigrade; keypad firmware converts reading to Fahrenheit. 3. The button panel can store up to 101 wav files that produce a total maximum of approximately 60 seconds playback. -
Page 8: Physical Description
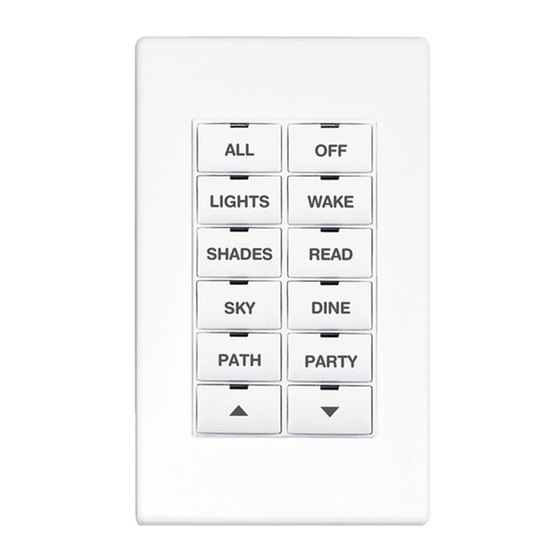
Single Gang Keypads 4. The latest software versions can be obtained from the Downloads | Software Updates section of the Crestron website (www.crestron.com). Refer to the NOTE following these footnotes. 5. Crestron 2-Series control systems include the AV2, CP2/CP2E, MP2/MP2E, PAC2, PRO2 and RACK2. - Page 9 Crestron CNX-B2/B4/B6/B8/B12 Keypad Physical Views 12-button Model (White Color) Keypad Overall Dimensions 4.762 in (12.096 cm) NOTE: Illustration is for 12-button keypad, other models have fewer buttons. Button numbers are for programming purposes only. Refer to the illustrations on page 19 for more button arrangement details.
- Page 10 Single Gang Keypads Crestron CNX-B2/B4/B6/B8/B12 Button Unit Detail View Front View Back View with buttons removed 1.788 in 1.696 in (4.541 cm) (4.301 cm) Speaker 4.158 in 2.696 in (10.56 cm) (6.848 cm) Cresnet port 24 Y Z G Rubber Membrane...
-
Page 11: Industry Compliance
Setup Network Wiring CAUTION: Use only Crestron power supplies for Crestron equipment. Failure to do so could cause equipment damage or void the Crestron warranty. NOTE: When installing network wiring, refer to the latest revision of the wiring diagram(s) appropriate for your specific system configuration, available from the Downloads | Product Manuals | Software and Wiring Diagrams section of the Crestron website (www.crestron.com). -
Page 12: Identity Code
“Setting the Net ID in Device Settings” on page 17 for details of the SIMPL Windows procedure. 8 • Single Gang Keypads: CNX-B2/B4/B6/B8/B12 Crestron CNX-B2/B4/B6/B8/B12 Where: R = Resistance (refer to table below). L = Length of run (or chain) in feet. - Page 13 Crestron CNX-B2/B4/B6/B8/B12 Refer to the note The NET ID of the keypad has been factory set to 60. The NET IDs of on page 22 for a multiple keypads in the same system must be unique. NET IDs are definition of Viewport.
- Page 14 Cresnet system or when such devices are being added/replaced. Ensure that all keypads are connected to the control system. Open the Crestron Viewport version 3.35 or later. From the Viewport menu, select Functions | Assign Cresnet ID by Serial Number. The “Set Net ID by TSID” window appears.
- Page 15 If you know the device serial number, but not its TSID number, or you know the TSID but not the serial number, do the following: Open the Crestron Viewport. From the Viewport menu, select Functions | Serial Number Conversion Tool” window is displayed.
-
Page 16: Installation
(such as drafts, etc.). Use type in compliance with local codes. After the Cresnet network wiring has been installed and verified, use the following procedure to install the keypad in a standard, single-gang electrical box (refer to illustrations on pages 5 and 6). - Page 17 Crestron CNX-B2/B4/B6/B8/B12 CAUTION: Excess wire pinched between the keypad and electrical box could short out. Make sure that all excess wire is completely inside the electrical box and not between the box and the keypad. Make sure button unit is oriented as marked with arrow at top, and place it in the electrical box.
-
Page 18: Programming Software
Once related Crestron Appbuilder creates the project, the system interfaces and suggestions program logic can be customized. It can easily be modified with Crestron and/or complaints to development tools (i.e., SIMPL Windows and Crestron Vision Tools Crestron via Pro-e (VT Pro-e) software packages). -
Page 19: Programming With Crestron Appbuilder Or D3 Pro
Crestron D3 Pro similarly offers automatic programming for lighting, HVAC, and security. Both Crestron AppBuilder and D3 Pro are fully integrated with Crestron's suite of software development tools, including SIMPL Windows, VT Pro-e, and the Crestron Database. Both access these tools behind the scenes, enabling you to easily create robust systems. - Page 20 To incorporate a CNX-B12 into the system, drag the CNX-B12 from the Wired Keypad folder of the Device Library and drop it in System Views. The PRO2 system tree displays the CNX-B12 in Slot 9, with a default NET ID of 60 as shown in the illustration on the next page.
- Page 21 Crestron CNX-B2/B4/B6/B8/B12 NOTE: The first CNX-B12 in a system is preset with a NET ID of 60 when its symbol is dragged into the upper pane of System Views. Additional units are assigned different NET ID numbers as they are added.
- Page 22 Single Gang Keypads NOTE: This procedure sets the NET ID for the CNX-B12 in the program only. It does not automatically set the NET ID for the keypad itself. SIMPL Windows automatically changes NET ID values of a device added to a program if a duplicate device or a device with the same NET ID already exists in the program.
- Page 23 NOTE: In the symbol, the number of press and fbck (feedback)—outputs and inputs, respectively—correspond to the number of buttons in a given keypad. For example, a CNX-B8 has press1-8 and fbck1-8 only in its symbol. The illustration below shows the button arrangement for the...
- Page 24 The compiled file incorporating all relevant WAV files is xxx.hex. Refer to the VT Pro-e help file for more information. To create additional sound symbols in SIMPL Windows, right click on the CNX-B12 symbol and select Insert Symbol/Parameter Field (alternatively, select Alt +).
-
Page 25: Programming With Vt Pro-E
NOTE: The join assignments for panels with fewer than 12 buttons and feedback LEDs do not change. Example Program An example program for the keypad is available from the Crestron FTP site (ftp://ftp.crestron.com/Examples). Search for CNX-B12.SMW. Programming with VT Pro-e The CNX-B12 is capable of playing audio messages as system prompts and responses. -
Page 26: Uploading And Upgrading
WAV files, etc. Once the project is created, use File | Upload Project from the VT Pro-e main menu to load it in the CNX-B12. For more information, refer to the VT Pro-e help file. -
Page 27: Communication Settings
The following sections define how one would upload a SIMPL Windows program or a VT Pro-e project, or upgrade the firmware of the CNX-B12. However, before attempting to upload or upgrade, it is necessary to establish communications. - Page 28 Guide (Doc. 6052) or the respective Operations Guide for the control system. These documents are available from the Downloads | Product Manuals section of the Crestron website (www.crestron.com). Refer to the figure below for a typical connection diagram when uploading files.
- Page 29 Crestron CNX-B2/B4/B6/B8/B12 Setup | Communications Settings Command Select RS-232 as the connection type. Verify that an available COM port (COM 1 is shown after this step) is selected, and that all communication parameters and necessary options from the “Port Settings” window are selected as shown after this step.
- Page 30 COM port and baud rate. If communication cannot be established, refer to the “Troubleshooting Communications” section in the respective Operations Guide for the control system. 26 • Single Gang Keypads: CNX-B2/B4/B6/B8/B12 Crestron CNX-B2/B4/B6/B8/B12 Operations & Installation Guide - DOC. 8173A...
-
Page 31: Uploading A Simpl Windows Program
Crestron CNX-B2/B4/B6/B8/B12 Uploading a SIMPL Windows Program A control The SIMPL Windows file can be uploaded to the control system source system using SIMPL Windows or via the Crestron file has the extension Viewport. .smw. A compiled Upload via SIMPL Windows... -
Page 32: Uploading A Vt Pro-E Wav File Project
Uploading a VT Pro-e WAV File Project The CNX-B12 The VT Pro-e project file can be uploaded to the keypad using keypad source VT Pro-e or via the Crestron Viewport. file has the extension .vtp. - Page 33 Crestron CNX-B2/B4/B6/B8/B12 File Transfer | Send Touchpanel Command As shown after this step, select the NET ID of the CNX-B12 keypad and then click OK. The “Open” window appears (refer to graphic below). “Select Network ID” Window NOTE: When transferring any Cresnet file (keypad project/firmware), lower the port speed baud rate to 38400 to match the Cresnet bus speed.
-
Page 34: Firmware Upgrade
Select the VT Pro-e (hex) file and click Open. The transfer will complete automatically. Firmware Upgrade A firmware To take advantage of all the CNX-B12 features, it is important that the upgrade file unit contains the latest firmware available. Please check the Crestron has the extension .csf. - Page 35 Crestron CNX-B2/B4/B6/B8/B12 “Select Network ID” Window NOTE: When transferring any Cresnet file (touchpanel project/ firmware), lower the port speed baud rate to 38400 to match the Cresnet bus speed. “Open” Window NOTE: Firmware upgrades to the button panel include two files, [filename]a.csf and [filename]b.csf.
-
Page 36: Serial Number Assignment
These procedures are to be used for keypads that just received a firmware upgrade enabling TSID support where it was not previously available. Open the Crestron Viewport. From the Viewport menu, select Functions | Assign Serial Number. The “Serial Number Assignment” window appears. -
Page 37: Problem Solving
Crestron CNX-B2/B4/B6/B8/B12 Problem Solving Troubleshooting The table below provides corrective action for possible trouble situations. If further assistance is required, please contact a Crestron customer service representative. Keypad Troubleshooting TROUBLE Keypad does not function when a button is pressed. Pressing button yields wrong result. -
Page 38: Further Inquiries
Crestron's award winning customer service team in your area. Dial one of the following numbers. • In the US and Canada, call Crestron's corporate headquarters at 1-888-CRESTRON [1-888-273-7876]. • In Europe, call Crestron International at +32-15-50-99-50. -
Page 39: Software License Agreement
This Agreement may only be modified by a writing signed by an authorized officer of Crestron. Updates may be licensed to You by Crestron with additional or different terms. This is the entire agreement between Crestron and You relating to the Software and it supersedes any prior representations, discussions, undertakings, communications or advertising relating to the Software. - Page 40 “applets” incorporated into the Software), the accompanying media and printed materials, and any copies of the Software are owned by Crestron or its suppliers. The Software is protected by copyright laws and international treaty provisions. Therefore, you must treat the Software like any other copyrighted material, subject to the provisions of this Agreement.
-
Page 41: Return And Warranty Policies
CRESTRON shall not be liable to honor the terms of this warranty if the product has been used in any application other than that for which it was intended, or if it has been subjected to misuse, accidental damage, modification, or improper installation procedures. - Page 42 Single Gang Keypads Crestron CNX-B2/B4/B6/B8/B12 This page intentionally left blank. 38 • Single Gang Keypads: CNX-B2/B4/B6/B8/B12 Operations & Installation Guide - DOC. 8173A...
- Page 43 Crestron CNX-B2/B4/B6/B8/B12 Single Gang Keypads This page intentionally left blank. Single Gang Keypads: CNX-B2/B4/B6/B8/B12 • 39 Operations & Installation Guide - DOC. 8173A...
- Page 44 Crestron Electronics, Inc. Operations & Installation Guide - DOC. 8173A 15 Volvo Drive Rockleigh, NJ 07647 03.03 Tel: 888.CRESTRON Fax: 201.767.7576 Specifications subject to www.crestron.com change without notice.
Need help?
Do you have a question about the CNX-B12 and is the answer not in the manual?
Questions and answers