Parkside PLSA 20-Li A1 Translation Of The Original Instructions
Cordless led worklight
Hide thumbs
Also See for PLSA 20-Li A1:
- Translation of the original instructions (216 pages) ,
- Instructions manual (148 pages) ,
- Translation of the original instructions (108 pages)
Table of Contents
Advertisement
Available languages
Available languages
Quick Links
Akku-LED-Strahler / Cordless LED Worklight /
Projecteur LED sans fi l PLSA 20-Li A1
Akku-LED-Strahler
Originalbetriebsanleitung
Projecteur LED sans fi l
Traduction des instructions d'origine
Akumulatorowy refl ektor LED
Tłumaczenie oryginalnej instrukcji obsługi
Akumulátor LED refl ektor
Preklad originálneho návodu na obsluhu
Foco led recargable
Traducción del manual de instrucciones original
IAN 373424_2104
Cordless LED Worklight
Translation of the original instructions
Accu-led-schijnwerper
Vertaling van de originele gebruiksaanwijzing
Aku LED refl ektor
Překlad originálního provozního návodu
Batteridreven LED projektør
Oversættelse af den originale driftsvejledning
Advertisement
Chapters
Table of Contents

Subscribe to Our Youtube Channel
Related Manuals for Parkside PLSA 20-Li A1


Summary of Contents for Parkside PLSA 20-Li A1
- Page 1 Akku-LED-Strahler / Cordless LED Worklight / Projecteur LED sans fi l PLSA 20-Li A1 Akku-LED-Strahler Cordless LED Worklight Originalbetriebsanleitung Translation of the original instructions Projecteur LED sans fi l Accu-led-schijnwerper Traduction des instructions d‘origine Vertaling van de originele gebruiksaanwijzing Akumulatorowy refl ektor LED Aku LED refl...
- Page 2 Klappen Sie vor dem Lesen die Seite mit den Abbildungen aus und machen Sie sich anschließend mit allen Funktionen des Gerätes vertraut. Before reading, unfold the page containing the illustrations and familiarise yourself with all functions of the device. Avant de lire le mode d‘emploi, ouvrez la page contenant les illustrations et familiarisez-vous ensuite avec toutes les fonctions de l‘appareil.
-
Page 4: Table Of Contents
Importeur ........13 Nutzung geeignet. Bei gewerblichem Ein- Original-EG- satz erlischt die Garantie. Konformitätserklärung ....95 Das Gerät ist Teil der Serie Parkside X 12 V TEAM und X 20 V TEAM und Explosionszeichnung ....104 kann wahlweise mit Akkus der Parkside X 12 V TEAM bzw. X 20 V TEAM Serie betrieben werden. -
Page 5: Allgemeine Beschreibung
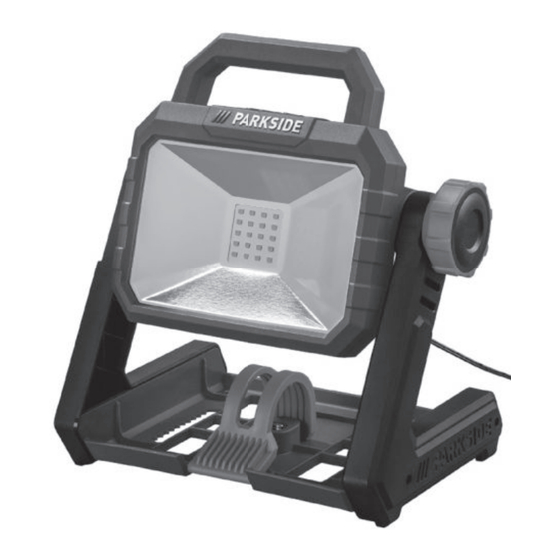
14 Schiene den Ausklappseiten. 15 Schlüssel lochbohrung 16 Innengewinde Lieferumfang Technische Daten Packen Sie das Gerät aus und kontrollieren Akku-LED-Strahler....PLSA 20-Li A1 Sie, ob es vollständig ist. - Akku-LED-Strahler Nennspannung - Betriebsanleitung ......... 20 V - 12 V-Adapter ......... 12 V - Netzteil ....... -
Page 6: Sicherheits Hinweise
Stufe 1 Durchschnittliche Effi zienz im Betrieb ...... 88,3% Effi zienz bei geringer Last (10%) ..83,7% Stufe 2 Leistungsaufnahme bei Nulllast ..0,08 W Blinkmodus Schutzklasse ........Schutzart........IP20 Wechsel des Leucht-Modus Temperatur ......max. 90°C Achtung! Nicht in die Licht- Achtung! Eine aktuelle Liste der Akkukompatibilität fi... -
Page 7: Sicherheitshinweise Für Akku-Lampen
Farbtemperatur: Tageslicht- selbst unbeabsichtigt blenden. weiß 5700 Kelvin 5700 K • Leuchte nicht für Kinder unter 14 Jahren geeignet • Prüfen Sie eine dauerhafte Halt- Entsorgungssymbol Wellpap- barkeit der Halterung des Akku- LED-Strahlers. Es besteht Verlet- Abfall bitte umweltschonend in zungsgefahr durch Herunterfallen dafür vorgesehene Abfall be- des Akku-LED-Strahlers. -
Page 8: Service
Batterien! Service • Verwenden Sie kein Zubehör, • Lassen Sie Ihr Elek tro werk zeug welches nicht von PARKSIDE nur von qualifi ziertem Fachper- empfohlen wurde. Dies kann zu sonal und nur mit Original-Er- elektrischem Schlag oder Feuer satzteilen reparieren. -
Page 9: Akku Entnehmen/Einsetzen
20 V-Akku entnehmen/ Ein-/Ausschalten einsetzen 1. Zum Einschalten drücken Sie den 1. Zum Einsetzen des Akkus (12) schieben Ein-/Ausschalter (2). Das LED-Licht leuchtet mit maximaler Helligkeit. Sie den Akku in die Schiene an der Rückseite des Geräts. Er rastet hörbar 2. Zum Ausschalten drücken Sie den Ein-/Ausschalter (2). -
Page 10: Stativ-Gewinde
Reinigung Akku-LED-Strahler mit Hilfe der Schlüssellochbohrung auf- Schalten Sie das Gerät vor der Reini- hängen 1. Bringen Sie eine Schraube oder einen gung aus und nehmen Sie den Akku Nagel an der Wunschposition einer aus dem Gerät. Gefahr eines elektri- schen Schlags! Wand an. -
Page 11: Zubehör
• Geben Sie das Gerät und das Ladege- rät an einer Verwertungsstelle ab. Die verwendeten Kunststoff- und Metallteile können sortenrein getrennt werden und so einer Wiederverwertung zugeführt werden. Fragen Sie hierzu unser Service- Center. • Die Entsorgung Ihrer defekten, eingesen- deten Geräte führen wir kostenlos durch. -
Page 12: Garantie
Garantie Garantieumfang Das Gerät wurde nach strengen Qualitäts- Sehr geehrte Kundin, sehr geehrter Kunde, richtlinien sorgfältig produziert und vor Sie erhalten auf diesen Artikel 3 Jahre Ga- Anlieferung gewissenhaft geprüft. rantie ab Kaufdatum. Im Falle von Mängeln dieses Produkts Die Garantieleistung gilt ausschließlich stehen Ihnen gegen den Verkäufer des für Material- oder Fabrikationsfehler. -
Page 13: Reparatur-Service
Service-Center über die Abwicklung Ihrer Reklamation. • Ein als defekt erfasstes Gerät können Sie, nach Rücksprache mit unserem Service Deutschland Kundenservice, unter Beifügung des Tel.: 0800 54 35 111 Kaufbelegs (Kassenbons) und der An- E-Mail: grizzly@lidl.de IAN 373424_2104 gabe, worin der Mangel besteht und wann er aufgetreten ist, für Sie portofrei an die Ihnen mitgeteilte Service-Anschrift Service Österreich... -
Page 14: Introduction
The warranty is void in the case of environment ......20 commercial use. Accessories ........ 20 The device is part of the Parkside X 12 V TEAM and X 20 V TEAM series Garantie ........21 Repair Service ......22 and can be operated using Parkside X 12 V TEAM or X 20 V TEAM series... -
Page 15: General Description
15 Keyhole bore on the fold-out pages. 16 Internal thread Technical data Extent of the delivery Carefully unpack the appliance and check Cordless LED Worklight ..PLSA 20-Li A1 that it is complete. Nominal voltage Cordless LED Worklight ......... 20 V Instruction Manual ......... -
Page 16: Safety Instructions
Changing the illumination Attention! mode An up-to-date list of battery compatibility can be found Warning! Do not look at: www.lidl.de/akku into the light source! This device must be operated with Electrical appliances must not the following rechargeable batteries: PAP 20 A1, PAP 20 A3. be disposed of with the do- mestic waste. -
Page 17: Safety Notices For Battery-Powered Lamps
LED fl ood lamp holder is stable. Disposal symbol for corruga- ted cardboard There is a risk of injury if the battery-powered LED fl ood lamp Please dispose of waste in an falls down. environmentally friendly man- The light source in this lamp is •... -
Page 18: Special Safety Directions For Battery-Operated Tools
using only identical replace- A detailed description of the char- ment parts. This will ensure that ging process and further informa- tion can be found in the separate the safety of the power tool is operating instructions. maintained. Special safety directions for Operation battery-operated tools •... -
Page 19: Switching On/Off
Inserting the 12 V battery Swivelling the battery- powered LED fl ood lamp 1. Slide the battery (12) into the 12 V adapter (8). 1. Loosen the adjusting screw (4). Removing the 12 V battery 2. Rotate the handle (3) of the battery- 1. -
Page 20: Tripod Mount
Storage Tripod mount “ internal thread (16), • For storage, you can slide the 12 V ad- Using the “ or apter (8) onto the guide (14) on the side you can screw the battery-powered LED flood lamp to a tripod (not included in of the device. -
Page 21: Garantie
Garantie lines and conscientiously checked prior to delivery. Dear Customer, This device comes with a three-year The warranty is only valid for material or warranty from the date of purchase. manufacturing defects. This warranty does In case of defects, you have statutory rights not extend to consumable parts exposed to against the seller of the product. -
Page 22: Repair Service
Service-Center tion of what constitutes the defect and when it occurred. In order to avoid ac- ceptance problems and additional costs, Service Great Britain please be sure to use only the address Tel.: 0800 404 7657 communicated to you. Ensure that the E-Mail: grizzly@lidl.co.uk IAN 373424_2104 consignment is not sent carriage forward... -
Page 23: Introduction
L‘appareil fait partie de la gamme Park- side X 12 V TEAM et X 20 V TEAM et peut être utilisé au choix avec les batteries de la gamme Parkside X 12 V TEAM ou X 20 V TEAM. Les batteries doivent être... -
Page 24: Description Générale
16 Filetage intérieur Données techniques - Projecteur LED sans fi l - Mode d’emploi Projecteur LED sans fi l ..PLSA 20-Li A1 - Adaptateur 12 V - Fiche secteur Tension nominale ......... 20 V La batterie et le chargeur ne sont ......... -
Page 25: Instructions De Sécurité
Instructions de sécurité Tension d‘entrée ....100-240 V~; Fréquence du courant Symboles et pictogrammes alternatif d‘entrée ..... 50-60 Hz Puissance absorbée .......50 W Symboles apposés sur Tension de sortie ...... 18,0 V l’appareil Courant de sortie ......1,5 A Puissance de sortie ......27,0 W Interrupteur Marche/Arrêt Rendement moyen en fonctionnement ......88,3 %... -
Page 26: Consignes De Sécurité Relatives Aux Lampes Sans Fi L
Les machines n’ont pas leur Symboles de remarque et infor- place dans les ordures ména- mations permettant une meil- gères. leure utilisation de l‘appareil Polarité Consignes de sécurité relatives aux lampes sans fi l Symboles sur l‘emballage Flux lumineux : max. •... - Page 27 • N‘utilisez aucune batterie non avec des pièces de rechange rechargeable ! d‘origine. Vous serez ainsi sûr de • N’utilisez pas d’accessoires non recommandés par PARKSIDE. conserver la sécurité pour l‘outil électrique correspondant. Cela pourrait entraîner une élec- trocution ou un incendie.
-
Page 28: Opération
1. Enlevez le cas échéant l‘adaptateur tice d‘utilisation de votre batterie et 12 V (8) du côté de l‘appareil en glis- chargeur de la gamme Parkside sant le verrou (7) situé sous l‘adaptateur X 20 V TEAM, ou X 12 V TEAM. 12 V à l‘opposé de l‘appareil et en Vous trouverez une description dé-... -
Page 29: Consignes De Travail
L‘ordre répétitif des modes est : 3. Laissez ressortir la tête de vis/du clou d‘env. 10 mm du mur. 2000 lm - 1000 lm - clignotant 4. Suspendez l‘appareil à l‘encoche (6) Consignes de travail de la plaque de base avec denture. La denture permet l‘équilibrage de Ne pas regarder fi... -
Page 30: Elimination Et Protection De L'environnement
• Retirez la batterie de l‘appareil avant un stockage prolongé. Elimination et protection de l’environnement Enlevez la batterie de l’appareil et veuillez recycler l’appareil et l’emballage dans le respect de l’environnement. Vous trouverez les consignes de recyclage de la batterie dans la notice d’utilisation séparée. -
Page 31: Garantie - France
Garantie - France ché par l‘acheteur, porté à la connaissance du vendeur et que ce dernier a accepté. Chère cliente, cher client, Ce produit bénéfi cie d’une garantie de Article L217-16 du Code de la 3 ans, valable à compter de la date consommation d’achat. - Page 32 ce produit - selon notre choix. Cette garan- quels une mise en garde est émise, doivent absolument être évités. tie suppose que l’appareil défectueux et le justifi catif d’achat (ticket de caisse) nous Le produit est conçu uniquement pour un soient présentés durant cette période de usage privé...
-
Page 33: Garantie - Belgique
clients, envoyer le produit, franco de trois ans et que la nature du manque et la manière dont celui-ci est apparu soient port à l’adresse de service après-vente indiquée, accompagné du justifi catif explicités par écrit dans un bref courrier. d’achat (ticket de caisse) et en indi- Si le défaut est couvert par notre garantie, quant quelle est la nature du défaut et... -
Page 34: Service Réparations
Marche à suivre dans le cas de qui ne font pas partie de la garantie. Nous garantie vous enverrons volontiers un devis estima- Pour garantir un traitement rapide de votre tif. demande, veuillez suivre les instructions Nous ne pouvons traiter que des appareils suivantes : qui ont été... -
Page 35: Inleiding
Bij commercieel gebruik Service-Center ......44 Importeur ........44 vervalt de garantie. Vertaling van de originele Het apparaat maakt deel uit van de CE-conformiteitsverklaring ..98 Parkside-reeksen X 12 V TEAM en X 20 V TEAM en kan met accu‘s van de Explosietekening ...... 104... -
Page 36: Algemene Beschrij Ving
Overzicht Parkside-reeks X 12 V TEAM dan wel X 20 V TEAM worden gebruikt. De accu‘s mogen alleen met originele la- Schakelaar ders van de Parkside-reeks X 12 V TEAM Aan-/uitknop of X 20 V TEAM worden geladen.werden. Greep Stelschroef Algemene beschrij ving Haak Uitsparing De afbeeldingen bevinden zich Grendel 12 V-adapter... -
Page 37: Veiligheids Voorschriften
Lader (adapter) ....JLH341801500G De vermelde 12 V-accu‘s kunnen met de volgende laders worden geladen: PLGK 12 A1, PLGK 12 A2, PLGK 12 B2. Grizzly Tools GmbH & Co. KG Stockstädter Straße 20 Laadtij d PAPK 12 A2 PAPK 12 B2 DE-63762 Großostheim (uur) HRA: 5468, Amtsgericht Aschaffenburg PLGK 12 A1 PLGK 12 A2 Ingangsspanning ....100-240 V~;... -
Page 38: Veiligheidsinstructies Voor Acculampen
Waarschuwingsbord met in- De lader is uitsluitend bedoeld voor gebruik formatie voor het voorkomen binnenshuis. van letsels door elektrische schok. Veiligheidstrandsformator Gebodsteken met informatie Onafhankelij ke transformator over de preventie van scha- Beschermniveau II Aanduidingsteken met infor- Elektrogeräte gehören nicht in matie over hoe u het appa- den Hausmüll. -
Page 39: Het Accugereedschap Gebruiken En Hanteren
onderdelen repareren. Daardoor Het accugereedschap wordt verzekerd dat de veilig- gebruiken en hanteren heid van het elektrische gereed- • Laad de accu uitsluitend op met schap in stand gehouden wordt. laders die door de fabrikant zij n aanbevolen. Een lader die voor Speciale een bepaald type accu bedoeld veiligheidsinstructies voor... -
Page 40: Bediening
12 V-accu‘s, moet u eerst de 12 V-adapter de gebruikshandleiding van uw insteken. accu en lader van de Parkside- reeks X 20 V TEAM, dan wel 12 V-adapter insteken X 12 V TEAM vermeld zij n, in acht. 1. Neem de 12 V-adapter (8) indien nodig Een gedetailleerde beschrij... -
Page 41: In-/Uitschakelen
In-/uitschakelen De accu-LED-werklamp ophangen 1. Voor het inschakelen van het appa- raat, drukt u op de aan-/uitknop (2). De accu-LED-werklamp De LED-lamp brandt nu op maximale aan de haak hangen 1. Klap de haak (5) uit. helderheid. 2. Voor het uitschakelen van het appa- 2. -
Page 42: Onderhoud
Onderhoud Neem de accu uit het apparaat en lever het apparaat en de verpakking in voor een Het apparaat is onderhoudsvrij .Reiniging milieuvriendelij ke recycling. Instructies voor verwij dering van de accu vindt u in de Schakel het apparaat uit en haal aparte handleiding. -
Page 43: Garantie
Garantie bestaande beschadigingen en gebreken moeten onmiddellij k na het uitpakken ge- meld worden. Na het verstrij ken van de Geachte cliënte, geachte klant, U ontvangt op dit apparaat een garantie garantieperiode tot stand komende repara- van 3 jaar vanaf datum van aankoop. ties worden tegen verplichte betaling van Ingeval van gebreken aan dit product heeft de kosten uitgevoerd. -
Page 44: Reparatieservice
• Gelieve voor alle aanvragen de ingezonden werden. Opgelet: Gelieve uw apparaat gereinigd kassabon en het artikelnummer (IAN 373424_2104) als bewij s van de en met een aanwij zing op het defect naar ons servicefi liaal te zenden. aankoop klaar te houden. •... -
Page 45: Spis Tresci Wstęp
Gwarancja ......... 53 Serwis naprawczy ..... 54 dzenia do celów komercyjnych powoduje utratę gwarancji. Service-Center ......54 Urządzenie należy do serii Parkside Importer ........54 Tłumaczenie oryginalnej X 12 V TEAM i X 20 V TEAM można je deklaracji zgodności WE .... 99 uruchamiać opcjonalnie z akumulato- Rysunek samorozwijający .. -
Page 46: Opis Ogólny
Zawartość opakowania Dane techniczne Rozpakuj urządzenie i sprawdź, czy jest Akumulatorowy refl ektor LED PLSA 20-Li A1 ono kompletne. - Akumulatorowy refl ektor LED Napięcie nominalne - Instrukcja obsługi ......... 20 V - Adapter 12 V... -
Page 47: Zasady Bezpieczeństwa
Zasady bezpieczeństwa Napięcie znamionowe na wyjściu . 18,0 V Prąd wyjściowy ......1,5 A Symbole i piktogramy Moc wyjś ciowa ......27,0 W Symbole na urządzeniu Średnia skuteczność podczas eksploatacji .........88,3 % Włącznik / wyłącznik Skuteczność przy zmniejszonej mocy (10 %) .......83,7 % Stopień... -
Page 48: Instrukcje Bezpieczeństwa Dotyczące Lamp Akumulatorowych
Urządzeń elektrycznych Instrukcje bezpieczeństwa nie należy wyrzucać razem dotyczące lamp z odpadami domowymi akumulatorowych • W trakcie pracy nie zakrywać re- Biegunowość fl ektora LED. W trakcie pracy re- fl ektor LED nagrzewa się i może Symbole na opakowaniu powodować oparzenia. •... -
Page 49: Serwis
• Przy pomocy ładowarki nie łado- miennych. Pozwoli to zachować wać baterii jednorazowych. • Nie używaj akcesoriów, które bezpieczeństwo użytkowania nie są zalecane przez PARKSIDE. narzędzia elektrycznego. Może to spowodować porażenie elektryczne lub pożar. Specjalne zasady bezpieczenstwa dotyczące Przestrzegać... -
Page 50: Obsługa
Obsługa Wyciąganie akumulatora 12 V 1. Wcisnąć przyciski zwalniające (11) na Urządzenie można podłączać albo do akumulatorze (12). napięcia sieciowego albo włączać opcjo- 2. Wyciągnąć akumulator (12) w górę z adaptera 12 V (8). nalnie z akumulatorami X 20 V TEAM lub X 12 V TEAM . Wyciąganie adaptera 12 V Podłączanie napięcia 1. -
Page 51: Obracanie Akumulatorowego
4. Zawiesić urządzenie w wycięciu (6) Obracanie der podstawy z ząbkami. akumulatorowego refl ektora LED Ząbki umożliwiają odpowiednie zba- lansowanie urządzenia. 1. Odkręcić śrubę ustalającą (4). 2. Obrócić rękojeść akumulatorowego Gwint statywu refl ektora LED (3) w żądane położenie. 3. Zamocować śrubę ustalającą (4). Za pomocą... -
Page 52: Usuwanie I Ochrona Środowiska
Usuwanie i ochrona Wyciągnąć akumulator z urządzenia i przekazać urządzenie oraz opakowanie środowiska do ekologicznego recyklingu opadów. Inforamcje dotyczące utylizacji akumula- Wyciągnąć akumulator z urządzenia i tora można znaleźć w osobnej instrukcji przekazać urządzenie oraz opakowanie obsługi. do ekologicznego recyklingu opadów. Instrukcje dotyczące utylizacji akumulatora można znaleźć... -
Page 53: Gwarancja
Gwarancja Zakres gwarancji Urządzenie wyprodukowano z zacho- waniem staranności zgodnie z surowymi Szanowna Klientko, Szanowny Kliencie, na niniejszy artykuł udzielamy 3-letniej normami jakościowymi i dokładnie spraw- dzono przed wysyłką. gwarancji od daty zakupu. W przypadku wad tego produktu przysługują Państwu Świadczenia gwarancyjne dotyczą... -
Page 54: Serwis Naprawczy
Service-Center • W przypadku wystąpienia usterek lub innych wad prosimy o skontaktowanie się z wymienionym niżej działem serwi- Serwis Polska sowym telefonicznie lub mailowo. Uzy- Tel.: 22 397 4996 skają Państwo wówczas szczegółowe E-Mail: grizzly@lidl.pl IAN 373424_2104 informacje na temat realizacji reklama- cji. -
Page 55: Obsah Úvod
V případě komerčního použití záruka Service-Center ......64 Dovozce ........64 zaniká. Překlad originálního Přístroj je součástí série Parkside prohlášení o shodě CE ....100 X 12 V TEAM a X 20 V TEAM a lze jej vo- Výkres sestavení ...... 104 litelně provozovat s akumulátory série Park- side X 12 V TEAM nebo X 20 V TEAM. -
Page 56: Obecný Popis
15 klíčový otvor Obrázky naleznete na 16 vnitřní závit výklopných stránkách. Technické parametry Objem dodávky Aku LED refl ektor ....PLSA 20-Li A1 Vybalte nástroj a zkontrolujte, je-li komplet- ní:. Jmenovité napětí - Aku LED refl ektor ......... 20 V - Návod k obsluze... -
Page 57: Bezpečnostní Pokyny
Změna svíticího režimu Pozor! Aktuální seznam kom- patibility akumulátorů najde- Pozor - nedívejte se do svě- te na: www.lidl.de/akku telného zdroje! Tento přístroj lze provozovat výhradně s Elektrické přístroje nepatří do následujícími akumulátory: PAP 20 A1, domácího odpadu.. PAP 20 A3. Třída ochrany III S 12 V adaptérem lze použít také... -
Page 58: Bezpečnostní Pokyny Pro Akumulátorová Svítidla
Symboly v návodu Manipulace s akumulátorovým nástrojem Výstražné značky s údaji pro a jeho použití zabránění škodám na zdraví anebo věcným škodám. • Akumulátory nabíjejte pouze v nabíječkách, doporučovaných Označení nebezpečí s infor- výrobcem. Použije-li se nabíječ- macemi o zabránění zranění ka, určená... -
Page 59: Připojení Síťového Napětí
• Svoje elektrické nářadí nechte • Nepoužívejte příslušenství, které opravit pouze kvalifi kovaným nebylo doporučeno společností odborným personálem a jenom PARKSIDE. To může vést k úrazu pomocí originálních náhradních elektrickým proudem nebo k po- dílů. Tímto se zajistí to, že bez- žáru pečnost elektrického nářadí... -
Page 60: Vyjmutí/Vložení Akumulátoru 20 V
Vyjmutí/vložení Zapnutí/vypnutí akumulátoru 20 V 1. K zapnutí stiskněte zapínač/vypínač 1. Ke vložení akumulátoru (12) zasuňte (2). LED světlo svítí s maximálním jasem. 2. K vypnutí stiskněte zapínač/vypínač akumulátor do příložníku na zadní stra- ně přístroje. Tento slyšitelně zaklapne. (2). 2. -
Page 61: Údržba
Zavěšení LED akumulátoro- • Nepoužívejte abrazivní čisticí pro- vého zářiče pomocí klíčového středky ani rozpouštědla. Ty by mohly neopravitelně přístroj poškodit. otvoru 1. Našroubujte jeden šroub nebo zatlučte • Nepoužívejte vodu ani kovové předmě- hřebík v požadované poloze do stěny. ty. -
Page 62: Příslušenství
Příslušenství příslušenství obdržíte na stránkách www.grizzlytools.shop Pokud máte problémy při objednávání, použijte prosím kontaktní formulář. V případě jakýchkoliv dalších dotazů se obraťte na servisní středisko / „Service-Center“ (viz strana 64). Pol. Označení ............... Č. artiklu. 20 V –> 12 V Adaptér ..............91105913... -
Page 63: Záruka
Rozsah záruky Záruka Přístroj byl precizně vyroben podle Vážení zákazníci, přísných jakostních směrnic a před do- Na tento produkt získáváte dáním byl svědomitě zkontrolován. 3letou záruku od data zakoupení. V případě závady tohoto výrobku vám vůči Záruka platí výhradně pro vady materiálu prodejci výrobku přináleží... -
Page 64: Opravna
Service-Center • Výrobek označený jako vadný může- te po domluvě s naším zákaznickým Servis Česko servisem, s připojením dokladu o koupi (pokladní stvrzenky) a po uvedení, v Tel.: 800143873 čem závada spočívá a kdy k ní došlo, E-Mail: grizzly@lidl.cz přeposlat bez platby poštovného na vám IAN 373424_2104 sdělenou adresu příslušného servisu. -
Page 65: Obsah Úvod
Pri komerčnom používaní zá- Service-Center ......74 Dovozca ........74 ruka zaniká. Preklad originálneho Prístroj je súčasťou série Parkside prehlásenia o zhode CE .... 101 X 12 V TEAM a X 20 V TEAM a môže Výkres náhradných dielov ..104 sa prevádzkovať voliteľne s akumulátor- mi série Parkside X 12 V TEAM, resp. -
Page 66: Všeobecný Popis
Kľúčová dierka Obrázky nájdete na roztváracích stranách. Vnútorný závit Technické údaje Objem dodávky Akumulátor LED refl ektor ..PLSA 20-Li A1 Vybaľte nástroj a skontrolujte, či je kompletný: Menovité napätie - Akumulátor LED refl ektor ......... 20 V – Návod na obsluhu ......... -
Page 67: Bezpečnostné Pokyny
Režim blikania Druh ochrany........IP20 Teplota ........max. 90°C Striedanie režimu svietenia Pozor! Aktuálny zoznam kom- Pozor – nepozerať do sve- patibility akumulátora nájdete telného zdroja! na: www.lidl.de/akku Tento prístroj sa môže prevádzkovať Elektrické zariadenia nepatria výlučne s nasledovnými akumulátormi: do domového odpadu. PAP 20 A1, PAP 20 A3. -
Page 68: Bezpečnostné Pokyny Pre Akumulátorové Žiarovky
• Svietidlo nie je vhodné pre deti Symbol likvidácie vlnitej le- mladšie ako 14 rokov penky • Skontrolujte stálu trvanlivosť držiaka akumulátorového LED Odpad zlikvidovať ekologicky žiariča. Existuje nebezpečenstvo do na tento účel určených ná- dob na odpad poranenia v dôsledku spadnutia akumulátorového LED žiariča. -
Page 69: Servis
• Elektrické náradie nechajte opra- • Nepoužívajte žiadne príslušen- viť len kvalifi kovaným odborným stvo, ktoré bolo odporúčané personálom a len s originálnymi spoločnosťou PARKSIDE. To môže náhradnými dielmi. Tým sa za- viesť k zásahu elektrickým prú- bezpečí, že bezpečnosť prístroja dom alebo požiaru. -
Page 70: Prevádzka
Vybratie 12 V akumulátora Prevádzka 1. Stlačte uvoľňovacie tlačidlá (11) na aku- Prístroj sa môže pripojiť buď na sieťové mulátore (12). napätie alebo sa môže voliteľne prevádz- 2. Akumulátor (12) vytiahnite nahor z 12 V adaptéra (8). kovať s akumulátormi X 20 V TEAM alebo X 12 V TEAM . -
Page 71: Zavesenie Akumulátorového Led Žiariča
Čistenie Zavesenie akumulátorového LED žiariča Prístroj pred čistením vypnite a z prí- Akumulátorový LED žiarič stroja vyberte akumulátor. Nebezpe- zavesenie na háku čenstvo zásahu elektrickým prúdom! 1. Vyklopte hák (5). 2. Prístroj zaveste na vodorovný záves. • Prístroj vyčistite suchou, mäkkou utierkou, aby ste nepoškrabali kryt LED svetla. -
Page 72: Príslušenstvo
• Zariadenie a nabíjačku odovzdajte na zbernom mieste na ďalšie zhodnotenie. Použité plastové a kovové časti sa môžu vytriediť a tak odniesť na ekologické zhodnotenie. Informujte sa o tom v na- šom servisnom centre. • Likvidáciu vašich zaslaných chybných zariadení vykonáme bezplatne. Príslušenstvo Náhradné... -
Page 73: Záruka
Záruka Záruka platí výlučne na chyby materiálu alebo výroby. Táto záruka sa nevzťahuje Vážená zákazníčka, vážený zákazník, na normálne opotrebenie rýchlo opotrebi- Na tento výrobok dostávate 3 ročnú záru- teľných dielov. Táto záruka zaniká, ak bol produkt použí- ku od dátumu kúpy. Ak je prístroj poškodený, podľa zákona vaný... -
Page 74: Servisná Oprava
Service-Center Pre zabránenie dodatočných nákladov a problémov pri prevzatí použite len tú adresu, ktorá vám bude oznámená. Ne- Servis Slovensko zasielajte prístroj ako nadmerný tovar na Tel.: 0850 232001 náklady príjemcu, expresne alebo s iným E-Mail: grizzly@lidl.sk špeciálnym nákladom. Prístroj zašlite so IAN 373424_2104 všetkými časťami príslušenstva dodanými pri zakúpení... -
Page 75: Introduktion
Ved erhvervsmæssig brug Reparations-service ....84 bortfalder garantien. Service-Center ......84 Dette apparat er del af Parkside X 12 V Importør ........84 TEAM- og X 20 V TEAM-serien og kan Oversættelse af den originale enten bruges med genopladelige batterier fra X 12 V TEAM- eller 20 V TEAM-seri-... -
Page 76: Generel Beskrivelse
16 Indvendigt gevind - Batteridreven LED-spot Tekniske data - Betjeningsvejledning - 12 V-adapter Batteridreven LED-spot ..PLSA 20-Li A1 - Strømforsyning Mærkespænding Det genopladelige batteri og opla- ........20 V deren er ikke inkluderet i leveringen ........12 V ...... -
Page 77: Sikkerhedsanvisninger
Sikkerhedsanvisnin- Indgangsspænding ....100-240 V~; Indgangsvekselspændings- frekvens ........50-60 Hz Symboler og billedsymboler Effektforbrug ........50 W Udgangsspænding ....18,0 V Billedsymboler på apparatet Udgangsstrøm ....... 1,5 A Udgangseffekt ......27,0 W Tænd-/sluk-kontakt Gennemsnitlig effektivitet i aktiv tilstand ....88,3% Effektivitet ved lav belastning (10 %)83,7% Trin 1 Effektforbrug i ubelastet tilstand ..0,08 W Trin 2... -
Page 78: Sikkerhedsanvisninger Til
Beskyttelsesklasse II Henvisningstegn med infor- mationer om bedre håndte- Elektriske apparater må ikke ring af udstyret. bortskaffes som husholdnings- affald. Sikkerhedsanvisninger til batteridrevne lamper Polaritet • Dæk ikke den batteridrevne LED- spot til, når den er i brug.Den Symboler på emballagen batteridrevne LED-spot opvarmes Lysstrøm: maks. 2000 Lu- under brug og kan medføre for-... -
Page 79: Service
Parkside X 20 V • Kontrollér, at apparatet er sluk- TEAM- eller Parkside X 12 V ket, inden du indsætter det gen- TEAM-SERIEN. En detaljeret beskri- opladelige batteri. -
Page 80: Drift
Drift Isætning af 12 V-batteri 1. Skub det genopladelige batteri (12) ind i 12 V-adapteren (8). Apparatet kan efter eget valg tilsluttes til en strømforsyning eller anvendes med Udtagning af 12 V-batteri X 20 V TEAM- eller X 12 V TEAM- batte- 1. Tryk på frigørelsesknappen (11) på bat- rier. -
Page 81: Arbejdsanvisninger
Arbejdsanvisninger 3. Lad skrue-/sømhovedet stikke ud fra væggen med ca. 10 mm. Se ikke ind i den tændte batteridrev- 4. Hæng apparatet op ved hjælp af udsparingen (6) på bundpladen med ne LED-spot. tænder. Drejning af Tænderne muliggør en afbalancering batteridreven LED-spot af apparatet. -
Page 82: Bortskaffelse/Miljøbeskyttelse
• Opbevar apparatet på et tørt og støvbe- skyttet sted uden for børns rækkevidde. • Tag batteriet ud af apparatet inden læn- gerevarende opbevaring. Bortskaffelse/ miljøbeskyttelse Apparatet, tilbehøret og emballagen skal afl everes til miljøvenlig genanvendelse. Elektriske apparater må ikke bort- skaffes som husholdningsaffald. -
Page 83: Garanti
Garanti Garantiens omfang Apparatet blev produceret meget omhyg- geligt efter strenge kvalitetsretningslinjer Kære kunde! På dette apparat yder vi 3 års garanti fra og kontrolleret grundigt inden det forlod købsdato. fabrikken. Skulle der forekomme defekter på dette produkt har du lovpligtige rettigheder mod Garantiydelsen gælder udelukkende for sælgeren af produktet. -
Page 84: Reparations-Service
Service-Center deling, telefonisk eller pr. e-mail. Der får du så yderligere informationer om afviklingen af din reklamation. Service Danmark • Et som defekt registreret produkt kan Tel.: 32 710005 du, efter aftale med vores kundeservice E-Mail: grizzly@lidl.dk og med vedlagt købsbilag (kassebon) IAN 373424_2104 samt en kort beskrivelse af, hvori de- Importør... -
Page 85: Introducción
Traducción de la Declaración de conformidad CE original ... 103 puede utilizarse opcionalmente con bate- rías de las series Parkside X 12 V TEAM Plano de explosión ....y X 20 V TEAM. Las baterías solo pue- den cargarse con cargadores de las series Parkside X 12 V TEAM y Parkside... -
Page 86: Descripción General
16 Rosca interior está completo. Datos técnicos - Foco led a batería - Manual de instrucciones Foco led a batería ....PLSA 20-Li A1 - Adaptador de 12 V - Fuente de alimentación Tensión nominal ......... 20 V La batería y el cargador no se in- ......... -
Page 87: Indicaciones De Seguridad
Nivel 1 Corriente de salida ......1,5 A Potencia de salida .......27,0 W Efi ciencia media durante Nivel 2 el funcionamiento ......88,3 % Efi ciencia a baja carga (10 %) ..83,7 % Modo intermitente Consumo de potencia sin carga ..0,08 W Sustitución del modo de ilumi- Clase de protección ...... -
Page 88: Indicaciones De Seguridad Para Linternas A Batería
• No dirija la mirada hacia el rayo Longitud del cable 1 m de luz. No dirija el rayo de luz hacia personas o animales. Temperatura del color: Blanco luz del día 5700 K • No permita a los niños que utili- 5700 Kelvin cen el foco led a batería. -
Page 89: Servicio
Indicaciones de seguridad funcionamiento de su batería y especiales para aparatos con batería cargador de la serie Parkside X 20 V TEAM o X 12 V TEAM. Para • Asegúrese de que el aparato está una descripción más detallada so- apagado antes de insertar la bre el proceso de carga y para más información, consulte este ma-... -
Page 90: Retirar/Insertar La Batería De 20 V
Retirar/insertar la (14) situado en el lateral del aparato. batería de 20 V Encender/apagar 1. Para insertar la batería (12), deberá in- troducir la batería en la parte posterior 1. Para encenderlo, pulse el interruptor del aparato deslizándola por la guía. de encendido/apagado (2). -
Page 91: Rosca Del Trípode
Colgar el foco led a batería • Limpie el aparato con un paño seco y con ayuda del orifi cio para la suave para no arañar la cubierta del llave foco LED. 1. Coloque un tornillo o un clavo en la •... -
Page 92: Garantía
Accesorios Encontrará accesorios en www.grizzlytools.shop Si tiene problemas con el proceso de pedido, utilice el formulario de contacto. Si tiene más preguntas, póngase en contacto con el «Centro de servicio» (véase página 93). Pos. Denominación ............N.º de pedido. 20 V –> Adaptador de 12 V ............91105913 Garantía Período de garantía y exigencias legales en caso de defectos... -
Page 93: Servicio De Reparación
Servicio de reparación El producto está previsto exclusivamente para su uso particular y no para un uso Reparaciones que no están cubiertas por profesional. La garantía desaparece en caso de manipulación inadecuada, uso de la garantía, las puede dejar efectuar por nuestra fi... -
Page 95: Konformitätserklärung
Original-EG-Konformitätserklärung Hiermit bestätigen wir, dass der Akku-LED-Strahler Modell PLSA 20-Li A1 Seriennummer 000001 - 157598 folgenden einschlägigen EU-Richtlinien in ihrer jeweils gültigen Fassung entspricht: Gerät Netzteil 2014/30/EU • 2014/35/EU 2014/30/EU • 2014/35/EU 2009/125/EG • (EU) 2019/1782 2011/65/EU* • (EU) 2015/863 2011/65/EU* •... -
Page 96: Translation Of The Original Ec Declaration Of Conformity
Translation of the original EC declaration of conformity We hereby confi rm that the Cordless LED Worklight model PLSA 20-Li A1 serial number 000001 - 157598 conforms with the following applicable relevant version of the EU guidelines: Device Power adapter 2014/30/EU •... -
Page 97: Traduction De La Déclaration De Conformité Ce Originale
Traduction de la déclaration de conformité CE originale Nous certifi ons par la présente que le Projecteur LED sans fi l série de construction PLSA 20-Li A1 Numéro de série 000001 - 157598 est conforme aux directives UE actuellement en vigueur Appareil Bloc d‘alimentation... -
Page 98: Vertaling Van De Originele Ce-Conformiteitsverklaring
Vertaling van de originele CE-conformiteitsverklaring Hiermede bevestigen wij dat de Accu-led-schijnwerper bouwserie PLSA 20-Li A1 Serienummer 000001 - 157598 is overeenkomstig met de hierna volgende, van toepassing zijnde EU-richtlijnen: Apparaat Lader (adapter) 2014/30/EU • 2014/35/EU 2014/30/EU • 2014/35/EU 2009/125/EC • (EU) 2019/1782 2011/65/EU* •... -
Page 99: Tłumaczenie Oryginalnej Deklaracji Zgodności We
Tłumaczenie oryginalnej deklaracji zgodności WE Niniejszym oświadczamy, że konstrukcja Akumulatorowy refl ektor LED typu PLSA 20-Li A1 seryjny 000001 - 157598 spełnia wymogi odpowiednich Dyrektyw UE w ich aktualnie obowiązującym brzmie Urządzenie Zasilacz 2014/30/EU • 2014/35/EU 2014/30/EU • 2014/35/EU 2009/125/EC • (EU) 2019/1782 2011/65/EU* •... -
Page 100: Překlad Originálního Prohlášení O Shodě Ce
Překlad originálního prohlášení o shodě CE Potvrzujeme tímto, že konstrukce Aku LED refl ektor konstrukční řady PLSA 20-Li A1 Pořadové číslo 000001 - 157598 odpovídá následujícím příslušným směrnicím EÚ v jejich právě platném znění: Přístroj Síťový zdroj 2014/30/EU • 2014/35/EU 2014/30/EU •... -
Page 101: Preklad Originálneho Prehlásenia O Zhode Ce
Preklad originálneho prehlásenia o zhode CE Potvrdzujeme týmto, že tento Akumulátor LED refl ektor konštrukčnej série PLSA 20-Li A1 Poradové číslo 000001 - 157598 zodpovedá nasledujúcim príslušným smerniciam EÚ v ich práve platnom znení: Sieťová jednotka Prístroj 2014/30/EU • 2014/35/EU 2014/30/EU •... -
Page 102: Oversættelse Af Den Originale Ce-Konformitetserklæring
Oversættelse af den originale CE-konformitetserklæring Hermed bekræfter vi, at Batteridreven LED projektør af serien PLSA 20-Li A1 Serienummer 000001 - 157598 opfylder følgende gældende EF-direktiver i deres respektive gyldige version: Apparat Strømforsyningsdel 2014/30/EU • 2014/35/EU 2014/30/EU • 2014/35/EU 2009/125/EC • (EU) 2019/1782 2011/65/EU* •... -
Page 103: Traducción De La Declaración De Conformidad Ce Original
Traducción de la Declaración de conformidad CE original Mediante la presente declaramos que Foco led recargable de la series PLSA 20-Li A1 Número de serie 000001 - 157598 corresponde a las siguientes Directivas de la UE corrientes en su respectiva versión vigente: Aparato Módulo de alimentación... -
Page 104: Explosionszeichnung
Explosionszeichnung • Vue éclatée Rysunek samorozwijający • Nákresy explózií Exploded Drawing • Explosietekening Výkres sestavení • Eksplosionstegning Plano de explosión PLSA 20-Li A1 informativ, informatif, pouczający, informatívny, informative, informatief, informační, informativo... - Page 108 GRIZZLY TOOLS GMBH & CO. KG Stockstädter Straße 20 63762 Großostheim GERMANY Stand der Informationen · Last Information Update · Version des informations · Stand van de informatie · Stan informacji · Stav informací · Stav informácií · Tilstand af information · Estado de las informaciones: 08/2021 Ident.-No.: 72091126082021-8 IAN 373424_2104...
Need help?
Do you have a question about the PLSA 20-Li A1 and is the answer not in the manual?
Questions and answers