
Subscribe to Our Youtube Channel
Related Manuals for Creative Play DINO CF103


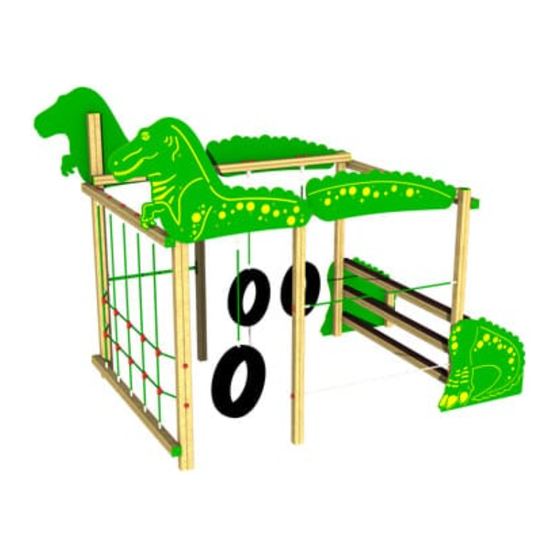
Summary of Contents for Creative Play DINO CF103
- Page 1 DINO CLIMBING FRAME Installation Instructions REF: CF103 - DINO CLIMBING FRAME pg 1 of 12...
-
Page 2: Parts Required
Parts required QTY x 2 QTY x 1 (120mm x 90mm) 3600mm (90mm x 90mm) 3000mm Including swing hanger QTY x 1 QTY x 1 (90mm x 90mm) 300mm (90mm x 90mm) 3000mm Including 2 swing hangers QTY x 1 QTY x 4 (90mm x 90mm) 3000mm (90mm x 90mm) 2400mm... - Page 3 Parts required ( NET ) (PRE-ASSEMBLED TYRE ROPE) ( 1015 STANDARD BAR) (Chain x 770mm Inc. thread bar /nylocs) ( 1685mm ROPE) (Chain x 1598mm) ( LEFT) ( LEFT) ( RIGHT) ( RIGHT) ( LEFT) ( LEFT) ( RIGHT) ( RIGHT) pg 3 of 12 REF: CF103 - DINO CLIMBING FRAME...
- Page 4 Parts required (M12 x 200 square hex bolt) (M12 x 230 square hex bolt) (M12 x 120 square hex bolt) (EYEBOLT x 130mm) (FM80 ‘BRASS SCREW’) (M12 NYLOC) (QUICKLINK ) (end caps) (BLUE end caps) SMALLER CAPS pg 4 of 12 REF: CF103 - DINO CLIMBING FRAME...
-
Page 5: Foundation Details
Foundation details = MINIMUM SPACE = SURFACING AREA pg 5 of 12 REF: CF103 - DINO CLIMBING FRAME... -
Page 6: Surfacing Details
Surfacing details TAIL TAIL NOTES: SMALL CIRCLES SHOWN ABOVE ARE FOR TYRE CHAIN TAIL pg 6 of 12 REF: CF103 - DINO CLIMBING FRAME... - Page 7 Assembly instructions Install the timbers (DF1,DF2,DF3,DF4,DF5,DF10) DF10 DF10 Attach the Timber (DF6) and DINO HEAD to the Timbers (DF1,DF3,DF5) Using M12 CUP SQUARE BOLTS / NYLOCS / END CAPS pg 7 of 12 REF: CF103 - DINO CLIMBING FRAME...
- Page 8 Assembly instructions Attach the Timber (DF7) and DINO HEAD to the Timbers (DF1,DF2,DF4) Using M12 CUP SQUARE BOLTS / NYLOCS / END CAPS Attach the DINO BACK PART to the Timbers (DF6,DF7) Using FM80 BRASS SCREWS pg 8 of 12 REF: CF103 - DINO CLIMBING FRAME...
- Page 9 Assembly instructions Attach the Timbers (DF9) to the Timbers (DF1) Using M12 CUP SQUARE BOLTS / NYLOCS / END CAPS Attach the NET to the Timbers (DF1,DF9) Using M12 CUP SQUARE BOLTS / NYLOCS / END CAPS pg 9 of 12 REF: CF103 - DINO CLIMBING FRAME...
- Page 10 Assembly instructions Attach the ROPE and CHAIN to the Timbers (DF3,DF5) Using / NYLOCS / END CAPS Attach the TYRES to the Timbers (DF6,DF7) Use LOCK TIGHT to ensure the quick link remains CLOSED pg 10 of 12 REF: CF103 - DINO CLIMBING FRAME...
- Page 11 Assembly instructions Attach the BARS to the Timbers (DEDF1,DF2) Using BRASS ‘SCREWS’ Attach the rest of PLAYEC parts to the Timbers (DF2,DF3,DF4,DF5,DF10) Using BRASS ‘SCREWS’ pg 11 of 12 REF: CF103 - DINO CLIMBING FRAME...
-
Page 12: Additional Dimensions
Additional dimensions pg 12 of 12 REF: CF103 - DINO CLIMBING FRAME...
Need help?
Do you have a question about the DINO CF103 and is the answer not in the manual?
Questions and answers