Advertisement
Quick Links
Advertisement

Related Manuals for TMG TMG-CRS1020


Summary of Contents for TMG TMG-CRS1020
- Page 1 WARNINGS-SAFE USAGE www.tmgindustrial.com 0/19 TOLL FREE:1-877-761-2819...
-
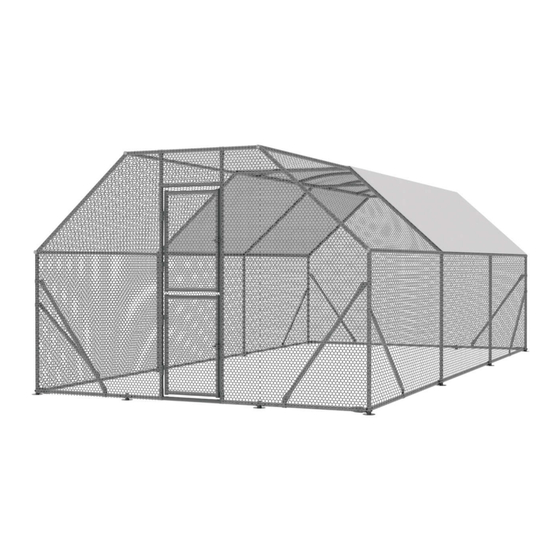
Page 2: Main Specifications
MAIN SPECIFICATIONS : - Assembly size : W3 x L6 x H2 (m) / 9.8 x 19.7 x6.6 (ft) - Shoulder wall clearance height : 1.2 m /3.9 ft PRIOR TO ASSEMBLY Please read the instructions carefully before installation. It is important to follow your local safety regulations and industry standards during installation. - Page 3 TMG-CRS1020 PART LIST PARTS GRAPHICAL DESCRIPTION LENGTH CODE Peak tube φ32xL1154mm Peak tube φ32xL1178mm Peak arch tube L144xW120mm (for front and rear truss) Peak arch tube L198xW144mm ( middle trusses ) Shoulder tube L138xW120mm (front and rear truss) Shoulder tube...
- Page 4 Inclined tube 32xL1130mm φ32xL1130mm Door L805xW548mm L805xW548mm Door frame tube 32xL568mm φ32xL568mm Pipe clamps 32xL70mm φ32xL70mm Clip L93xW40mm L93xW40mm Connector L55xW34mm L55xW34mm Screw bolt M8x50mm M8x50mm Screw bolt M6x60mm M6x60mm Tapping screw #12x25mm #12x25mm Screw bolt M6x60mm M6x60mm Waterproof plug φ32mm Barbed wire L25xW2m...
- Page 5 STEP 1 :INSTALL V-SPRING BUCKLE PART www.tmgindustrial.com 4/19 TOLL FREE:1-877-761-2819...
- Page 6 STEP 2: ASSEMBLE FRONT AND REAR TRUSSES. PART www.tmgindustrial.com 5/19 TOLL FREE:1-877-761-2819...
- Page 7 STEP 3 : ASSEMBLE MIDDLE TRUSSES. PART www.tmgindustrial.com 6/19 TOLL FREE:1-877-761-2819...
- Page 8 STEP 4 : CONNECT THE FRONT TRUSS AND THE 2ND TRUSS THROUGH PART (#6). PART www.tmgindustrial.com 7/19 TOLL FREE:1-877-761-2819...
- Page 9 STEP 5 : CONNECT THE 3ST TRUSS AND THE REAR TRUSS THROUGH PART (#6). PART www.tmgindustrial.com 8/19 TOLL FREE:1-877-761-2819...
- Page 10 STEP 6 : ASSEMBLE PART (#4). PART www.tmgindustrial.com 9/19 TOLL FREE:1-877-761-2819...
- Page 11 STEP 7 : FOUNDATION INSTALLATION. PART PART www.tmgindustrial.com 10/19 TOLL FREE:1-877-761-2819...
- Page 12 STEP 8 : INSTALL THE DOOR FRAME (#9) AND (#9A). PART PART www.tmgindustrial.com 11/19 TOLL FREE:1-877-761-2819...
- Page 13 STEP 9 : INSTALL THE DIAGONAL BRACING BARS (#10). PART www.tmgindustrial.com 12/19 TOLL FREE:1-877-761-2819...
- Page 14 STEP 10 : INSTALL THE DOOR (#11). PART www.tmgindustrial.com 13/19 TOLL FREE:1-877-761-2819...
- Page 15 STEP 11 : INSTALL THE TOP HEXAGONAL WIRE MESH. PART www.tmgindustrial.com 14/19 TOLL FREE:1-877-761-2819...
- Page 16 STEP 12 : INSTALL THE TOP HEXAGONAL WIRE MESH. PART www.tmgindustrial.com 15/19 TOLL FREE:1-877-761-2819...
- Page 17 STEP 13 : INSTALL THE FRONT DOOR HEXAGONAL WIRE MESH . Note : When installing the hexagonal mesh (#18) of the front truss, cover the net on the front truss, and then wrap the rope (#19) through the mesh hole to the truss to ensure that the hexagonal mesh is stretched and flat, and the surplus parts at the top left and right corners are...
- Page 18 STEP 14 : INSTALL THE REAR DOOR HEXAGONAL WIRE MESH. PART www.tmgindustrial.com 17/19 TOLL FREE:1-877-761-2819...
- Page 19 STEP 15: INSTALL THE TOP COVER (#21). PART www.tmgindustrial.com 18/19 TOLL FREE:1-877-761-2819...
-
Page 20: After The Installation
AFTER THE INSTALLATION Walk around and inspect the building periodically to make sure all components are still firmly secured and the whole building is well supported. Check all bolts and nuts as well as all connection points to make sure they are all in good position.
Need help?
Do you have a question about the TMG-CRS1020 and is the answer not in the manual?
Questions and answers