Table of Contents
Advertisement
Quick Links
Advertisement
Table of Contents

Related Manuals for Microh ARENA PROFILE SPOT


Summary of Contents for Microh ARENA PROFILE SPOT
- Page 1 MICROH ARENA PROFILE SPOT USERS MANUAL © Copyright 2000...
- Page 2 Congratulations on your purchase of a MICROH ARENA PROFILE SPOT or as we affectionately call it the “ARENA SPOT”. Every effort has been made to ensure that you now own one of the most technically advanced, feature packed, and versatile moving head fixtures on the market today.
-
Page 3: Table Of Contents
Table of Contents 1. Safety ....................…..….4 1.1 Safety instructions............……….….. .….4 1.2 Operating the fixture ……..............5 2. Introduction ................…..… ……7 2.1 Features.................…..….7 2.2 Description of the fixture.............…..….8 2.3 Beampath..........…..…...…………………...9 3. Installation ................….....10 3.1 Fitting/Exchanging the lamp ........…....10 3.2 Installation of an optional lens........…...…..12 3.3 Inserting/Exchanging gobos ......…....…....13 3.4 Rigging the fixture........….......14 3.5 Connection to the power supply......……......15... -
Page 4: Safety
CAUTION! Keep this fixture away from rain and moisture! Unplug fixture before opening the housing! FOR YOUR OWN SAFETY, PLEASE READ THIS USER MANUAL CAREFULLY BEFORE YOUR INITIAL START UP! 1. SAFETY 1.1 Safety instructions Everyone involved with the installation, operation and maintenance of this de- vice should : - be knowledgeable of sophisticated lighting systems - follow the instructions contained in this manual... -
Page 5: Operating The Fixture
Always disconnect the fixture from the power supply when it is not in use or before cleaning it. Only handle the power cord by the plug; Never pull out the plug by tugging on the power cord. This device falls under protection Class I. Therefore it is essential to connect the green conductor to earth, ensuring the the unit is properly grounded. - Page 6 When choosing the location for installation, please make sure that the fixture is not exposed to extreme heat, moisture or dust. There should not be any cables lying around. You may endanger yourself and the safety of others! The minimum distance between light output and the illuminated surface must be greater than 1 meter (3 Feet).
-
Page 7: Introduction
2. Introduction Unpack your MICROH ARENA PROFILE SPOT and make sure that there was no damage caused by transportation. Should there be any, please consult your local dealer and do not operate the fixture. 2.1 Features Moving Head Profile Spot Rotating gobo wheel with 6 interchangeable and indexable rotating gobos plus open. -
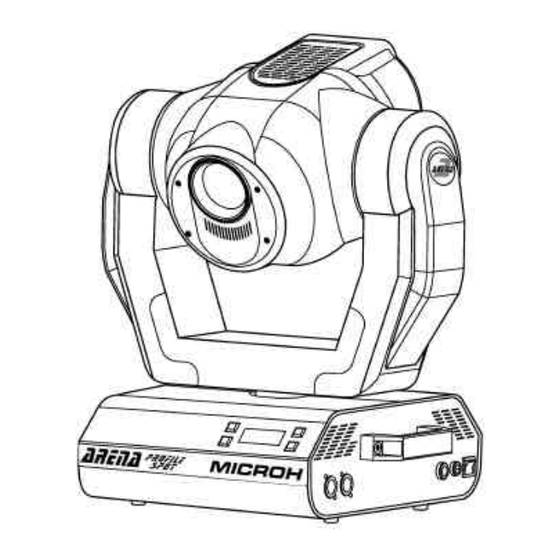
Page 8: Description Of The Fixture
2.2 Description of Device... -
Page 9: Beampath
2.3 Beampath... -
Page 10: Installation
3. Installation 3.1 Fitting/Exchanging the lamp DANGER! Install the lamp with the fixture switched off. Unplug from power supply before opening unit! To insert the lamp, open the top cover of the head (see the drawings to identify which cover is top) by loosening the 4 Phillips screws on the front and rear sides of the top cover. - Page 11 Do not operate the fixture with housing cover open! Lamp Adjustment The ARENA PROFILE SPOT lamp holder is aligned at the factory. Due to differ- ences between lamps, fine adjustment may improve light output. Strike the lamp and focus the light on a flat surface (wall). As the optimum distance of lamp from lens was adjusted during the installation of the lamp (by turning the screw "A"), it should only be necessary to adjust only the second position by turning...
-
Page 12: Installation Of An Optional Lens
3.2 Installation of an optional lens The fixture is delivered with a 15° standard lens. If you wish to insert an optional 12° or 18° lens, please follow the instructions below: Optional 12° lens: Remove the C-Clip of the 15° lens with an appropriate tool. Remove the lens. Install the optional 12°... -
Page 13: Inserting/Exchanging Gobos
3.3 Inserting/Exchanging gobos DANGER! Install gobos with the fixture switched off / and Unplugged from the power supply! To insert the gobos open the top cover of the head by loosening the 4 Phillips screws on the front and rear sides of the top cover. If you wish to use other forms and patterns as the standard gobos, or if gobos are to be exchanged, please follow the instructions below: Rotating gobo wheel:... -
Page 14: Rigging The Fixture
Use 2 appropriate clamps to rig the fixture to the truss. Follow the instructions on the bottom of the base. Make sure that the device is secured properly! . ARENA PROFILE SPOT can placed directly on the stage floor or rigged in any orientation on a truss without altering its operational characteristics (see the drawing). -
Page 15: Connection To The Power Supply
3.5 Connection to the power supply Connect the fixture to the power supply with the plug. The earth has to be connected! The configuration of the power supply cables is as follows:... -
Page 16: Dmx-512 Connection / Connection Between Fixtures
Configuration of the XLR connector: Building a serial DMX chain: Connect the DMX output of the first fixture in the DMX chain with the DMX input of the next fixture. Always connect one output with the input of the next fixture until all fixtures are connected. -
Page 17: Dmx-Protocol
4. DMX-Protocol 4.1 Function of the control channels - 16 bit protocol 4.1.1 Channel 1 - Horizontal movement (Pan) Push fader up in order to move head horizon- tally (PAN). Gradual head adjustment from one end of the fader to the other (0-255, 128-center). The head can be turned by 530°... - Page 18 4.1.5 Channel 5 - Speed of PAN / TILT movement 4.1.6 Channel 6 - Switch on / off the lamp, reset, speed control of cooling fan ( FANTROL) 4.1.7 Channel 7 – Colours Linear colour change follows the movement of the fader, allowing you to stop the colour wheel in any position - even between two colours creating dual col- oured beams.
- Page 19 4.1.9 Channel 9 – Effect Wheel 4.1.10 Channel 10 – Prism Rotation Control 4.1.11 Channel 11 – Gobo Selection and Continuous Rotation...
-
Page 20: Function Of The Control Channels - 8 Bit Protocol
4.1.12 Channel 12 – Rotating gobo index and gobo rotation 4.1.13 Channel 13 – No function 4.1.14 Channel 14 - Focus 4.1.15 Channel 15 – Shutter and Strobing 4.1.16 Channel 16 – Dimming 4.2 Function of the Control Channels Using 8 Bit DMX Protocol... -
Page 21: Addressing
5. Addressing The Control Panel on the top side of the ARENA PROFILE SPOT allows you to assign the DMX fixture address. This is defined as the first channel from which the ARENA PROFILE SPOT will respond to the controller. -
Page 22: Remotely Controllable Functions
The ARENA PROFILE SPOT is to be installed with a MSD 250 120V lamp. A relay inside of the ARENA PROFILE SPOT allows you to switch on and off the lamp via the Control Panel on the fixture or by your DMX controller. -
Page 23: Rotating Gobo Wheel
6.8 Fan Two axial fans cool the ARENA PROFILE SPOT - one in the projector head and one in the base. The speed of the fan (and of course the noise) can be regulated if very quiet performance is required (FANTROL). -
Page 24: Control Panel
7. Control Panel The Control Panel situated on the topside of the ARENA PROFILE SPOT offers several features. You can, very simply set the DMX address, read the number of lamp or unit hours, switch on and off the lamp, run demonstration se- quences, reset the fixture and also use special functions for manual control and service purposes. -
Page 25: Special Functions
- Lamp On time This option enables you to read the total number of hours that the lamp has been powered on. Press [Enter] or [Mode] to return to the main menu. In order to reset the counter to 0, you have to hold the Up and Down button and press the Enter button. - Page 26 - Manual control of effects This function allows you to manually control the channel functions of the fixture. Use the [Up] and [Down] keys to select the desired function and press [Enter] to adjust the effect or [Mode] to cancel and return to the menu. - Lamp On automatically This function enables the lamp to strike automatically after switching on the fix- ture.
- Page 27 - low/high speed of the fan operating The fan keeps the adjusted low speed until the temperature exceeds maximum inside temperature of the fixture, then the ARENA PROFILE SPOT automati- cally switches from low to high fan speed.
- Page 28 - Default settings Press [Enter] to reset all fixture personalities (not the adjusting functions) to the de- fault values. On the display will appear “rSt” indicating that the fixture Is resetting. See the table of personality setting and their default positions. Checked - Adjusting the default positions of colour, gobo and effect wheels Using this function you can calibrate and adjust the colour, gobo and effect wheels...
- Page 29 1. Calibration via the control panel Press [Enter] and the [Up] and [Down] keys in order to display the following messages: "Colo, EFEC, rGob, Grot" for very smooth function calibration. Select one of them, press [Enter] and use the [Up] and [Down] keys in order to adjust their right value from 0 to 255.
-
Page 30: Error And Information Messages
8. Error and information messages This message appears if you try to switch on the lamp within 5 minutes after having switched it off (the lamp is too hot). The message will also appear on the display if the lamp doesn't ignite within 28 seconds. The ARENA PROFILE SPOT will store this information and automatically ignite the lamp when the 5 minutes period has expired. - Page 31 (Prism wheel error) This message will appear after the fixture resets if the magnetic indexing circuit malfunctions (sensor failed or magnet missing) or the stepper motor is defective (or its driver circuit on the main PCB). The prism-wheel is not located in the default position after the reset. This error message informs you that the fixture was overheating (occurred if the ambient temperature is 45°...
-
Page 32: Technical Specifications
9. Technical specifications Power supply US/Canadian -model: 120V AC, 60 Hz (default) Internally changeable to 100/220/240 V 50/60Hz Power consumption: 400 W Fuse: T 3.15A, 250V Lamp MSD/HSD 250 120V GY-9.5 Optical System High luminous-efficiency parabolic mirror and double condenser system -Standard 15°... - Page 33 Electronics - Digital serial input DMX-512 - 16 control-channels (full 16 bit protocol): Channel 1: Panning yoke movement 8 bit Channel 2: Tilting yoke movement 8 bit Channel 3: Fine Panning yoke movement 16 bit Channel 4: Fine Tilting yoke movement 16 bit Channel 5: Pan/Tilt speed Channel 6: Fan speed (FANTROL), On/Off lamp, reset Channel 7: Colours...
-
Page 34: Maintenance And Cleaning
10. Maintenance and cleaning It is absolutely essential that the fixture is kept clean and that dust, dirt and fog fluid residues must not build up on or within the fixture. Otherwise, the fixture‘s light output will be significantly reduced. Regular cleaning will not only ensure the maximum light-output, but will also allow the fixture to function reliably throughout its life. -
Page 35: Appendix
11. Appendix We hope you will enjoy your ARENA PROFILE SPOT. We can assure you that this fixture will give you many years of reliable service if you follow the instruc - tions outlined in this manual. Should you have further questions, do not hesitate to contact your local dealer. - Page 36 NOTES...
Need help?
Do you have a question about the ARENA PROFILE SPOT and is the answer not in the manual?
Questions and answers