Advertisement
Quick Links
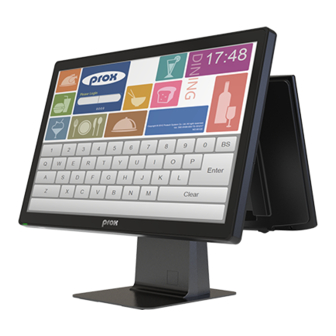
PA-J600
Quick
Reference
Guide
Specifications
CPU Support
Intel
Memory
1 x DDR4 SO-DIMM slot (up to 16GB)
Network
1 x Giga LAN (RJ45) for 10/100/1000 Mbps
Power Supply
90/120 Watt Power Adapter
System
O.S. Support
Windows 10 IoT 2016/2019
Speaker
2W Speaker
Wall Mount Type
VESA 100 x 100mm
Other Slots
1 x M.2 2230 type for Wi-Fi module, Wi-Fi(PCIe) / BT(USB)
Watchdog
1~255 seconds watchdog timer selectable
System Weight
With power adapter approx. 11kg
Dimensions (WxHxD)
535 x 389 x 293mm
1 x 2.5" HDD or SSD
Storage
SATA
1 x M.2 2242, SATA interface
USB
2 + 2 (optional) x USB 2.0 / 2 x USB 3.0 (Type A, rear I/O)
Serial Ports
1 x DB-9, 2+1 (optional)xRJ45
LAN
1 x Giga LAN (RJ45) for 10/100/1000 Mbps
I/O Ports
Cash Drawer
1 x RJ11, support 12V/24V selectable by Jumper
2nd & 3rd Display
1 x VGA D-Sub, 1080P@60Hz
Support
1 x HDMI port, 4096 x 2304 @60Hz
Audio
1 x Mic In & Line Out (optional)
DC In
1 x 4-pin DC power jack, 24VDC In
Power Switch
1 x Power Switch
Customer Display
VFD kit, 20 columns and 2 lines, Resolution: 320 x 32 dots
MSR & iButton
JIS I,II , ISO Track1+2+3
ISO14443A read/write; ISO18092 read only
RFID
Add-ons
Fingerprint
8-bit grayscale reader
Camera
5.0M pixel CMOS camera module
Barcode Scanner
1D: EAN-13, EAN-8, UPC-A, UPC-E, ISSN, ISBN, Codabar,
2D: PDF417, QR Code, Micro QR, Data Matrix
LCD
21.5" TFT LCD (Resolution: 1920 x 1080)
Display
Brightness: 250 cd/m²
Touchscreen
P-CAP touch panel, USB interface
Tilt Angle
0~50 degrees
EMC & Safety
CE / FCC
Operating Temp.
0°C ~ 35°C (32°F ~ 95°F)
Environment
Storage Temp.
-20°C ~ 60°C (-4°F ~ 140°F)
Humidity
20% ~ 90%
Ver. Q1
All Rights Reserved. Copyright 2020
All Right Reserved Copyright 2016
All Right Reserved Copyright 2015
PA-J600
®
®
Core
i5-7300U/i3-7100U/Pentium
4415U/Celeron
™
(all support +5V/+12V selectable)
Code 128, Code 93, ITF-6, ITF-14, Interleaved 2 of 5,
Industrial 2 of 5, Standard 2 of 5, Matrix 2 of 5,
GS1 Databar, Code 39, Code 11
Packing Checklist
If you discover any of the items below are damaged or lost,
please contact your vendor immediately.
PA-J600
This Quick Reference Guide
Power Adaptor
AC Power Cord
Driver DVD
322
System View
®
3965U
Front View
240
535
551
REAR I/O
(Option)
Line
Out
MIC
DC Out
DC Out
12V
24V
USB
COM4
Side View
227
293
DRW
VGA
HDMI
DC-IN
LAN
USB
USB
PA-J600
3
X 1
X 1
X 1
X 1
X 1
PA-6322
PA-J600
PA-63
Unit: mm
COM2
COM1
COM3
Advertisement

Subscribe to Our Youtube Channel
Related Manuals for protech prox PA-J600


Summary of Contents for protech prox PA-J600
- Page 1 PA-J600 Packing Checklist If you discover any of the items below are damaged or lost, please contact your vendor immediately. PA-J600 PA-J600 This Quick Reference Guide Power Adaptor Quick AC Power Cord Reference Driver DVD Guide Ver. Q1 All Rights Reserved. Copyright 2020 All Right Reserved Copyright 2016 All Right Reserved Copyright 2015 PA-J600...
-
Page 2: Jumper Setting
PA-J600 21.5" Fanless Slim POS Terminal Jumper Setting M.2_E (Wi-Fi) LVDS VCC Selection Clear CMOS Data USB4 Selection Selection Selection Normal Clear CMOS 3.3V JP20 JP15 JP20 JP15 (default) Data (default) (default) (default) Clear RTC Data Selection Normal Clear RTC JUSB4 LVDS Backlight Control (default) -
Page 3: Packing Checklist
PA-J600 Packing Checklist If you discover any of the items below are damaged or lost, please contact your vendor immediately. PA-J600 PA-J600 This Quick Reference Guide Power Adaptor Quick AC Power Cord Reference Driver DVD Guide Ver. Q1 All Rights Reserved. Copyright 2020 All Right Reserved Copyright 2016 All Right Reserved Copyright 2015 PA-J600... - Page 4 PA-J600 21.5" Fanless Slim POS Terminal Jumper Setting M.2_E (Wi-Fi) LVDS VCC Selection Clear CMOS Data USB4 Selection Selection Selection Normal Clear CMOS 3.3V JP20 JP15 JP20 JP15 (default) Data (default) (default) (default) Clear RTC Data Selection Normal Clear RTC JUSB4 LVDS Backlight Control (default)
- Page 5 PA-J600 Packing Checklist If you discover any of the items below are damaged or lost, please contact your vendor immediately. PA-J600 PA-J600 This Quick Reference Guide Power Adaptor Quick AC Power Cord Reference Driver DVD Guide Ver. Q1 All Rights Reserved. Copyright 2020 All Right Reserved Copyright 2016 All Right Reserved Copyright 2015 PA-J600...
- Page 6 PA-J600 21.5" Fanless Slim POS Terminal Jumper Setting M.2_E (Wi-Fi) LVDS VCC Selection Clear CMOS Data USB4 Selection Selection Selection Normal Clear CMOS 3.3V JP20 JP15 JP20 JP15 (default) Data (default) (default) (default) Clear RTC Data Selection Normal Clear RTC JUSB4 LVDS Backlight Control (default)
- Page 7 PA-J600 Floor Stand Installation Guide Floor Stand Package Contents (P/N: PA-J600-GZZ-32A) 1. ID Card Drawer Key 2. Hanging Screws 3. POS Mounting Screws Power Cord Printer Door Key 4. Base Stand & Part 1/Part 2 Screws Follow the instructions below to assemble PA-J600 Floor Stand: Step 1.
- Page 8 PA-J600 Floor Stand Installation Guide Floor Stand Step 4-1. Step 4-2. Remove the screws as shown: Remove the back cover. Step 5. Step 6. Tighten Part #1 bracket with Base Stand with Take out Part #2 bracket. screws #1. Step 7. Step 8.
- Page 9 PA-J600 Floor Stand Installation Guide Floor Stand Step 9. Step 10. Remove the printer screws as shown: Pull out the Printer as shown: Step 11. Unplug two cables from the printer and remove the Printer. Step 12. Push and lift up the printer stand. Step 13.
- Page 10 PA-J600 Floor Stand Installation Guide Floor Stand Step 15. Step 16. Connect printer cables. Put printer back. Step 17. Tighten the screws for Printer. Step 18. Connect power cord to complete KIOSK stand installation. Step 19. Follow the cable labels and connect the cables with a head unit (Panel PC).
- Page 11 PA-J600 Floor Stand Installation Guide Floor Stand Step 20. Install the hanging screw #4. Step 21. Connect all cables and install the cable cover. Step 22. After you mount the head unit onto Stand, use POS mounting screws #3 with KIOSK stand (Red circle is for 21.5”...
Need help?
Do you have a question about the prox PA-J600 and is the answer not in the manual?
Questions and answers