Table of Contents
Advertisement
INDEX
1 DESCRIPTION (see page 3)
2 SAFETY WARNINGS . . . . . . . . . . . . . . . . . . . . . . . . . . . . . . . . . . . . . . . . . . . . . .
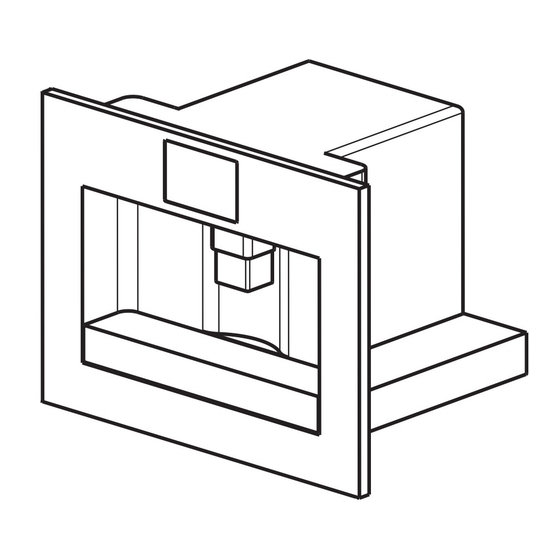
BUILDING-IN . . . . . . . . . . . . . . . . . . . . . . . . . . . . . . . . . . . . . . . . . . . . . . . . . . . .
3 BEFORE FIRST USE . . . . . . . . . . . . . . . . . . . . . . . . . . . . . . . . . . . . . . . . . . . . . . . .
4 USING FOR THE FIRST TIME
5 PREPARING COFFEE (USING COFFEE BEANS)
6 CHANGING THE QUANTITY OF COFFEE IN THE CUP . . . . . . . . . . . . . . . . . . . . . .
7 REGULATING THE COFFEE MILL . . . . . . . . . . . . . . . . . . . . . . . . . . . . . . . . . . . . . .
8 PREPARING ESPRESSO COFFEE USING GROUND COFFEE (INSTEAD OF BEANS)
9 PRODUCING HOT WATER
10 PREPARING CAPPUCCINOS (USING STEAM) . . . . . . . . . . . . . . . . . . . . . . . . . . . . .
11 CLEANING AND MAINTENANCE
11.1 CLEANING THE COFFEE MAKER . . . . . . . . . . . . . . . . . . . . . . . . . . . . . . . . .
11.2 CLEANING THE INFUSER
12 CHANGING AND SETTING THE MENU PARAMETERS . . . . . . . . . . . . . . . . . . . . . .
12.1 SETTING THE CLOCK . . . . . . . . . . . . . . . . . . . . . . . . . . . . . . . . . . . . . . . . .
12.2 SETTING AUTO-START TIME . . . . . . . . . . . . . . . . . . . . . . . . . . . . . . . . . . . . .
12.3 DESCALING . . . . . . . . . . . . . . . . . . . . . . . . . . . . . . . . . . . . . . . . . . . . . . . .
12.4 CHANGING COFFEE TEMPERATURE
12.5 CHANGING THE LENGTH OF TIME THE APPLIANCE REMAINS ON
12.6 SETTING WATER HARDNESS
12.7 RESETTING FACTORY DEFAULT SETTINGS
13 CHANGING THE LANGUAGE . . . . . . . . . . . . . . . . . . . . . . . . . . . . . . . . . . . . . . .
14 MEANING OF MESSAGES AND WHAT TO DO
15 PROBLEMS TO BE RESOLVED BEFORE CALLING THE SERVICE CENTRE
THIS APPLIANCE IS MARKED ACCORDING TO THE EUROPEAN DIRECTIVE 2002/96/EC ON WASTE ELECTRICAL AND
ELECTRONIC EQUIPMENT (WEEE).
By ensuring this product is disposed of correctly, you will help prevent potential negative consequences for the environment and
human health, which could otherwise be caused by inappropriate waste handling of this product.
The symbol
on the product, or on the documents accompanying the product, indicates that this appliance may not be trea-
ted as household waste. Instead it shall be handed over to the applicable collection point for the recycling of electrical and elec-
tronic equipment.
Disposal must be carried out in accordance with local environmental regulations for waste disposal.
For more detailed information about treatment, recovery and recycling of this product, please contact your local city office, your
household waste disposal service or the shop where you purchased the product.
. . . . . . . . . . . . . . . . . . . . . . . . . . . . . . . . . . . . . . . . .
. . . . . . . . . . . . . . . . . . . . . . . . . . . . . . . . . . . . . . . .
. . . . . . . . . . . . . . . . . . . . . . . . . . .
. . . . . . . . . . . . . . . . . . . . . . . . . . . . . . . . . . . . . . . . .
. . . . . . . . . . . . . . . . . . . . . . . . . . . . . . . . . . . .
. . . . . . . . . . . . . . . . . . . . . . . . . . . . . . . . . . . . . .
. . . . . . . . . . . . . . . . . . . . . . . . . . . . . .
. . . . . . . . . . . . . . . . . . . . . . . . . . . . . . . . . . .
. . . . . . . . . . . . . . . . . . . . . . . . . .
. . . . . . . . . . . . . . . . . . . . . . . . . .
page. 24
page. 24
page. 25
page. 27
page. 27
page. 28
page. 30
page. 30
. .
page. 30
page. 31
page. 31
page. 32
page. 32
page. 32
page. 34
page. 34
page. 34
page. 34
page. 36
. . . . . . . .
page. 36
page. 36
page. 36
page. 37
page. 37
. . . . . . . . . .
page. 38
23
Advertisement
Table of Contents

Related Manuals for Whirlpool ACE 100 IX


Summary of Contents for Whirlpool ACE 100 IX
- Page 1 INDEX 1 DESCRIPTION (see page 3) 2 SAFETY WARNINGS ..........BUILDING-IN .
-
Page 2: Safety Warnings
1 DESCRIPTION (SEE PAGE 3) A. Main ON/OFF switch B. Lights C. Steam spout D. Water tank (removable) E. Cup tray F. Drip tray (removable) G. Service door H. Coffee spout (adjustable in height) I. Control panel J. Bean container lid K. -
Page 3: Building-In
BUILDING-IN Please check the minimum measures necessary to the proper installation of the appliance. The coffee maker must be installed in a column unit, which must in turn be fixed to the wall. Fasten metal strip using the two screws. - Page 4 Lean the runners to the surface of the furniture. Fix the runners with the screws provided; then completely extract the two runners. If the coffee maker is installed above a "war- mer drawer", use the top of the latter as a refe- rence for the coffee maker runners.
-
Page 5: Before First Use
3 BEFORE FIRST USE • After removing the packaging, make sure the product is complete and undamaged. If in doubt, do not use the appliance and contact a qualified professional. • Installation must be carried out by a qualified techncian and in compliance with current regulations. •... -
Page 6: Preparing Coffee (Using Coffee Beans)
The appliance then displays the setting message in English. 2. After a few seconds, the appliance displays: To fill, remove the tank (fig. 1), rinse and fill with fresh water. Never exceed the MAX line. (When removing the tank, the cappuccino maker must always be positioned towards the centre of the appliance, otherwise the tank cannot be removed). - Page 7 (The appliance now grinds the beans and starts running off the coffee into the cup. Once the desired quantity has been reached, the appliance automatically stops delivering the coffee and ejects the grounds into the special container). 4. After a few seconds, the ready message is displayed again and you can make another coffee. 5.
-
Page 8: Changing The Quantity Of Coffee In The Cup
When proceeding, always completely extract the drip tray, to avoid that it falls when removing the grounds container. Empty the grounds container and clean thoroughly, making sure all residues deposited on the bottom are removed. IMPORTANT: when removing the drip tray, the grounds container MUST be emptied, even if it is not completely full. -
Page 9: Preparing Espresso Coffee Using Ground Coffee (Instead Of Beans)
8 PREPARING ESPRESSO COFFEE USING GROUND COFFEE (INSTEAD OF BEANS) • Press the (fig. 14) button to select the ground coffee function. This disables the coffee mill function. The appliance displays • Extract the appliance by pulling it using the special handles (fig. 3). •... -
Page 10: Cleaning And Maintenance
• Press the /OK button. Allow the steam mixed with water to run off for a few seconds until steam only is given off. • To interrupt steam delivery, press the steam button (fig. 18). Note: if you accidentally push the steam button, push any button, except the function or wait that the appliance automatically turn back to the main menu. -
Page 11: Cleaning The Infuser
11.2 Cleaning the infuser The infuser must be cleaned regularly to avoid the build-up of coffee encrustations which could cause mal- function. Proceed as follows: • turn the appliance off by pressing the and wait for the display to go off; •... -
Page 12: Changing And Setting The Menu Parameters
NOTE 2: If it is hard to insert the infuser, before inserting it squeeze it to the right size by pressing it force- fully from the top and bottom simultaneously, as shown in figure 27. NOTE 3: If it is still hard to insert the infuser, leave it out of the appliance, close the service door, unplug from the mains then plug in again. - Page 13 12.3 Descaling Over time, the continuous heating up of the water used to make the coffee leads to lime scale building up in the inner circuits of the appliance. When the appliance displays the message: you should perform the descale cycle. Proceed as follows: •...
-
Page 14: Changing Coffee Temperature
12.4 Changing coffee temperature To change the temperature of the coffee, proceed as follows: • Press the button (the light over the button comes on) then press the the appliance displays: • Press the button until the appliance displays the required coffee temperature •... -
Page 15: Changing The Language
13 CHANGING THE LANGUAGE To change the language, proceed as follows: • Press the button for at least 5 seconds until the appliance displays: and press the button for at least 3 seconds to confirm. The appliance then displays the setting mes- sage in English. -
Page 16: Problems That Can Be Resolved Before Calling The Service Centre
MESSAGE INSERT INFUSER ASSEMBLY GENERIC ALARM 15 PROBLEMS THAT CAN BE RESOLVED BEFORE CALLING THE SERVICE CENTRE If the appliance is not working, the causes of the malfunction can be identified and resolved by referring to chapter 14. If, on the other hand, no message is displayed, run the following checks before calling the ser- vice PROBLEM •... -
Page 17: Electrical Connection (Uk Only)
PROBLEM When the button • The appliance is not plugged in or the is pressed, the appliance main switch on the rear side of the appliance is not switched on. does not switch on. • The appliance is on. The infuser can The infuser cannot be only be removed if the appliance is off.
Need help?
Do you have a question about the ACE 100 IX and is the answer not in the manual?
Questions and answers