Table of Contents

Related Manuals for Inalto ICGG302W


Summary of Contents for Inalto ICGG302W
- Page 1 U S E R M A N U A L I N A L T O . H O U S E 30,60,75 & 90cm Gas on Glass Cooktops M O D E L C O D E / S I C G G 3 0 2 W , I C G G 6 0 4 W , I C G G 7 5 5 W , I C G G 9 0 5 W F O R A L L A U S T R A L I A N H O M E S...
- Page 2 Again, thank you for choosing an InAlto appliance and we look forward to being of service to you. Scan to Register your InAlto Appliance or go to: →...
-
Page 3: Table Of Contents
27 Purchase Details 28 Warranty Information Customer Care InAlto recommends the use of original spare parts. When contacting our customer service team, please ensure that you have the following information at hand (which can be found on your appliances’ rating plate). -
Page 4: Important Instructions
Important Instructions IMPORTANT INFORMATION BEFORE USING YOUR APPLIANCE The following statements you will see in this Before you use the appliance, we recommend booklet have these meanings: that you read through the relevant sections of this manual, which provides the description of WARNING: Indicating information concerning your appliance and its functions. - Page 5 WARNING: Read the following carefully to • Do not spray aerosols in the vicinity of this avoid damage or injury. appliance while it is in operation. • Do not store flammable materials on or • Do not allow pots to boil dry, as damage to under this appliance, e.g.
-
Page 6: Your Inalto Cooktop
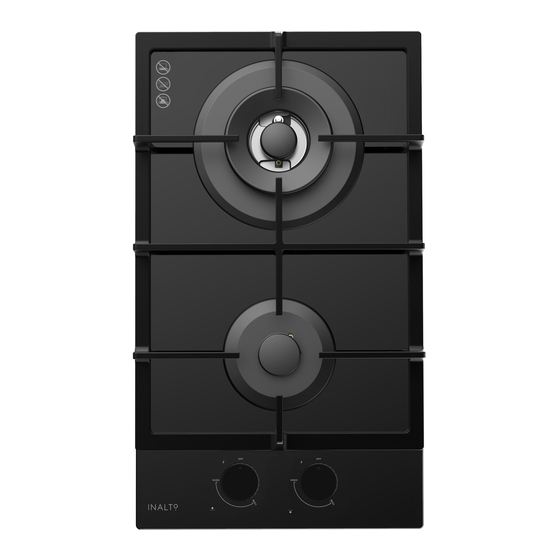
Your InAlto Cooktop ICGG302W ICGG604W Figure 1A Figure 1B ICGG755W ICGG905W Figure 1C Figure 1D A. Toughened Black Glass E. Semi Rapid Burner B. Burner Control Knobs F. Rapid Burner C. Cast Iron Trivets G. Triple Crown Wok Burner D. Auxiliary Burner H. - Page 7 Burner Flame Ports Flame Safeguard Sensor Ignition Spark Plug COOKTOP COMPONENTS & ACCESSORIES Your InAlto cooktop is supplied with: • 1 × Cooktop • 1 × Wok support trivet • 1 × Gas regulator valve • 2 × Injector (ICGG302W) •...
-
Page 8: Before First Use
Before First Use INSTALLATION CLEANING • An authorised person must install this • Always ensure the appliance is turned off appliance and MUST provide a Certificate before cleaning. of Compliance. This certificate should be • This appliance contains aluminium fittings. Do not use caustic based cleaners. -
Page 9: Using Your Cooktop
Using Your Cooktop STANDARD BURNER CAUTION: • Keep hands clear of burners when lighting. • If burner does not light within 5 seconds, turn knob to ‘OFF’ position, wait to allow gas to disperse and then try lighting again. • Burners MUST be operated between ‘HIGH’ and ‘LOW’... -
Page 10: Burners
Burners POTS AND PANS CHOICE OF BURNER All common pots and pans; aluminium, For your convenience there is a choice of burners to choose from: stainless steel, cast iron, ceramic, etc., may be used on your new gas cooktop. Ensure •... -
Page 11: Cleaning And Care
Cleaning and Care CAUTION: Ensure the appliance is off and cool quantity of cleaner directly onto the hob. before cleaning. Rub clean using a damp cloth or paper towels. TRIVETS 3. Use a damp cloth to remove all remaining traces of the cleaner, which could Persistent stains may require rubbing with a otherwise burn on when the hob is next nylon scourer or creamed powder cleansers. -
Page 12: Troubleshooting
Troubleshooting If you have a problem with the cooktop, check the table below. You may be able to solve the problem and this will save you from paying for a service call. You will have to pay for a service call even in the warranty period if the problem is one listed below. -
Page 13: Technical Data
Technical Data We reserve the right to alter these specifications. This appliance conforms to AS/NZS 5263. TABLE 2 FEATURES ICGG302W ICGG604W ICGG755W ICGG905W Burners Yes, triple ring Wok Yes, triple ring Wok Yes, triple ring Wok Ignition 220–240V 220–240V 220–240V 220–240V... -
Page 14: Installation Instructions
• The particular instructions as given below. • A certificate of compliance MUST be given to the customer after the application is successfully installed. Figure 5A – ICGG302W Figure 5B – ICGG604W 145* 120* 120* * Minimum clearance from cut-out to combustible surface. - Page 15 Figure 5C – ICGG755W Figure 5D – ICGG905W 130* 140* 110* 110* Gas Supply Gas Supply 130* 130* Connection Connection * Minimum clearance from cut-out to combustible surface. NOTE: This dimension is not relevant if the adjacent surface is non-combustible.
-
Page 16: Installation Procedure
Installation Procedure • The bench cutout should be made as per • Ensure that there is an earthed power cutout dimensions in Table 2 and Figure outlet within 900mm of the rear right hand 5A – 5D (depending on your model). side of the cooktop when installed. - Page 17 Do not use a silicon sealant appliance against the apertu Figure 6 FITTING THE CLAMPS of the screws.There are one set of sc (A) SEALING STRIP • Ensure that the hob is free from all burner (A) SEALING STRIP corner of the hob (H) . pieces and trivets.
-
Page 18: Gas Connection
appliance from the aperture in future, particularly if it needs to be serviced. Place the bracket (B) over the holes that match the size of the screws.There are one set of screw holes in (A) SEALING STRIP each corner of the hob (H).Slightly tighten a screw (C) through the bracket (B) so that the bracket is attached Gas Connection to the hob, but so that you can still adjust the position. - Page 19 OPERATION ON N.G./S.N.G ELBOW POSITIONING It is possible to reposition the elbow if This appliance is supplied for use with Natural required by loosening the locking nut and Gas. However, it can be converted for use with elbow by using two spanners. Re-tighten the LPG.
- Page 20 Gas Connection (Continued) ASSEMBLY OF THE REGULATOR CHECKING THE GAS SUPPLY The assembly of the regulator to the cooktop • Check the manometer zero point is correct. manifold is achieved via the elbow union and • Connect the manometer to the cooktop sealing washer supplied, refer to Figure 7.
- Page 21 Semi Rapid burner 1.15 0.68 Rapid burner 10.8 10.8 Wok burner 1.72 13.5 13.5 TABLE 3C – ICGG302W Burner Type Natural Gas (Nominal Test point pressure: 1.00kPa) (Nominal Test point pressure: 2.75kPa) Injector Size Gas Consumption Injector Size Gas Consumption (mm)
-
Page 22: Lpg Conversion
LPG Conversion This appliance is supplied set up for Natural • If the regulator appears to not be Gas usage. A conversion kit is included with performing satisfactorily then check the following points: product for Universal LPG usage. The • If the outlet pressure is consistently too conversion kit contains the appropriate low then the inlet pressure may be too low injectors, 1 Brass Test Point and 1 LPG sticker. -
Page 23: Electrical Connection
Earth symbol. When the power cord is damaged it must be replaced by the manufacturer to produce, customer service agent or similarly qualified personnel. Diagram 1C – ICGG302W Model: ICGG302W When the power cord is damaged it must be replaced by the manufacturer to produce, WARNING: When the power cord is damaged customer service agent or similarly qualified personnel. -
Page 24: Testing Appliance Operation
Testing Appliance Operation After installation, test the appliance and • If the appliance cannot be adjusted to ensure that it operates correctly before perform safely inform the customer of the handing it over to the customer. The following problem and affix an appropriate warning procedure is recommended: notice to the appliance. - Page 25 Figure 9 Flame size adjusted to maximum Flame size adjusted to minimum Figure 10 Bypass screw...
-
Page 26: Your Receipt
Attach your receipt to this page... -
Page 27: Purchase Details
Purchase Details For future reference, please record the following information which can be found on the rating plate and the date of purchase which can be found on your sales invoice. STORE DETAIL S STORE NAME ADDRESS TELEPHONE PURCHASE DATE PRODUCT DETAIL S MODEL NO. -
Page 28: Warranty Information
Warranty Information AUSTRALIAN WARRANTY TERMS & CONDITIONS (h) ‘you’ means the purchaser of the Appliance not COOKING APPLIANCES having purchased the Appliance for re-sale, and ‘your’ has a corresponding meaning. This document sets out the terms and conditions This warranty only applies to Appliances of the product warranties for Residentia Group purchased and used in Australia and is in Appliances. - Page 29 (a) the Appliance is damaged by: failure. The benefits to you given by this warranty accident are in addition to your other rights and remedies (ii) misuse or abuse, including failure to properly under a law in relation to the Appliances or services maintain or service to which the warranty relates.
- Page 30 THIS PAGE IS INTENTIONALLY LEFT BL ANK...
- Page 31 Simply visit the below website, or ask your retailer 24 months on the microwave magnetron; Waste for help: www.inalto.house/nz/registration disposers have a 12 month warranty. The provision of service under this warranty is...
- Page 32 D E S I G N E D I N M E L B O U R N E F O R A L L A U S T R A L I A N H O M E S —...
Need help?
Do you have a question about the ICGG302W and is the answer not in the manual?
Questions and answers