
Subscribe to Our Youtube Channel
Related Manuals for Inalto ICGW71


Summary of Contents for Inalto ICGW71
- Page 1 MODEL CODE / S PRODUCT D OCUMENT ICGW71 USER ICGW70S COOKTOP MANUAL ICGW91 ICGW90S...
- Page 2 Again, thank you for choosing an Inalto appliance and we look forward to being of service to you. Kind Regards,...
- Page 3 PAGE 03 PAGE CONTENT SAFETY INSTRUCTIONS YOUR INALTO COOKTOP INSTALLATION INSTRUCTIONS CLEANING & MAINTENANCE TECHNICAL DATA WARRANTY INFORMATION PURCHASE DETAILS NOTES...
-
Page 4: Safety Instructions
► Repairs may only be carried out by authorised service agents. ► Your Inalto cooktop is not to be used by children or persons with reduced physical, sensory or mental capabilities, or lack of experience and knowledge, unless they have been given supervision or instruction. -
Page 5: Declaration Of Conformity
PAGE 05 DECLARATION OF CONFORMITY UNPACKING This appliance complies with the following European During transportation, protective packaging was used to Directives: protect the appliance against any damage. After unpacking, please dispose of all elements of packaging in a way that will —... -
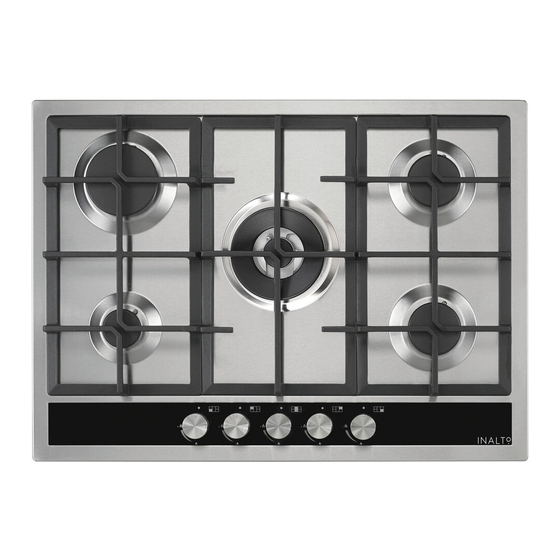
Page 6: Your Inalto Cooktop
YOUR INALTO COOKTOP SPECIFICATIONS Connection points diagram (left): 1. Front of cooktop 2. Gas connection point 3. Electrical connection point. Above: ICGW71 & ICGW70S Above: ICGW91 & ICGW90S MODEL PRODUCT DIMENSIONS CUT-OUT DIMENSIONS (W×D) CONNECTION POINT LOCATIONS (W×D×H) (DIAGRAMS ABOVE) -
Page 7: Automatic Ignition With Flame Failure Safety Device
AUTOMATIC IGNITION WITH FLAME FAILURE SAFETY DEVICE Your Inalto cooktop is fitted with a flame failure safety device on each burner, which is designed to stop the flow of gas to the burner head in the event of the flame going out. -
Page 8: Installation Instructions
USER MANUAL PAGE 08 INSTALLATION INSTRUCTIONS INSTALLATION INSTRUCTIONS It’s important to carefully read the following installation instructions before beginning the installation of your cooktop. IMPORTANT! The installation must be carried out by a suitably qualified and authorised person, in accordance with the current version of the following: ►... -
Page 9: Installing The Cooktop
PAGE 09 INSTALLING THE COOKTOP Cut a hole in your benchtop that corresponds with the relevant cut-out size for your Inalto Cooktop model. Refer to the “Your Inalto Cooktop” section of this user manual. IMPORTANT! You must have a gap of at least 30mm between the underside of the cooktop and any surface below. -
Page 10: Ventilation Requirements
USER MANUAL PAGE 10 INSTALLATION INSTRUCTIONS IMPORTANT! This appliance must be installed by a licenced and authorised person and in compliance with the current standards. IMPORTANT! This hob is supplied to run on natural gas only and cannot be used on any other type of gas without modification. -
Page 11: Gas Connection
PAGE 1 1 GAS CONNECTION Install in accordance with relevant gas standards and/or codes of practice applicable. Connect the elbow fitting to the appliance gas manifold connection, and check that seals between the elbow and manifold connection are in place and in good condition. ►... - Page 12 USER MANUAL PAGE 12 INSTALLATION INSTRUCTIONS CHECKING THE GAS SUPPLY Check the manometer zero point is correct. Connect the manometer to the cooktop pressure point (located on the regulator). Turn on the gas supply and electricity and try to ignite the gas burner. Note: It will take additional time to light the gas for the first time as air needs to be purged from the pipes.
-
Page 13: Gas Adjustment (Conversion To Lpg)
PAGE 13 GAS ADJUSTMENT (CONVERSION TO LPG) The conversion work must be carried out by a registered gas fitter and in accordance with the IMPORTANT! current standards. Always isolate the cooktop from the electricity supply before changing the injectors and/or WARNING! adjusting the minimum flow of the burners. - Page 14 USER MANUAL PAGE 14 INSTALLATION INSTRUCTIONS MINIMUM FLOW ADJUSTMENT FOR COOKTOP GAS TAPS IMPORTANT! All work must be carried out by a registered gas fitter and in accordance with the current standards. WARNING! Always isolate the cooktop from the electricity and gas supply before changing the injectors and/or adjusting the minimum flow of the burners.
-
Page 15: Gas Tap Maintenance
PAGE 15 GAS TAP MAINTENANCE IMPORTANT! The installation must be carried out by a suitably qualified and licensed gas fitter and in accordance with the current standards. WARNING! Before carrying out any maintenance operations, always isolate the cooktop from the electricity and gas supplies. - Page 16 USER MANUAL PAGE 16 INSTALLATION INSTRUCTIONS The mains supply cable should be replaced in accordance with the following instructions and by suitably qualified licen ced person: ► Switch the appliance off at your mains supply. ► Open the box of the supply board. ►...
-
Page 17: Cleaning And Maintenance
PAGE 17 CLEANING & MAINTENANCE By ensuring proper cleaning and maintenance of your Inalto cooktop, you can ensure that it will have a long and fault free operation. WARNING! Do not start cleaning the cooktop until it has completely cooled. -
Page 18: Technical Data
USER MANUAL PAGE 18 TECHNICAL DATA ELECTRICAL DETAILS Rated Voltage: 220 - 240 Vac 50 / 60 Hz Supply Connection: 3A Max Rated Inputs: 0.8 W Mains Supply Lead: 3 core x 0.75mm² (Type RR-F <HAR> marked) GAS TYPE AND OPERATING Connection: Rp ½... -
Page 19: Purchase Details
PAGE 19 RECEIPT PURCHASE DETAILS For future reference, please record the following information which can be found on the rating plate and the date of purchase which can be found on your sales invoice. The rating plate of your hob is located on the underneath of the appliance. Therefore please fit the duplicate data plates or label on the outside of the cupboard to sure that the label can be easily seen during operation. -
Page 20: Warranty Information
USER MANUAL PAGE 20 WARRANTY INFORMATION WARRANTY TERMS & CONDITIONS IN THIS WARRANTY COOKING APPLIANCES ‘acceptable quality’ as referred to in clause 10 of this (BUILT-IN OVENS, COOKTOPS) warranty has the same meaning referred to in the ACL; ‘ACL’ means Trade Practices Amendment (Australian This document sets out the terms and conditions of the Consumer Law) Act (No.2) 2010;... - Page 21 PAGE 21 10. For Appliances and services provided by Residentia You will bear the cost of transportation, travel and delivery of the Appliance to and from Residentia Group in Australia, the Appliances come with a Group or its ASR. If you reside outside of the service guarantee by Residentia Group that cannot be area, you will bear the cost of: excluded under the Australian Consumer Law.
- Page 22 USER MANUAL PAGE 22 NOTES...
- Page 23 PAGE 23...
- Page 24 MODEL CODE / S ICGW71 ICGW70S ICGW91 ICGW90S...
Need help?
Do you have a question about the ICGW71 and is the answer not in the manual?
Questions and answers