Table of Contents
Advertisement
Quick Links
Advertisement
Table of Contents

Related Manuals for Air Lift 60817


Summary of Contents for Air Lift 60817
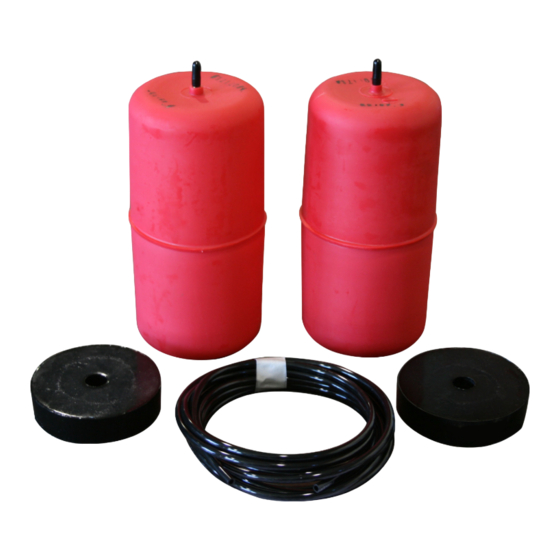
- Page 1 Kit 60817 Jeep Wrangler 2WD & 4WD Cover illustration may not depict actual kit. InstallatIon GuIdE For maximum effectiveness and safety, please read these instructions completely before proceeding with installation. Failure to read these instructions can result in an incorrect installation.
- Page 2 1000 MN-695...
-
Page 3: Table Of Contents
Installing the Air Lift 1000 System . . . . . . . . . . . . . . . . . -
Page 4: Introduction
Air Lift Company reserves the right to make changes and improvements to its products and publications at any time. Contact Air Lift Company at (800) 248-0892 or go online to www.airliftcompany.com for the latest version of this manual. -
Page 5: Installing The Air Lift 1000 System
Tee ............. 1 21455 Valve ............2 34668 Heat shield kit ..........1 Missing or damaged parts? Call Air Lift customer STOP! service at (800) 248-0892 for a replacement part. Installing the air lift 1000 system PREPARING ThE VEhICLE 1. Jack up the rear of the vehicle or raise on a hoist. Support the frame with safety stands. Lower the axle or raise the body of the vehicle until the suspension is fully extended (fig. -
Page 6: Installing The Air Line
1000 2. Insert the flattened air spring into the coil spring through the lowest opening with the stem at the bottom (fig. 3). 3. Push the air spring up or down within the coil by hand or with a blunt instrument such as a spoon-type tire iron. - Page 7 1000 2. Slide an air line clamp onto the air line. 3. Push the air line over one side of the tee until all the barbs are covered. With a pair of pliers, slide the air line clamp forward until it fully covers the barbed section. Repeat the entire procedure for the other leg of the tee (fig.
- Page 8 1000 9. Drill a 5/16” hole for the inflation valve and mount as shown (fig. 8). The rubber washer serves as an outside weather seal. 10. Slide the air line clamp over the air line. Push the air line onto the fitting covering all barbs.
-
Page 9: Dual Air Line Routing
1000 13. Raise the axle or lower the vehicle body until the air springs lightly touch the upper spring seat and lower spacers. 14. Check the tail pipe clearance and ensure that it is at least 2-3 inches from the air spring. -
Page 10: Maintenance And Servicing
1000 Maintenance and servicing Minimum Air Pressure Maximum Air Pressure 5 PSI 35 PSI FAILURE TO MAINTAIN CORRECT MINIMUM PRESSURE (OR PRESSURE PROPORTIONAL TO LOAD), BOTTOMING OUT, OVER-ExTENSION OR RUBBING AGAINST ANOTHER COMPONENT WILL VOID THE WARRANTY. MAINTENANCE GUIDELINES By following these steps, vehicle owners will obtain the longest life and best results from their air springs. -
Page 11: Product Use
No. Adding air springs will not change the weight ratings (GAWR, GCWR and/or GVWR) of a vehicle. Exceeding the GVWR is dangerous and voids the Air Lift warranty. Q . Is it necessary to keep air in the air springs at all times and how much pressure will they need? The minimum air pressure should be maintained at all times. -
Page 12: Guidelines For Adding Air
1000 GUIDELINES FOR ADDING AIR 1. Start with the vehicle level or slightly above. 2. When in doubt, always add air. 3. For motorhomes, start with 50-100 PSI in the rear because it can be safely assumed that it is heavily loaded. -
Page 13: Warranty And Return Policy
Air Lift 1000 ....Lifetime Limited Load Controller (I) ... . 2 Year Limited RideControl . -
Page 14: Replacement Information
1000 Replacement Information If you need replacement parts, contact the local dealer or call Air Lift customer service at (800) 248-0892. Most parts are immediately available and can be shipped the same day. Contact Air Lift Company customer service at (800) 248-0892, first if: •... - Page 16 Thank you for purchasing Air Lift products — the professional installer’s choice! Air Lift Company • 2727 Snow Road • Lansing, MI 48917 or PO Box 80167 • Lansing, MI 48908-0167 Toll Free (800) 248-0892 • Local (517) 322-2144 • Fax (517) 322-0240 • www.airliftcompany.com...
Need help?
Do you have a question about the 60817 and is the answer not in the manual?
Questions and answers