Nilfisk-Advance ecoflex BR 752 User Manual
Hide thumbs
Also See for ecoflex BR 752:
- Service manual (130 pages) ,
- Instructions for use manual (124 pages) ,
- Instructions for use manual (123 pages)
Table of Contents
Advertisement
Quick Links
Advertisement
Table of Contents

Subscribe to Our Youtube Channel
Related Manuals for Nilfisk-Advance ecoflex BR 752


Summary of Contents for Nilfisk-Advance ecoflex BR 752
- Page 1 BR 652 - BR 752 - BR 752C BETRIEBSANLEITUNG ORIGINALANLEITUNG MANUEL D’UTILISATION INSTRUCTIONS D’ORIGINE USER MANUAL ORIGINAL INSTRUCTION GEBRUIKSAANWIJZING ORIGINELE INSTRUCTIES 9098684000 Edition 1 2010-05 Printed in Hungary setting standards...
- Page 2 Сертификат за съответствие Conformity certificate Declaração de conformidade Osvědčení o shodě Πιστοποιητικό συμμόρφωσης Deklaracja zgodności Konformitätserklärung Megfelelősségi nyilatkozat Certificat de conformitate Overensstemmelsescertifikat Dichiarazione di conformità Заявление о соответствии Declaración de conformidad Atitikties deklaracija Överensstämmelsecertifikat Vastavussertifikaat Atbilstības deklarācija Certifikát súladu Déclaration de conformité Konformitetssertifisering Certifikat o ustreznosti Yhdenmukaisuustodistus...
-
Page 3: Table Of Contents
USER MANUAL ENGLISH TABLE OF CONTENTS INTRODUCTION ................................2 MANUAL PURPOSE AND CONTENTS ............................2 TARGET ......................................2 HOW TO KEEP THIS MANUAL ............................... 2 DECLARATION OF CONFORMITY ..............................2 IDENTIFICATION DATA ................................... 2 OTHER REFERENCE MANUALS ..............................2 SPARE PARTS AND MAINTENANCE ............................. 2 CHANGES AND IMPROVEMENTS .............................. -
Page 4: Introduction
ENGLISH USER MANUAL INTRODUCTION NOTE The numbers in brackets refer to the components shown in Machine Description chapter. MANUAL PURPOSE AND CONTENTS The purpose of this Manual is to provide the operator with all necessary information to use the machine properly, in a safe and autonomous way. -
Page 5: Operation Capabilities
USER MANUAL ENGLISH OPERATION CAPABILITIES This scrubber-dryer is used to clean (scrubbing and drying) smooth and solid fl oors, in civil or industrial environment, under safe operation conditions by a qualifi ed operator. The scrubber-dryer cannot be used for fi tted carpet and carpet cleaning. CONVENTIONS Forward, backward, front, rear, left or right are intended with reference to the operator’s position, that is to say on the driver’s seat (17). -
Page 6: General Instructions
ENGLISH USER MANUAL GENERAL INSTRUCTIONS Specifi c warnings and cautions to inform about potential damages to people and machine are shown below. DANGER! – Before performing any maintenance, repair, cleaning or replacement procedure disconnect the battery connector and remove the ignition key. –... - Page 7 USER MANUAL ENGLISH WARNING! – Do not use the machine in particularly dusty areas. – Use the machine only where a proper lighting is provided. – If the machine is to be used where there are other people besides the operator, it is necessary to install the pivoting light and the reverse gear buzzer (optional).
-
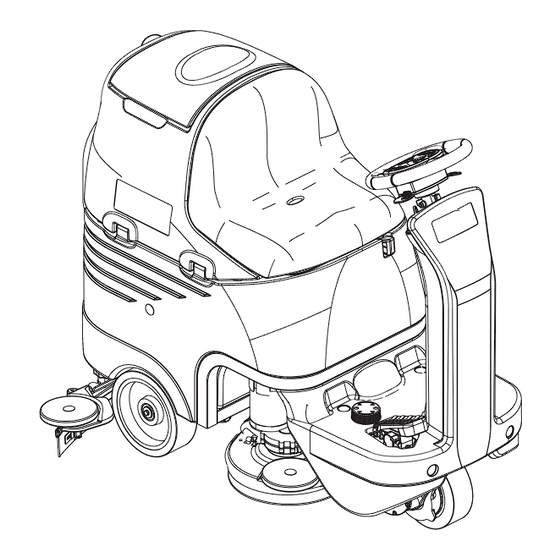
Page 8: Machine Description
ENGLISH USER MANUAL MACHINE DESCRIPTION MACHINE STRUCTURE Steering wheel with control panel (see the following Bumper wheel paragraph) Solution fi lter Steering wheel height control lever Solenoid valve Ignition key Solution/clean water tank opening/closing valve Drive pedal Squeegee hook Heel support height adjustment Battery charger (optional) Front steering, driving and braking wheel Seat... - Page 9 USER MANUAL ENGLISH MACHINE STRUCTURE (Continues) Serial number plate/technical data/conformity certifi cation Squeegee support wheels Solution/clean water tank Squeegee mounting handwheels Solution/clean water tank fi ller plug with removable fi ller Squeegee balance adjusting handwheel hose Vacuum system motor Recovery water drain hose Vacuum system motor fi...
-
Page 10: Steering Wheel With Control Panel
ENGLISH USER MANUAL STEERING WHEEL WITH CONTROL PANEL Reverse gear activation/deactivation lever Brush/pad-holder deck and squeegee lifting/lowering LED Reverse gear LED indicator indicator Detergent fl ow control switch (*) EcoFlex™ activation/deactivation lever (*) Washing detergent fl ow control switch led indicator (*) EcoFlex™... -
Page 11: Accessories/Options
USER MANUAL ENGLISH ACCESSORIES/OPTIONS In addition to the standard components, the machine can be equipped with the following accessories/options, according to the machine specifi c use: – GEL/AGM batteries – Electronic battery charger – Brushes and cylindrical brushes of different materials –... -
Page 12: Wiring Diagram
ENGLISH USER MANUAL Technical data for machines with cylindrical brush deck Description BR 752C Cylindrical brush size (diameter x length) 145 x 690 mm Weight without batteries and with empty tanks 180 kg Maximum weight with batteries, full tanks and operator (75 kg) (GVW) 451 kg Cylindrical brush motor power 2 x 600 W... - Page 13 USER MANUAL ENGLISH WIRING DIAGRAM (Continues) P100361 BR 652 - BR 752 - BR 752C 9098684000(1)2010-05 A...
-
Page 14: Use
ENGLISH USER MANUAL WARNING! On some points of the machine there are some adhesive plates indicating: – DANGER – WARNING – CAUTION – CONSULTATION While reading this Manual, the operator must pay particular attention to the symbols shown on the plates. Do not cover these plates for any reason and immediately replace them if damaged. -
Page 15: Battery Installation And Battery Type Setting (Wet Or Gel/Agm)
USER MANUAL ENGLISH BATTERY INSTALLATION AND BATTERY TYPE SETTING (WET OR GEL/AGM) Battery installation Open the cover (20) and check that the recovery tank (19) is empty, otherwise empty it with the drain hose (24). Close the cover (20). Carefully lift the tank assembly (44). Install the batteries and connect them according to the diagram (38). -
Page 16: Before Start-Up
ENGLISH USER MANUAL BEFORE START-UP WARNING! At every machine start-up, check that, between the deck (10 and 28) and the machine or between the squeegee (30) and the machine, there is no foreign material which may prevent the deck and the squeegee from lifting. This check is necessary because, if the machine has been turned off without lifting the deck and the squeegee, the deck and the squeegee will lift automatically at next machine start-up. - Page 17 USER MANUAL ENGLISH Cylindrical brush installation/removal (only for BR 752C) Insert the ignition key (58) and turn it to “I”. WARNING! Before pressing the switch (67), always check that, between the deck (28) and the machine there is no foreign material which may prevent the deck from lifting.
- Page 18 ENGLISH USER MANUAL Solution/clean water tank fi lling NOTE If the machine is equipped with EcoFlex™ system (optional) pour clean water in the tank, otherwise pour solution. CAUTION! Use only low-foam and non-fl ammable detergents, intended for automatic scrubber applications. WARNING! When using fl...
-
Page 19: Machine Start And Stop
USER MANUAL ENGLISH MACHINE START AND STOP Starting the machine Prepare the machine as shown in the previous paragraph. Turn the ignition key (58) to “I” without pressing the drive pedal (4). Check if the battery green warning light (62) turns on. If the yellow or red warning light turns on, turn the ignition key (58) back to “0”... -
Page 20: Machine Operation (Scrubbing/Drying)
ENGLISH USER MANUAL MACHINE OPERATION (SCRUBBING/DRYING) Start the machine as shown in the previous paragraph. If necessary, adjust the solution quantity by pressing the switches (59 and 60). If necessary, to reduce the noise, turn on the mute function by pressing the switch (55). NOTE It is suggested to use the mute function only on smooth fl... - Page 21 USER MANUAL ENGLISH EcoFlex™ function Lift the EcoFlex™ lever (D, Fig. 4) whenever a stronger washing power is required. When lifting the lever (D) (LED (E) fl ashing) the solution fl ow increases, the extra pressure function activates and (for machines with EcoFlex™...
-
Page 22: Tank Emptying
ENGLISH USER MANUAL Working with brush/pad-holder extra pressure function turned on (only for BR 652 / BR 752) If the fl oor proves to be particularly diffi cult to clean, it is possible to turn on the brush/pad-holder extra pressure function by pressing the switch (65). -
Page 23: After Using The Machine
USER MANUAL ENGLISH Solution/clean water tank emptying Perform steps 1 to 3. Remove the adapter (45) from its housing inside the battery compartment. Install the adapter (A, Fig. 5) on the squeegee vacuum hose (B), then fasten it to the drain tap (C). Turn the ignition key (58) to “I”... -
Page 24: First Period Of Use
ENGLISH USER MANUAL FIRST PERIOD OF USE After the fi rst 8 hours, check the machine fastening and connecting parts for proper tightening. Check the visible parts for integrity and leakage. MAINTENANCE The lifespan of the machine and its maximum operating safety are ensured by correct and regular maintenance. The following chart provides the scheduled maintenance. -
Page 25: Squeegee Cleaning
USER MANUAL ENGLISH SQUEEGEE CLEANING NOTE The squeegee must be clean and its blades must be in good conditions in order to get a good drying. CAUTION! It is advisable to wear protective gloves when cleaning the squeegee because there may be sharp debris. Drive the machine on a level fl... -
Page 26: Brush/Cylindrical Brush Cleaning
ENGLISH USER MANUAL BRUSH/CYLINDRICAL BRUSH CLEANING CAUTION! It is advisable to wear protective gloves when cleaning the brushes because there may be sharp debris. Remove the brushes/pads from the machine, as shown in Use chapter. Clean and wash the brushes with water and detergent. Check the brush bristles for integrity and wear;... -
Page 27: Side Skirt Check And Replacement (Only For Br 752C)
USER MANUAL ENGLISH SIDE SKIRT CHECK AND REPLACEMENT (ONLY FOR BR 752C) Check Drive the machine on a level fl oor. Turn the ignition key (58) to “0”. On both sides of the machine, loosen the knob (A) and remove the side skirt assemblies (B). Wash and clean the skirt. -
Page 28: Vacuum System Motor Filter Cleaning
ENGLISH USER MANUAL VACUUM SYSTEM MOTOR FILTER CLEANING Drive the machine on a level fl oor. Turn the ignition key (58) to “0”. Open the cover (20) and check that the recovery tank (19) is empty, otherwise empty it with the drain hose (24). Close the cover (20). -
Page 29: Battery Charging
USER MANUAL ENGLISH BATTERY CHARGING NOTE Charge the batteries when the yellow or red warning light (62) turns on, or at the end of every working cycle. CAUTION! Keeping the batteries charged make their life last longer. CAUTION! When the batteries are discharged, charge them as soon as possible, as that condition makes their life shorter. Check for battery charge at least once a week. -
Page 30: Detergent Tank Cleaning
ENGLISH USER MANUAL DETERGENT TANK CLEANING (For machine with EcoFlex™ system) Clean the detergent tank (42) according to the following procedure: Drive the machine to the appointed disposal area. Open the cover (20) and check that the recovery tank (19) is empty, otherwise empty it with the drain hose (24). Close the cover (20). -
Page 31: Safety Functions
USER MANUAL ENGLISH SAFETY FUNCTIONS The machine is equipped with the following safety functions. EMERGENCY PUSH-BUTTON It is located in an easily accessible position (8). Press it fi rmly in case of immediate necessity to stop all machine functions. To reset the machine operation, lift the tank assembly (44) and reconnect the battery connector (9). ANTI-SKID SAFETY SYSTEM This system reduces the speed when turning and when the machine tilts laterally to avoid sudden skids, this increasing the machine stability in any condition. -
Page 32: Troubleshooting
ENGLISH USER MANUAL TROUBLESHOOTING TROUBLE POSSIBLE CAUSE REMEDY The motors do not work; no warning light turns on. The battery connector is disconnected. Connect. The batteries are discharged. Charge the batteries. The machine does not move and the display (71) The machine has been turned on by using the Release the drive pedal. - Page 34 Nilfisk-Advance SpA Registered office: Via F. Turati 16/18, 20121 Milano Administrative office: Strada Comunale della Braglia n° 18 26862 Guardamiglio (Lodi) setting standards Phone: +39 0377 451124 - Fax: +39 0377 51443 www.nilfisk.com...
Need help?
Do you have a question about the ecoflex BR 752 and is the answer not in the manual?
Questions and answers