Table of Contents
Advertisement
Quick Links
One Technology Way • P.O. Box 9106 • Norwood, MA 02062-9106, U.S.A. • Tel: 781.329.4700 • Fax: 781.461.3113 • www.analog.com
Evaluating the AD9081, AD9082, AD9986, or
FEATURES
Fully functional evaluation boards for the AD9081, AD9082,
AD9986, AD9988, AD9207, AD9209, or
PC software for control with
software
On-board clocking provided by the
device and FPGA clocking
Option to switch to external direct clocking
EVALUATION KIT CONTENTS
AD9081-FMCA-EBZ, AD9082-FMCA-EBZ, AD9986-FMCB-EBZ,
or AD9988-FMCB-EBZ evaluation boards
Subminiature push on female (SMP-F) to Subminiature
Version A female (SMA-F) cables (for only the AD908x-
FMCA-EBZ boards)
MicroSD cards
AD-FMC-SDCARD
ADS9V2-UZSD-MXFE
ADDITIONAL HARDWARE NEEDED
ADS9-V2EBZ
FPGA-based data capture board
Signal generator for analog input
Spectrum analyzer (to measure DAC output)
SMA cable
SMA female to female adapter (optional)
Ethernet to USB adapter (optional)
PC with USB port and Ethernet port
Windows 7 or newer operating system
SOFTWARE NEEDED
Analysis, control, evaluate (ACE) software
DPGDownloaderLite software (included in ACE installation)
WinSCP (or similar Telnet software)
DOCUMENTS NEEDED
AD9081, AD9082, AD9986, AD9988, AD9207, AD9209, or
AD9177 data sheet
ADS9-V2EBZ user guide
ACE software documentation
Serial Control Interface Standard (Rev 1.0)
AN-835, Understanding High Speed ADC Testing and
Evaluation
PLEASE SEE THE LAST PAGE FOR AN IMPORTANT
WARNING AND LEGAL TERMS AND CONDITIONS.
EVAL-AD9081/EVAL-AD9082/EVAL-AD9986/EVAL-AD9988
AD9177
analysis, control, evaluate (ACE)
HMC7044
manages
AD9988
Transceiver
GENERAL DESCRIPTION
This user guide describes the AD9081-FMCA-EBZ, AD9082-
FMCA-EBZ, AD9986-FMCB-EBZ, and AD9988-FMCB-EBZ
evaluation boards, which provide all of the support circuitry
required to operate the AD9081, AD9082, AD9986, AD9988,
AD9207, AD9209, or AD9177 in their various modes and
configurations. The application software used to interface with
the devices is also described. These evaluation boards connect
to the Analog Devices, Inc., ADS9-V2EBZ for evaluation with
the ACE software.
These evaluation boards can also interface to commercially
available field-programmable gate array (FPGA) development
boards from Xilinx® or Intel®. Information on how to use these
platforms to evaluate the AD9081 or the AD9082 is available in
the Using the AD-FMC-SDCARD section.
The ACE software allows the user to set up the MxFE® in
various modes and to capture analog-to-digital converter
(ADC) data for analysis. The DPGDownloaderLite software
(included in ACE installation) generates and transmits vectors
to the digital-to-analog converters (DACs), which can then be
sent to a spectrum analyzer for further analysis.
For additional information, see the AD9081, AD9082, AD9986,
AD9988, AD9207, AD9209, or AD9177 data sheets and the
UG-1578, the device user guide, which must be consulted in
conjunction with this user guide when using the evaluation
boards.
Rev. 0 | Page 1 of 26
Mixed Signal, Front-End RF
User Guide
UG-1829
Advertisement
Table of Contents

Subscribe to Our Youtube Channel
Related Manuals for Analog Devices EVAL-AD9081


Summary of Contents for Analog Devices EVAL-AD9081
-
Page 1: Features
The application software used to interface with Option to switch to external direct clocking the devices is also described. These evaluation boards connect EVALUATION KIT CONTENTS to the Analog Devices, Inc., ADS9-V2EBZ for evaluation with the ACE software. AD9081-FMCA-EBZ, AD9082-FMCA-EBZ, AD9986-FMCB-EBZ, or AD9988-FMCB-EBZ evaluation boards... -
Page 2: Table Of Contents
UG-1829 EVAL-AD9081/EVAL-AD9082/EVAL-AD9986/EVAL-AD9988 User Guide TABLE OF CONTENTS Features ....................1 Default Clocking Scheme for AD9082-FMCA-EBZ, AD9081- FMCA-EBZ, AD9986-FMCB-EBZ, or AD9988-FMCB-EBZ .. 11 Evaluation Kit Contents ..............1 Set Up the Instrumentation ............12 Additional Hardware Needed ............1 Using the AD9081, AD9082, AD9986, or AD9988 Board View ... -
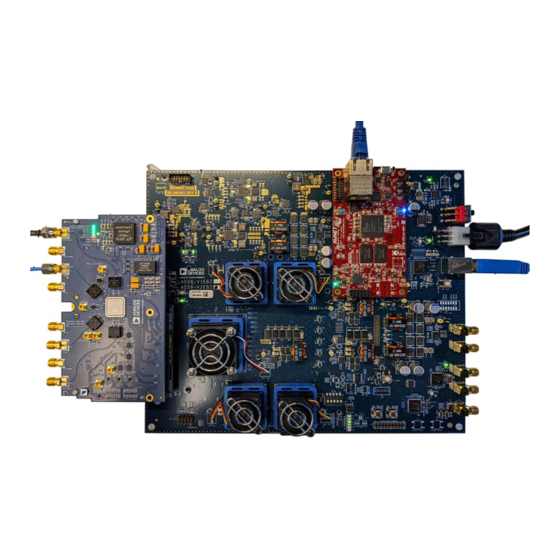
Page 3: Evaluation Board Photographs
EVAL-AD9081/EVAL-AD9082/EVAL-AD9986/EVAL-AD9988 User Guide UG-1829 EVALUATION BOARD PHOTOGRAPHS ADC3/ ADC2/ ADC3/ ADC2/ ADC1 DAC3 DAC2 DAC1 DAC0 ADC0 ADC1 ADC1 DAC3 DAC2 EXT_CLK DAC1 DAC0 ADC0 ADC0 EXT_CLK AD9082/ POWER DELIVERY AD9988/ AD9081 POWER DELIVERY AD9986 Figure 1. AD9082-FMCA-EBZ/AD9081-FMCA-EBZ Top Image Figure 3. -
Page 4: Evaluation Board Overview
UG-1829 EVAL-AD9081/EVAL-AD9082/EVAL-AD9986/EVAL-AD9988 User Guide EVALUATION BOARD OVERVIEW BOARD MODELS EVALUATION BOARD CONNECTION OVERVIEW The different board models are all listed in Table 1. Figure 5 shows the basic hardware setup required to evaluate the AD9081, AD9082, AD9986, or AD9988. Note that the Certain early revisions of the evaluation boards shipped with a AD9082-FMCA-EBZ is shown in Figure 5 as an example. -
Page 5: Installation Of Heat Sink With Integrated Fan
EVAL-AD9081/EVAL-AD9082/EVAL-AD9986/EVAL-AD9988 User Guide UG-1829 INSTALLATION OF HEAT SINK WITH INTEGRATED FAN A heat sink (with integrated fan) is shipped with each Additional information on the Advanced Thermal Solutions evaluation board for active cooling of the IC. Note that the fanSink™ product can be found on the website of the company. -
Page 6: Evaluation Board Software
To install the plugin from the web, take the following steps: Ensure that the ACE software is installed. From the ACE software page on the Analog Devices, Inc., website (www.analog.com/ace), navigate to the ACE Evaluation Board Plug-ins section and search for the device to evaluate (see Figure 11). -
Page 7: Introduction To The Ad9081, Ad9082, Ad9986, Or Ad9988 Plugin
EVAL-AD9081/EVAL-AD9082/EVAL-AD9986/EVAL-AD9988 User Guide UG-1829 Board View INTRODUCTION TO THE AD9081, AD9082, AD9986, OR AD9988 PLUGIN Double-clicking the evaluation board icon in the Attached Hardware section in the ACE software opens the board view The AD9081, AD9082, AD9986, or AD9988 plugin allows the corresponding to the connected evaluation board. - Page 8 UG-1829 EVAL-AD9081/EVAL-AD9082/EVAL-AD9986/EVAL-AD9988 User Guide Chip View AD9988 beyond the functions available in the board view. Use the QUICK CONFIGURATION pane in the chip view if using Double-clicking the AD9081, AD9082, AD9986, or AD9988 a direct external clock. Figure 14 shows the details of the chip icon in the board view opens the chip view.
-
Page 9: Setting Up The Microzed Connection
EVAL-AD9081/EVAL-AD9082/EVAL-AD9986/EVAL-AD9988 User Guide UG-1829 SETTING UP THE MicroZed CONNECTION Before performing the evaluation of the AD9081, AD9082, CONFIGURE THE NETWORK INTERFACE TO THE AD9986, or AD9988, the Ethernet interface to the MicroZed™ MicroZed BOARD board must be set up by configuring the network interface To configure the network interface to the MicroZed board, take between the PC and the MicroZed board. - Page 10 UG-1829 EVAL-AD9081/EVAL-AD9082/EVAL-AD9986/EVAL-AD9988 User Guide Figure 17. Internet Protocol Settings Rev. 0 | Page 10 of 26...
-
Page 11: Evaluation Board Hardware Setup
EVAL-AD9081/EVAL-AD9082/EVAL-AD9986/EVAL-AD9988 User Guide UG-1829 EVALUATION BOARD HARDWARE SETUP AD9986, or AD9988. The HMC7044 provides the reference DETERMINE THE CLOCK SOURCE input to the chip. The evaluation board provides all the necessary Determine whether the AD9081-FMCA-EBZ, AD9082-FMCA- clocks for conducting a quick evaluation of the device, including... -
Page 12: Set Up The Instrumentation
CRYSTAL OSCILLATOR Figure 20. Default Clocking Scheme Used for the AD9081, AD9082, AD9986, or AD9988 Evaluation Board Analog Devices recommends the coaxial, 48.0 in. (1.2 m or SET UP THE INSTRUMENTATION 4.0 ft), RG316 DS, SMA to SMA, male to male cable assembly... -
Page 13: Using The Ad9081, Ad9082, Ad9986, Or Ad9988 Board View
EVAL-AD9081/EVAL-AD9082/EVAL-AD9986/EVAL-AD9988 User Guide UG-1829 USING THE AD9081, AD9082, AD9986, OR AD9988 BOARD VIEW The board view allows the user to quickly set up the AD9081, USE CASES AD9082, AD9986, or AD9988 to a predetermined use case for The use cases in Table 2, Table 3, Table 4, and Table 5 are evaluation. - Page 14 UG-1829 EVAL-AD9081/EVAL-AD9082/EVAL-AD9986/EVAL-AD9988 User Guide Clock JESD204x (GHz) Mode Interpolation Decimation Data Data Link Line Rate No. of Tx Rate No. of Rx Rate JESD204x Description Coarse Fine Coarse Fine (MSPS) Channels (MSPS) Channels (Gbps/lane) Protocol AD9209 Full 4000 24.75 Bandwidth...
- Page 15 EVAL-AD9081/EVAL-AD9082/EVAL-AD9986/EVAL-AD9988 User Guide UG-1829 In Table 4, N/A means not applicable. Table 4. Use Cases for AD9082-FMCA-EBZ Board View (Uses 100 MHz On-Board Crystal Oscillator, all single link) Clock JESD204x (GHz) Mode Interpolation Decimation Data Data Link Line Rate No. of Tx Rate No.
- Page 16 UG-1829 EVAL-AD9081/EVAL-AD9082/EVAL-AD9986/EVAL-AD9988 User Guide In Table 5, N/A means not applicable. Table 5. Use Cases for AD9986-FMCBA-EBZ Board View (Uses 122.88 MHz On-Board Crystal Oscillator, All Single Link) JESD204x Tx Data Rx Data Link Line Clock (GHz) Mode Interpolation Decimation Rate No.
-
Page 17: Setting Up The Ad9081, Ad9082, Ad9986, Or Ad9988 In Full Bandwidth Mode
EVAL-AD9081/EVAL-AD9082/EVAL-AD9986/EVAL-AD9988 User Guide UG-1829 SETTING UP THE AD9081, AD9082, AD9986, OR AD9988 IN FULL BANDWIDTH MODE Set up the evaluation board as explained in the Evaluation Board Hardware Setup section. Open the board view. This section uses the evaluation board in its default configuration with... - Page 18 UG-1829 EVAL-AD9081/EVAL-AD9082/EVAL-AD9986/EVAL-AD9988 User Guide Figure 24. Additional Controls Including Analysis Features Rev. 0 | Page 18 of 26...
-
Page 19: Adc Analysis And Dac Output Setup
EVAL-AD9081/EVAL-AD9082/EVAL-AD9986/EVAL-AD9988 User Guide UG-1829 ADC ANALYSIS AND DAC OUTPUT SETUP This section explains how to use for analysis of ADC data Analysis button in the AD9081, AD9082, AD9986, or AD9988 and DPGDownloaderLite (included in ACE installation) for chip view. Set up a signal generator with a single-tone sinusoid at sending waveforms out the DAC channels. -
Page 20: Dac Waveform Generation Using Dpgdownloaderlite Software
UG-1829 EVAL-AD9081/EVAL-AD9082/EVAL-AD9986/EVAL-AD9988 User Guide DAC WAVEFORM GENERATION USING matching the hardware used. Ensure AD9081, AD9082, AD9986, or AD9988 is selected under Eval Board (AD9082 is shown in DPGDownloaderLITE SOFTWARE Figure 26). To generate a waveform using the DPGDownloaderLite software, Next, select Single Tone from Add Generated Waveform (see open DPGDownloaderLite (Start >... - Page 21 EVAL-AD9081/EVAL-AD9082/EVAL-AD9986/EVAL-AD9988 User Guide UG-1829 Then, in the DPGDownloaderLite software, follow these steps: Then, connect the DAC0 or DAC1 output to a spectrum analyzer. A 1.85 GHz single tone appears on the spectrum At the top of the window, enter or verify the following data analyzer as shown in Figure 27.
-
Page 22: Using The Ad9081, Ad9082, Ad9986, Or Ad9988 Chip View
UG-1829 EVAL-AD9081/EVAL-AD9082/EVAL-AD9986/EVAL-AD9988 User Guide USING THE AD9081, AD9082, AD9986, OR AD9988 CHIP VIEW The chip view enables the user to customize the AD9081, Set the reference clock signal generator to 750 MHz with AD9082, AD9986, or AD9988 beyond the functions available in an amplitude set to 5 dBm. - Page 23 EVAL-AD9081/EVAL-AD9082/EVAL-AD9986/EVAL-AD9988 User Guide UG-1829 Select the options for the other sections (TX Link Click the Proceed to Analysis button for further analysis. Configuration, Rx Link Configuration, and Clock See the ADC Analysis and DAC Output Setup section and the Configuration) in the QUICK CONFIGURATION pane Additional Use Cases and Customization section for more as shown in Figure 31.
-
Page 24: Additional Features
(to use the microSD card in an SD card slot), preformatted with UZSD-MXFE microSD Card. More information is available in an Analog Devices supported Linux image on it, which can be the documentation supplied with the application programming used for development and prototyping with the AD9081-FMCA- interface (API) framework. -
Page 25: Troubleshooting Tips
EVAL-AD9081/EVAL-AD9082/EVAL-AD9986/EVAL-AD9988 User Guide UG-1829 TROUBLESHOOTING TIPS EVALUATION BOARD FUNCTIONING If the evaluation board is not functioning properly, take the following steps: Ensure that the evaluation board is properly seated in the FMC connector. After has programmed the FPGA, power is provided to the evaluation board for the AD908x-FMCA-EBZ board. -
Page 26: Hmc7044 Configuration Error
By using the evaluation board discussed herein (together with any tools, components documentation or support materials, the “Evaluation Board”), you are agreeing to be bound by the terms and conditions set forth below (“Agreement”) unless you have purchased the Evaluation Board, in which case the Analog Devices Standard Terms and Conditions of Sale shall govern. Do not use the Evaluation Board until you have read and agreed to the Agreement.
Need help?
Do you have a question about the EVAL-AD9081 and is the answer not in the manual?
Questions and answers