Reolink Go PT Plus - 2K 4MP Wireless 4G PT Camera Manual
- User manual (104 pages) ,
- Operational instruction (49 pages) ,
- Quick start manual (12 pages)
Advertisement
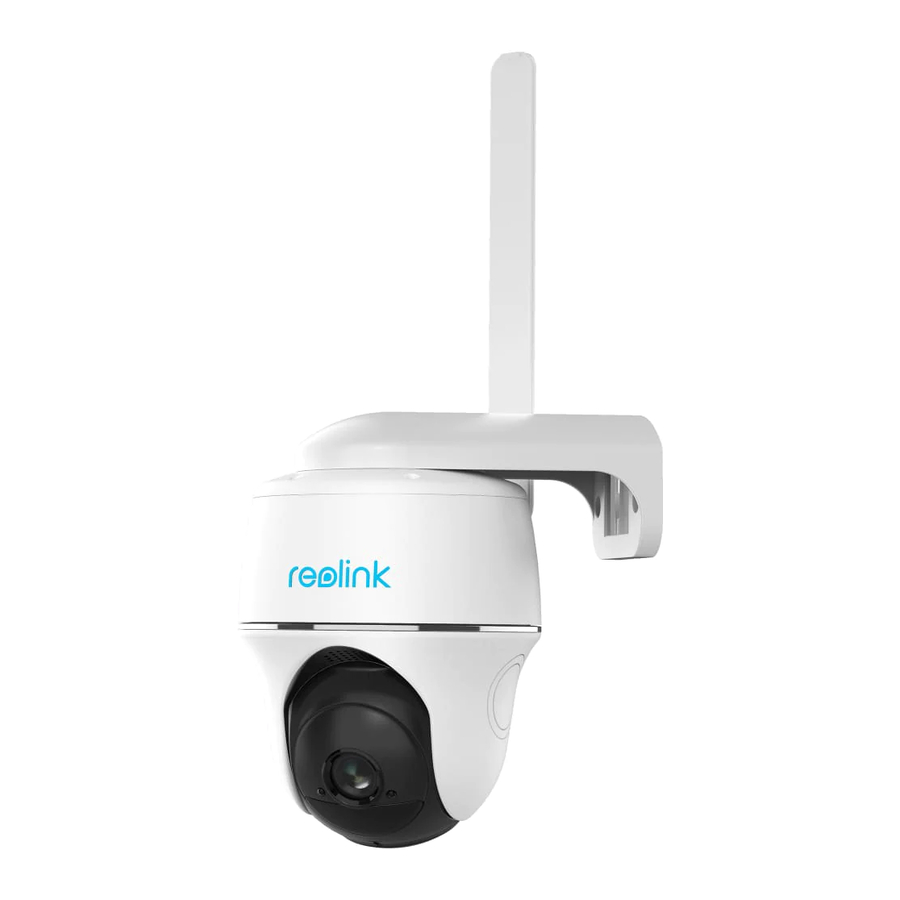
Go PT Plus
Reolink Go PT Plus is a 100% wire-free outdoor surveillance camera that runs on 4G LTE and 3G networks. No WiFi needed. No wiring hassles. With an ultra-wide viewing angle of 355° pan & 140° tilt, it can be a perfect security solution for large areas warehouses, woods, etc.!
Specs

| 1 | Speaker |
| 2 | 6 IR LEDs |
| 3 | Status LED |
| 4 | Built-in PIR Sensor |
| 5 | Built-in Mic |
| 6 | Lens |
| 7 | Daylight Sensor |

| 1 | Antenna |
| 2 | Battery Status LED |
| 3 | Micro USB Port |
| 4 | Power Switch |
| 5 | Reset Hole |
| 6 | Nano SIM Card Slot |
| 7 | microSD Card Slot |
Status Light
Note:
If the camera connects the network successfully, there will be no status LED light up during idle mode.
| Status Light | Camera Status |
| Red LED solid light up then starts to flash | Camera cannot recognize the SIM card or there is PIN code of the SIM card. |
| Red LED solid light up then flash slowly about once every second | Camera cannot register the mobile carrier network. |
| Red LED solid light up then flash quickly about 3 times in 1s | Data call failed or requires to input the APN. |
| Red LED solid light up then blue LED starts to flash and goes off completely | Network connection failed. |
| Red LED solid light up then blue LED starts to flash and solid light up | Network connection succeed. |
Setup and Install
Set up the Camera
What's in the Box
Note: The package content may vary and update with different version and platforms, please take the below information only for a reference. And the actual package content are subject to the latest information on the product selling page.

Activate the SIM Card for the Camera
The SIM card shall support WCDMA and FDD LTE.
Activate the card on your smartphone or with your network carrier before inserting it into the camera.
Notes:
- Some SIM cards have a PIN code, please use your smartphone to disable the PIN first.
- Do not insert the IoT or M2M SIM card into your smartphone.
Install the SIM Card
- Rotate the camera lens, and remove the rubber cover.

- Insert the SIM card.

- With these done, press the rubber cover firmly for better waterproof performance.


Notes:
- The SIM card slot is above the SD card slot. When inserting the SIM card in, remember that the gold contacts shall face down and you need to push the trimmed corner inside the camera.
- The SD card slot is below the SIM card slot. When inserting the SD card in, remember that gold contacts shall face up.
Connect to the Mobile Carrier Network
- With the SIM card inserted, you can turn on the camera.

- Wait a few seconds and a red light will be on and solid for a couple of seconds. Then, it will go out.

- A blue LED will flash for a few seconds and then go solid before going out. You will hear a voice prompt "Network connection succeeded", which means the camera has been successfully connected to the network.


Note:
You may also run into the following situations:
| No. | Voice Prompts | Camera Status | Solutions |
| 1 | "SIM card cannot be recognized" | Camera cannot recognize this SIM card. |
|
| 2 | "The SIM card is locked with a PIN. Please disable it" | Camera cannot recognize this SIM card. | Put the SIM card into your mobile phone and disable the PIN. |
| 3 | "Not registered on network. Please activate your SIM card and check the signal strength" | Camera fails to register to the operator network. |
|
| 4 | "Network connection failed" | Camera fails to connect to the server. | The camera will be in standby mode and reconnect later. |
| 5 | "Data call failed. Please confirm your cellular data plan is available or import the APN settings" | The SIM card has run out of data or APN settings are not correct. |
|
Set up the Camera on the App
Please follow the steps below to do initial setup for the battery-powered cameras via Reolink App.
Step 1. Tap the icon![]() in the top right corner to add the camera.
in the top right corner to add the camera.
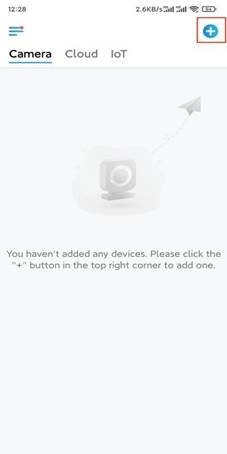
Step 2. Scan the QR code on the back of the camera. If the phone doesn't respond, please tap Input UID/IP below the scan window, and then enter the 16-digit UID number under the QR code of the camera.

Step 3. Create the login password and name your camera. Then tap Next.

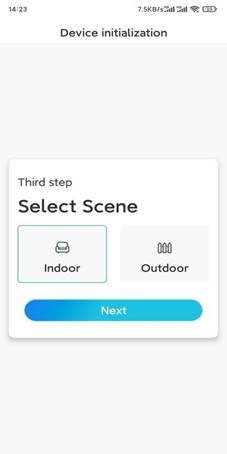
Step 4. Select a scene according to the place where your camera will be installed. Then tap Next.
Step 5. Read the note and then tap Finish to complete the initialization of your camera.

Now the initialization is finished and you can move it to the position you want. Here is an article to choose a good position for the camera.
Install the Camera
We offer you guides on three different scenes in which the camera could be installed. Check out them respectively.
Mount the Camera to the Wall
Step 1. Drill holes in accordance with the mounting hole template and screw the security mount to the wall.

Note: Use the drywall anchors included in the package if needed.
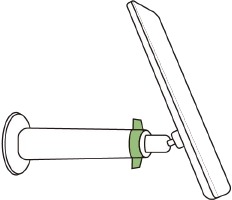
Step 2. Screw the antenna to the camera.

Note: In order to get a better network connection, it is recommended to install the antenna upward or horizontally.
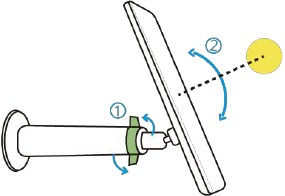
Step 3. Screw the camera to the security mount and adjust to the proper direction.

Mount the Camera to the Ceiling
Step 1. Pull the button on the security mount and unscrew the bracket to separate the two parts.

Step 2. Install the bracket base on the ceiling with screws.

Step 3. Align the camera with the bracket and turn the camera unit clockwise to lock it in position.

Install the Camera with Loop Strap
You are allowed to strap the camera to a tree with both the security mount and ceiling bracket. Thread the provided strap through the slots of the plate and fasten it to a tree. Next, attach the camera to the plate as you have done in the previous two methods.

Done! You've installed the Go PT Plus successfully.
Note: The best way to install the camera is to install it upside down in order to prevent water from flowing into the microphone hole.
Reolink Solar Panel (Optional)
Reolink Solar Panels are specially designed to charge Reolink battery-powered cameras, converting sunlight into electricity, which is is both cost-effective and environmentally friendly. The more and stronger light that hits the solar panel, the more electricity it produces.
Specs
Physical Parameters
Size: 185.4 x 120.4 x 6.5mm
Cable Length: 4 Meters
Weight: 280g
General
Charging Temperature: 0°C to 45°C (32°F to 113°F)
Operating Temperature: -10°C to 55°C (14°F to 131°F)
Weather Resistance: IP65 certified weatherproof
Max Output Voltage: 6V; Standard Working Voltage: 6V ± 0.3V
Max Current: 530MA
Install the Solar Panel
What's in the Box
Solar Panel ×1
Bracket ×1
Screws (in pack) ×1
Mounting Template ×1
Note: The package content may vary and update with different version and platforms, please take the below information only for a reference. And the actual package content are subject to the latest information on the product selling page.
Install the solar panel
Step 1. Please choose a location for your solar panel that gets the most sunlight throughout the year. The Reolink solar panel needs only a few hours of direct sunlight to sufficiently power up your camera daily. The amount of energy that the solar panel can produce is affected by weather conditions, seasonal changes, geographic locations, etc.

Step 2. Mount the bracket with the mounting template and the screws provided in the package.

Step 3. Slot the solar panel into the bracket and make sure it's secure.
Step 4. Loosen the adjustment knob on the bracket, and adjust the angle of the solar panel to receive the most direct sunlight. Then re-tighten the adjustment knob to secure the panel.
Step 5. Connect the solar panel to the camera with the micro USB cable

Notes:
- Make sure the solar panel is not blocked. The energy harvesting efficiency drops drastically even when a small portion of the solar panel is blocked.
- Please don't install the solar panel completely horizontally. Otherwise your solar panel might accumulate dust and other debris easily. It's advised to install the solar panel angularly to receive the most direct sunlight.
- Wipe the solar panel regularly to remove dust or debris.
- Please charge the batteries in temperature between 0°C and 45°C (32-113°F). The solar panel won't charge the camera at temperatures below 0°C (32°F).
- Make sure the camera is plugged in all the way and that the waterproof wire cover protects the interface between the camera and the solar panel.


Documents / Resources
References
Download manual
Here you can download full pdf version of manual, it may contain additional safety instructions, warranty information, FCC rules, etc.
Download Reolink Go PT Plus - 2K 4MP Wireless 4G PT Camera Manual
Advertisement


Need help?
Do you have a question about the Go PT Plus and is the answer not in the manual?
Questions and answers