Reolink Argus PT Ultra - Smart 4K 8MP Pan & Tilt Camera Manual
- Quick start manual (9 pages) ,
- Operational instruction (42 pages)
Advertisement
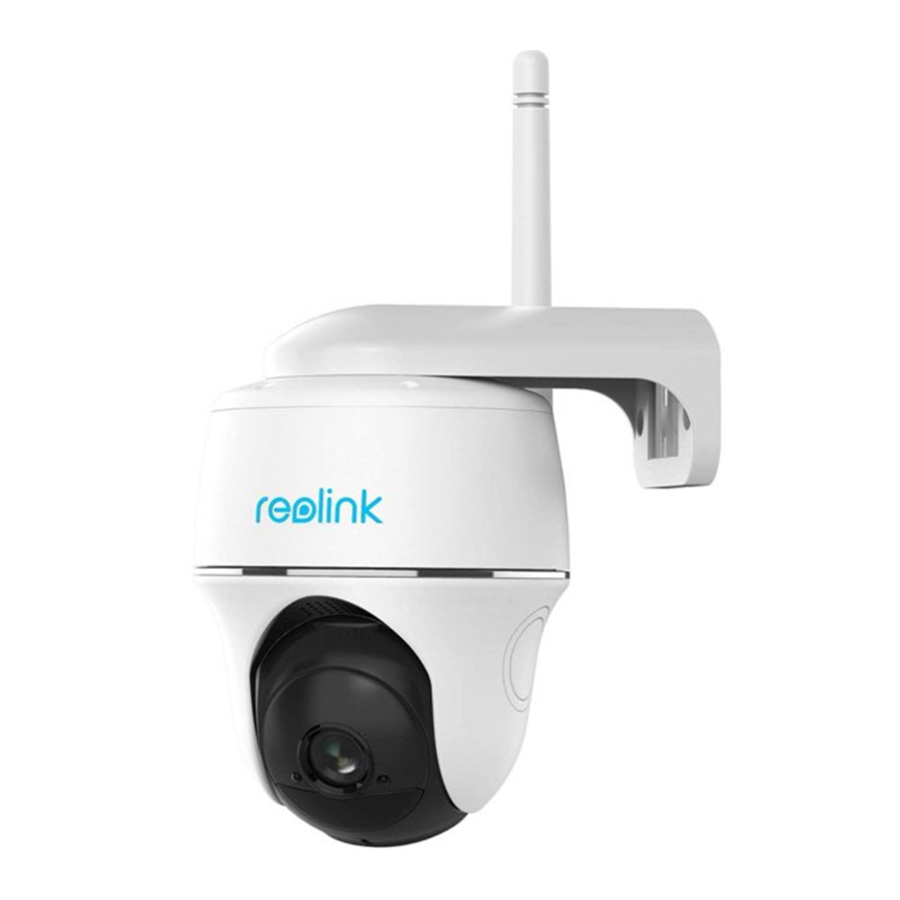
Argus PT Ultra, with 4K Ultra HD resolution, the camera offers you sharper images. See more details of your properties whether you're watching the live view or the playback. Besides having an ultra-high resolution, the camera can also pan 355° and tilt 140° to help you see more corners easily.
Specs

| 1 | Speaker |
| 2 | Lens |
| 3 | Spotlight |
| 4 | Daylight Sensor |
| 5 | IR LEDs |
| 6 | Status LED |
| 7 | Built-in PIR Sensor |
| 8 | Built-in Mic |

| 1 | Antenna |
| 2 | USB-C Port |
| 3 | Power Switch |
| 4 | Micro SD Card Slot |
| 5 | Reset Hole |
Status Light
| Status Light | Camera Status |
| Red light | Wi-Fi connection failed |
| Blue light | Wi-Fi connection succeeded |
| Blinking | Standby status |
| On | Working status |
Setup and Install
Set up the Camera
What's in the Box
Note: The package content may vary and update with different version and platforms, please take the below information only for a reference. And the actual package content are subject to the latest information on the product selling page.
Argus PT 4K

Set up the Camera on the App
Please follow the steps below to do initial setup for the battery-powered cameras via Reolink App.
Step 1. Power on the camera. Remember to turn on the power switch on the camera before initial setup except for Argus 2 and Argus Pro. After a startup sound, you will hear a repeated Ding sound or a voice prompt.
Note: The voice prompt you will hear may be "Welcome to Reolink, please install Reolink app and scan the QR code on the camera" in multilingual versions, or "please run Reolink app, add the camera and set it up".
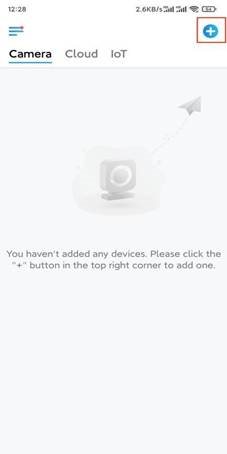
Step 2. Tap the icon ![]() in the top right corner to start the initial setup.
in the top right corner to start the initial setup.
Step 3. Scan the QR code on the back of the camera. You may tap Light to enable a flashlight when setting up the camera in a dark environment. If the phone doesn't respond, please tap Input UID/IP and then manually type in the UID (16-digit characters under the QR code of the camera). Then click Next.

Step 4. Select Wi-Fi Not Configured. If you hear a voice prompt played by the camera, please tick correspondingly and then tap Next.

Step 5. Enter the WiFi password of the selected WiFi network (you may tap the right eye icon to see and double-check the password) and tap Next.

Note: Argus 2E only supports the WiFi frequency of 2.4GHz.
Step 6. Tap Scan Now. Place the QR code on your phone in front of the camera's lens at a distance of about 20 cm (8 inches) and let the camera scan the QR code. Tick correspondingly and tap Next.

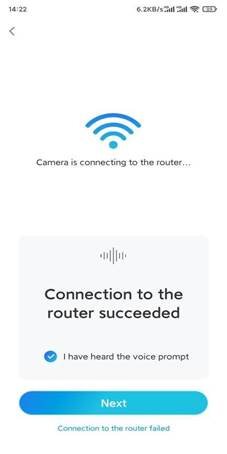
Step 7. Wait around 60 seconds for the camera to connect to the router. After hearing "connection to the router succeeded", tick correspondingly and tap Next.
Step 8. Create a login password and then name your camera.

Step 9. Read the note below and then tap Finish to complete the initialization of your camera.

Once the initial setup is completed, you may choose a good position to mount your camera.
Install the Camera
We offer you guides on three different scenes in which the camera could be installed. Check out them respectively.
Mount the Camera to the Wall
Step 1. Drill holes in accordance with the mounting hole template and screw the security mount to the wall.

Note: Use the drywall anchors included in the package if needed.
Step 2. Screw the antenna to the camera.

Note: In order to get a better network connection, it is recommended to install the antenna upward or horizontally.
Step 3. Screw the camera to the security mount and adjust to the proper direction.

Mount the Camera to the Ceiling
Step 1. Pull the button on the security mount and unscrew the bracket to separate the two parts.

Step 2. Install the bracket base on the ceiling with screws.

Step 3. Align the camera with the bracket and turn the camera unit clockwise to lock it in position.

Install the Camera with Loop Strap
You are allowed to strap the camera to a tree with both the security mount and ceiling bracket. Thread the provided strap through the slots of the plate and fasten it to a tree. Next, attach the camera to the plate as you have done in the previous two methods.

Done! You've installed the Argus PT successfully.
Note: The best way to install the camera is to install it upside down in order to prevent water from flowing into the microphone hole.
Documents / Resources
References
Download manual
Here you can download full pdf version of manual, it may contain additional safety instructions, warranty information, FCC rules, etc.
Download Reolink Argus PT Ultra - Smart 4K 8MP Pan & Tilt Camera Manual
Advertisement


Need help?
Do you have a question about the Argus PT Ultra and is the answer not in the manual?
Questions and answers