Table of Contents
Advertisement
Available languages
Available languages
Quick Links
Technical Support
If you need any technical help, please visit our official support site and contact our
support team before returning the products, https://support.reolink.com.
Technische Unterstützung
Wenn Sie Hilfe brauchen, kontaktieren Sie bitte Reolink Support Team zuerst, bevor Sie
Ihre Bestellung zurücksenden. Meiste Fragen oder Probleme können von unserem Online
Support Center beantwortet und gelöst werden: https://support.reolink.com.
Support technique
Si vous avez besoin d'aide, veuillez contacter Reolink avant de retourner votre produit.
La plupart des questions peuvent être répondues via notre centre de support en ligne à
l'adresse https://support.reolink.com.
Supporto Tecnico
Se avete bisogno di aiuto, le chiediamo gentilmente di contattare Reolink prima di
restituire il prodotto.La maggior parte delle domande può essere risolta tramite il nostro
centro di assistenza online all'indirizzo https://support.reolink.com.
Soporte técnico
Si necesita ayuda, comuníquese con Reolink antes de devolver su producto. La mayoría
de las preguntas se pueden responder a través de nuestro centro de soporte en línea en
https://support.reolink.com.
REOLINK INNOVATION LIMITED
FLAT/RM 705 7/F FA YUEN COMMERCIAL BUILDING 75-77 FA YUEN STREET MONG KOK KL
HONG KONG
Product Ident GmbH
EU REP
Hoferstasse 9B, 71636 Ludwigsburg, Germany
Email: prodsg@libelleconsulting.com
APEX CE SPECIALISTS LIMITED
UK REP
Addr.: 89 Princess Street, Manchester, M14HT, UK
Email: info@apex-ce.com
J u l y 2 02 1
Q S G 1 _ A
58 . 03 . 0 0 1 . 02 3 0
Operational Instruction
Apply to: Reolink Duo PoE / WiFi
@ R e o l i n kTe c h
h t t p s ://re o l i n k . c o m
E N/D E /FR /I T/E S
Advertisement
Table of Contents

Related Manuals for Reolink Duo PoE


Summary of Contents for Reolink Duo PoE
- Page 1 Technische Unterstützung Wenn Sie Hilfe brauchen, kontaktieren Sie bitte Reolink Support Team zuerst, bevor Sie Ihre Bestellung zurücksenden. Meiste Fragen oder Probleme können von unserem Online Support Center beantwortet und gelöst werden: https://support.reolink.com.
-
Page 2: What's In The Box
Content What's in the Box What's in the Box Camera Introduction Camera Antenna * Waterproof Lid Power Adapter * Connection Diagram Set up the Camera Mount the Camera Power * Mounting Plate Mounting Hole Troubleshooting Ethernet Cable Extension Cable Template Specification Notification of Compliance Quick Start Guide... -
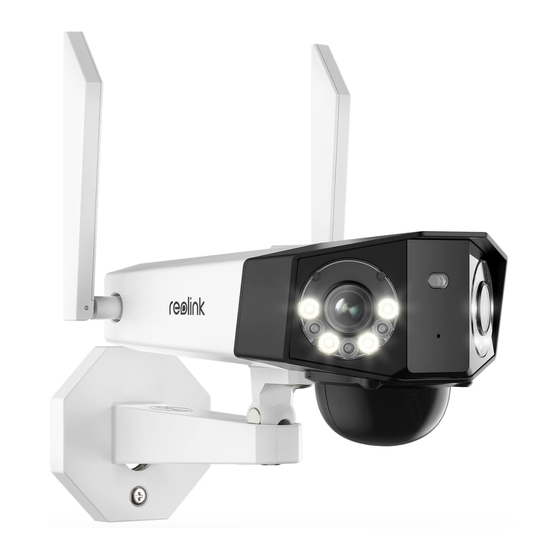
Page 3: Camera Introduction
Camera Introduction WiFi Camera Antenna Micro SD Card Slot Daylight Sensor Reset Button *Press the reset button with a pin to restore factory settings. Lens Spotlights Infrared Lights Speaker Mounting Bracket Waterproof Lid Ethernet Port Power Port English English... - Page 4 PoE Camera Daylight Sensor Micro SD Card Slot Lens Reset Button *Press the reset button with a pin to restore factory settings. Spotlights Infrared Lights Mounting Bracket Speaker Waterproof Lid Ethernet Port Power Port NOTE: Actual camera appearance and components are subject to the model you purchased. English English...
-
Page 5: Connection Diagram
Before initial setup, follow the steps below to connect your camera. Download and Launch the Reolink App or Client software, and follow the onscreen 1. Connect the camera to a LAN port on your router with an Ethernet cable. instructions to finish initial setup. 2. Use the power adapter to power on the camera. • On Smartphone Camera Power Adapter Scan to download the Reolink App. Router • On PC Download path of the Reolink Client: Go to https://reolink.com > Support > App & Client. Power Cable Network Cable NOTE: • When setting up the WiFi camera, you need to follow the onscreen instructions to finish the... -
Page 6: Mount The Camera
Mount the Camera Mount the Camera to the Wall The following installation methods take the WiFi camera as an example and also apply to Installation Tips the PoE camera. • Do not face the camera towards any light sources. • Do not point the camera towards a glass window. Or, it may result in poor image quality because of the window glare by infrared LEDs, ambient lights or status lights. • Do not place the camera in a shaded area and point it towards a well-lit area. Or, it may result in poor image quality. To ensure best image quality, the lighting condition for both the camera and the capture object shall be the same. • To ensure better image quality, it’s recommended to clean the lens with a soft cloth from time to time. • Make sure the power ports are not directly exposed to water or moisture and not blocked by dirt or other elements. • With IP waterproof ratings, the camera can work properly under conditions like rain and snow. However, it doesn't mean the camera can work underwater. • Do not install the camera at places where rain and snow can hit the lens directly. Drill holes in accordance with the mounting template, Secure the mounting plate to the wall • The camera may work in extreme cold conditions as low as -25°C. Because when it is with the upper two screws and hang the camera on it. Then lock the camera in position powered on, the camera will produce heat. You may power on the camera indoors for a few with the lower screw. - Page 7 Mount the Camera to Ceiling To get the best field of view, loosen the adjustment screw on security mount and turn the camera. Drill holes in accordance with the mounting template, Secure the mounting plate to the wall Stiffen the adjustment with the upper two screws and hang the camera on it. Then lock the camera in position screw to lock the with the lower screw. camera. English English...
-
Page 8: Troubleshooting
Troubleshooting • Power on the camera with another working 12V 2A DC adapter and see if it works. To get the best field Camera is not Powering on of view, loosen the If these won’t work, contact Reolink adjustment screw on Support. If your camera is not powering on, please security mount and try the following solutions: turn the camera. Picture is not Clear For PoE Camera If the picture from the camera is not clear, • Make sure your camera is powered on please try the following solutions: properly. The PoE camera should be powered by a PoE switch/injector, a • Check the camera lens for dirt, dust or Reolink NVR or a 12V power adapter. spiderwebs, please clean the lens with a • If the camera is connected to a PoE... -
Page 9: Specification
General in a particular installation.If this equipment (2) this device must accept any does cause harmful interference to radio Simplified EU Declaration interference received, including Dimension: 195 x 103 x 56mm or television, reception, which can be of Conformity interference that may cause undesired Weight: 590g determined by turning the equipment off operation. Changes or modifications not Operating Temperature: and on, the user is encouraged to try to Reolink declares that the WiFi camera is in expressly approved by the party -10°C~+55°C (14°F~131°F) correct the interference by one or more of compliance with the essential requirements responsible for compliance could void the Operating Humidity: 10% ~ 90% the following measures: and other relevant provisions of Directive user’s authority to operate the equipment. 2014/53/EU, the PoE camera is in For more specifications, visit • Reorient or relocate the receiving compliance with Directive 2014/30/EU. https://reolink.com/. antenna. NOTE: The following notes are only for • Increase the separation between the WiFi camera. This equipment has been... - Page 10 To prevent possible harm to the should be installed and operated with Terms and Privacy environment or human health from minimum distance 20cm between the uncontrolled waste disposal, recycle it radiator & your body. Use of the product is subject to your responsibly to promote the sustainable agreement to the Terms of Service and reuse of material resources. To return your Privacy Policy at reolink.com. Keep out of OPERATING FREQUENCY (For WiFi Version) used device, please use the return and reach of children. (the maximum transmitted power) collection systems or contact the retailer where the product was purchased. They 2412MHz --- 2472MHz (19dBm) can take this product for environmentally End User License Agreement 5150MHz --- 5350MHz (18dBm) safe recycling.
- Page 11 Überblick Lieferumfang Lieferumfang Einführung in die Kamera Kamera Antenne * Wasserfester Deckel Netzteil * Anschluss-Diagramm Kamera-Einrichtung Kamera-Installation Strom- Montageplatte Lochschablone Fehlerbehebung Ethernet-Kabel Verlängerungskabel * zur Montage Spezifikationen Konformitätserklärung Kurzanleitung Videoüberwachung Päckchen mit Schraubendreher Schrauben HINWEIS: * Das Netzteil, die Antennen und das 4,5 m lange Stromverlängerungskabel sind nur im Lieferumfang der WLAN-Kamera enthalten. * Die Anzahl des Zubehörs variiert je nach dem von Ihnen gekauften Kameramodell. Deutsch Deutsch...
- Page 12 Einführung in die Kamera WLAN-Kamera Antenne MicroSD-Kartenslot Tageslichtsensor Reset-Taste *Drücken mit einer Stecknadel, um die Mikrofon Werkseinstellungen wiederherzustellen. Objektiv Spotlights Infrarot-LEDs Lautsprecher Halterung Wasserfester Deckel Ethernet-Port Stromanschluss Deutsch Deutsch...
- Page 13 PoE-Kamera Tageslichtsensor MicroSD-Kartenslot Mikrofon Reset-Taste Objektiv *Drücken mit einer Stecknadel, um die Werkseinstellungen wiederherzustellen. Spotlights Infrarot-LEDs Halterung Lautsprecher Wasserfester Deckel Ethernet-Port Stromanschluss HINWEIS: Das tatsächliche Aussehen und die Komponenten der Kamera hängen von dem von Ihnen gekauften Modell ab. Deutsch Deutsch...
- Page 14 Anschluss-Diagramm Kamera-Einrichtung Befolgen Sie vor der Ersteinrichtung die folgenden Schritte, um Ihre Kamera anzuschließen. Laden Sie die Reolink App oder Client-Software herunter, starten Sie sie und befolgen Sie die 1. Schließen Sie die Kamera mit einem Ethernet-Kabel an einen LAN-Anschluss Ihres Routers an. Anweisungen auf dem Bildschirm, um die Ersteinrichtung abzuschließen. 2. Verwenden Sie den Netzadapter, um die Kamera mit Strom zu versorgen. • Smartphone Kamera Netzteil Scannen zur Installation der Reolink App. Router • PC Download-Pfad des Reolink Clients: Gehen Sie auf https://reolink.com/de/ > Hilfe > App & Netzkabel Netzwerkkabel Client HINWEIS: HINWEIS: Das Anschlussdiagramm nimmt die WLAN-Kamera als Beispiel und gilt auch für • Wenn Sie die WLAN-Kamera einrichten, müssen Sie zuerst die Anweisungen auf dem die PoE-Kamera. Für die PoE-Kamera muss die Kamera mit einem PoE-Switch/-Injektor, Bildschirm befolgen, um die WLAN-Konfiguration abzuschließen. Reolink PoE NVR oder einem DC 12V-Netzteil betrieben werden. (Nicht im Paket enthalten) • Wenn Sie die PoE-Kamera an einen Reolink PoE NVR anschließen, richten Sie die Kamera bitte über die NVR-Schnittstelle ein. Deutsch Deutsch...
- Page 15 Kamera-Installation Installation an der Wand zu Zeit zu reinigen. • Stellen Sie sicher, dass die Stromanschlüsse nicht direkt mit Wasser Die folgenden Installationsmethoden beziehen sich auf die WLAN-Kamera als Beispiel und Tipps zur Installation oder Feuchtigkeit in Berührung kommen gelten auch für die PoE-Kamera. und nicht durch Schmutz oder andere Elemente blockiert sind. • Richten Sie die Kamera nicht auf • Dank der IP-Schutzklasse kann die Lichtquelle. Kamera auch bei Regen und Schnee • Richten Sie die Kamera nicht auf ein einwandfrei funktionieren. Das bedeutet Glasfenster. Es kann sonst zu schlechter jedoch nicht, dass die Kamera unter Bildqualität führen, da das Fenster durch Wasser funktionieren kann. Scheinwerfer, Umgebungslichter oder • Montieren Sie die Kamera nicht an Orten, Statuslichter geblendet wird. an denen Regen und Schnee direkt auf das • Platzieren Sie die Kamera nicht in einem Objektiv treffen könnte. Schattenbereich und richten Sie sie auf • Die Kamera kann unter extrem kalten einen gut beleuchteten Bereich. Es kann Bedingungen bis zu -25°C arbeiten, da sie...
- Page 16 Installation an der Decke Um das beste Sichtfeld zu erhalten, lösen Sie die Einstellschraube an der Sicherheitshalterung und drehen Sie die Kamera. Bohren Sie die Löcher gemäß der Montageschablone. Befestigen Sie die Montageplatte mit Ziehen Sie die den beiden oberen Schrauben an der Wand und hängen Sie die Kamera daran auf. Einstellschraube fest, Verriegeln Sie dann die Kamera mit der unteren Schraube. um die Kamera zu arretieren. Deutsch Deutsch...
-
Page 17: Fehlerbehebung
Die Kamera ist nicht Steckdose an und prüfen Sie, ob sie zu erhalten, lösen Sie die einzuschalten funktioniert. Einstellschraube an der • Versorgen Sie die Kamera mit einem Sicherheitshalterung und anderen arbeitsfähigen 12V 2A DC-Adapter Wenn die Kamera nicht einzuschalten ist, drehen Sie die Kamera. mit Strom und prüfen Sie, ob sie funktioniert. versuchen Sie bitte die folgenden Lösungen: Falls dies nicht funktioniert, wenden Sie sich bitte ans Reolink Support-Team. Für die PoE-Kamera Unscharfe Bilder • Stellen Sie sicher, dass Ihre Kamera richtig mit Strom versorgt wird. Die PoE-Kamera Ziehen Sie die sollte über einen PoE-Switch/-Injektor, Wenn das Bild der Kamera nicht scharf ist, Einstellschraube fest, einen Reolink NVR oder einen 12V- versuchen Sie bitte die folgenden um die Kamera zu Netzadapter mit Strom versorgt werden. Lösungen: arretieren. -
Page 18: Spezifikationen
beleuchteten Bereich, da die Gewicht: 590 g HINWEIS: Die folgenden Hinweise gelten • Richten Sie die Empfangsantenne neu Lichtverhältnisse die Bildqualität stark Arbeitstemperatur: nur für die WLAN-Kamera. Dieses Gerät aus oder verlegen Sie sie. beeinflussen. -10°C bis 55°C (14°F bis 131°F) wurde getestet und entspricht den • Vergrößern Sie den Abstand zwischen • Aktualisieren Sie die Firmware Ihrer Arbeitsfeuchtigkeit: 10% - 90% Grenzwerten für ein digitales Gerät der Gerät und Empfänger. Kamera auf die neueste Version. • Schließen Sie das Gerät an eine Steckdose Klasse B, entsprechend Teil 15 der • Setzen Sie die Kamera auf die FCC-Bestimmungen. Diese Grenzwerte eines anderen Stromkreises an als den, an Konformitätserklärung Werkseinstellungen zurück und überprüfen sollen einen angemessenen Schutz gegen den der Empfänger angeschlossen ist. Sie sie erneut. - Page 19 Vereinfachte EU- oder kontaktieren Sie den Händler, bei AGB & Datenschutz in einer unkontrollierten Umgebung. Dieses welchem Sie das Produkt gekauft haben. Gerät sollte mit einem Mindestabstand von Konformitätserklärung Die Nutzung des Produkts unterliegt Ihr Händler kann das Produkt dem 20 cm zwischen dem Strahler und Ihrem Ihrer Zustimmung zu AGB und Reolink erklärt, dass die WLAN-Kamera umweltverträglichen Recycling zuführen. Körper installiert und in Betrieb genommen Datenschutzrichtlinien auf den grundlegenden Anforderungen und werden. https://reolink.com/de/. Das Produkt darf anderen relevanten Bestimmungen der Eingeschränkte Garantie nicht in die Hände von Kindern gelangen. Richtlinie 2014/53/EU entspricht, die BETRIEBSFREQUENZ PoE-Kamera der Richtlinie 2014/30/EU. Für dieses Produkt gilt eine 2-jährige (Für die WLAN-Version) Endbenutzer-Lizenzvertrag beschränkte Garantie, die nur gültig ist, (Die maximale Sendeleistung)
-
Page 20: Contenu De La Boîte
Contenu de la boîte Contenu Contenu de la boîte Introduction de la caméra Caméra Antenne * Couvercle étanche Adapteur d’alimentation * Diagramme de connexion Configurer la caméra Monter la caméra Câble Ethernet Rallonge électrique Plaque de montage Gabarit de trou de montage Dépannage Spécifications Avis de Conformité... - Page 21 Introduction de la caméra Caméra WiFi Antenne Fente pour carte Micro SD Capteur de lumière du jour Bouton de réinitialisation *Appuyez sur le bouton de réinitialisation avec Microphone une aiguille pour restaurer les paramètres d’usine. Objectif Projecteur Lumières infrarouges Haut-parleur Support de montage Couvercle étanche Port Ethernet Port d’alimentation Français Français...
- Page 22 PoE Caméra Capteur de lumière du jour Fente pour carte Micro SD Microphone Objectif Bouton de réinitialisation *Appuyez sur le bouton de réinitialisation avec une aiguille pour restaurer les paramètres d’usine. Projecteur Lumières infrarouges Support de montage Haut-parleur Couvercle étanche Port Ethernet Port d’alimentation NOTA : L’apparence et les composants réels de la caméra dépendent du modèle que vous avez acheté. Français Français...
-
Page 23: Diagramme De Connexion
Diagramme de connexion Configurer la caméra Avant la configuration initiale, suivez les étapes ci-dessous pour connecter votre caméra. Télécharger et lancer l’application ou le Client Reolink, et suiver les instructions à l’écran pour 1. Connectez la caméra à un port LAN de votre routeur avec un câble Ethernet. terminer la configuration initiale. 2.Utilisez l’adaptateur d’alimentation pour allumer la caméra. Adapteur • Sur Smartphone Caméra d’alimentation Scanner pour télécharger l’application Reolink. Routeur • Sur PC Chemin de téléchargement du client Reolink : Accédez à https://reolink.com > Support > Câble d’alimentation Câble réseau App & Client NOTA : NOTA : Le diagramme de connexion prend la caméra WiFi comme exemple et s’applique • Lors de la configuration de la caméra WiFi, vous devez d’abord suivre les instructions à également à la caméra PoE. Pour la caméra PoE, veuillez alimenter la caméra avec un l’écran pour terminer la configuration WiFi. commutateur/injecteur PoE, NVR PoE Reolink ou un adaptateur d’alimentation CC 12V. - Page 24 Monter la caméra Monter la caméra au mur • Assurez-vous que le port d’alimentation ne sont pas directement exposés à l’eau ou à l’humidité et qu’il n’est pas bloqués par la Les méthodes d’installation suivantes prennent la caméra WiFi comme exemple et Conseils d’installation saleté ou d’autres éléments. s’appliquent également à la caméra PoE. • Avec l’étanchéité IP, la caméra peut fonctionner correctement dans des • Ne pas mettre la caméra vers des conditions telles que la pluie et la neige. sources lumineuses. Cependant, cela ne signifie pas que la • Ne pas diriger la caméra vers la vitre. caméra peut fonctionner sous l’eau. Sinon, cela peut entraîner une mauvaise • Ne pas installer la caméra dans des qualité d’image en raison de la lumière vive endroits où la pluie et la neige peuvent de la vitre causée par les projecteurs, les frapper directement l’objectif. lumières ambiantes ou LED d’état. • La caméra peut fonctionner dans des • Ne pas placer la caméra dans une zone conditions de froid extrême jusqu’à -25°C.
- Page 25 Monter la caméra au plafond Pour obtenir le meilleur champ de vision, desserrez la vis de réglage sur le support de sécurité et tournez la caméra. Percez des trous conformément au gabarit de montage, fixez la plaque de montage au mur avec les deux vis supérieures et accrochez la caméra dessus. Verrouillez ensuite la caméra Serrez la vis de réglage en position avec la vis inférieure. pour fixer la caméra. Français Français...
-
Page 26: Dépannage
• Allumez la caméra avec un autre vision, desserrez la Si votre caméra ne s’allume pas, veuillez adaptateur CC 12V/2A et voyez si cela vis de réglage sur le fonctionne. essayer les solutions suivantes : support de sécurité et tournez la caméra. Pour caméra PoE Si ces solutions ne fonctionnent pas, veuillez contacter le support Reolink. • Assurez-vous que votre caméra est correctement alimentée. La caméra PoE L’image n’est pas claire doit être alimentée par un commutateur/ injecteur PoE, le Reolink NVR ou un Si l’image de la caméra n’est pas claire, adaptateur d’alimentation 12V. veuillez essayer les solutions suivantes : • Si la caméra est connectée à un dispositif Serrez la vis de réglage PoE comme indiqué ci-dessus, connectez pour fixer la caméra. • Vérifiez l’objectif de la caméra pour la la caméra à un autre port PoE et voyez si... -
Page 27: Spécifications
Poids : 590 g approuvés par la partie responsable de la être déterminé en éteignant et en allumant • Restaurez la caméra aux paramètres Température de fonctionnement : conformité pourraient annuler l’autorité de l’équipement, l’utilisateur est encouragé à d’usine et vérifiez à nouveau. -10°C~+55°C (14°F~131°F) l’utilisateur à utiliser l’équipement. essayer de corriger l’interférence par une Humidité de fonctionnement : 10 % ~ 90 % ou plusieurs des mesures suivantes : Si ces solutions ne fonctionnent pas, NOTA : Les notes suivantes ne concernent veuillez contacter le support Reolink. Pour plus de spécifications, visitez • Réorienter ou relocaliser l’antenne de que la caméra WiFi. Cet équipement a https://reolink.com/ réception été testé et déclaré conforme aux limites • Augmenter la séparation entre Spécifications applicables aux appareils numérique de l’équipement et le récepteur. Avis de Conformité classe B, conformément à la partie 15 des • Brancher l’équipement sur une prise règles de la FCC. Ces limites sont conçues de courant d’un circuit différent de celui Fonctionnalité... - Page 28 été Conditions et Confidentialité non contrôlé. Cet équipement doit être acheté. Ils peuvent prendre ce produit pour installé et utilisé avec une distance conformité UE simplifiée L’utilisation du produit est soumise à votre un recyclage sans danger pour minimale de 20 cm entre le radiateur et acceptation des Conditions d’utilisation Reolink déclare que la caméra WiFi est l’environnement. votre corps. et de la Politique de confidentialité sur conforme aux exigences essentielles et https://reolink.com. Tenez-le hors de la aux autres dispositions pertinentes de la Garantie limitée FREQUENCE DE FONCTIONNEMENT portée des enfants. Directive 2014/53/UE, la caméra PoE est (Pour la version WiFi) conforme à la Directive 2014/30/UE.
-
Page 29: Cosa C'è Nella Scatola
Cosa c’è nella Scatola Content Cosa c’è nella Scatola Presentazione della Telecamera Telecamera Antenna * Coperchio Adattatore di Impermeabile Alimentazione * Diagramma di Collegamento Configurare la Telecamera Installare la Telecamera Cavo Ethernet da 1 m Cavo di Prolunga di Piastra di Montaggio Dima per Fori di Risoluzioni dei Problemi Alimentazione Montaggio Specifiche Notifica di Conformità Guida Rapida Adesivo di Avviso di Confezione di Viti... - Page 30 Presentazione della Telecamera Telecamera WiFi Antenna Slot per Scheda SD Sensore di Luce Diurna Pulsante di Ripristino * Premere con uno spillo per ripristinare la Microfono telecamera alle impostazioni di fabbrica. Obiettivo Faretti Luci a Infrarossi Altoparlante Braccio di Montaggio Coperchino Impermeabile Porta Ethernet Porta di Alimentazione Italiano Italiano...
- Page 31 PoE Telecamera Sensore di Luce Diurna Slot per Scheda SD Diurna Obiettivo Pulsante di Ripristino * Premere con uno spillo per ripristinare la telecamera alle impostazioni di fabbrica. Faretti Luci a Infrarossi Braccio di Montaggio Altoparlante Coperchino Impermeabile Porta Ethernet Porta di Alimentazione NOTA: La telecamera e gli accessori si variano a seconda del modello di prodotto ordinato. Italiano Italiano...
-
Page 32: Diagramma Di Collegamento
Diagramma di Collegamento Configurare la Telecamera Collegare la telecamera secondo l’istruzione seguente prima della configurazione iniziale. Scaricare ed avviare l’App o Client Reolink, e poi seguire le istruzioni per finire la 1.Collegare la telecamera alla porta LAN del router con un cavo Ethernet. configurazione iniziale. 2.Usare l’adattatore di alimentazione fornito per alimentare la telecamera. Adattatore Telecamera • Sullo Smartphone d’Alimentazione Scansionare per scaricare l’App Reolink. Router • •Sul PC Cavo di Percorso di come scaricare Client Reolink: Andare su https://reolink.com/it/ > Assistenza > Alimentazione Cavo di Rete App & Client. NOTA: NOTA: il diagramma di collegamento prende la telecamera WiFi come un esempio, il quale •Quando si configura la telecamera WiFi, è necessario seguire le istruzioni per finire prima la applica anche alla telecamera PoE. Per la telecamera PoE, va alimentata con un adattatore configurazione WiFi. d’alimentazione DC 12V o un dispositivo energico PoE come l’iniettore PoE, switch PoE o NVR •Se collegare la telecamera PoE all’NVR PoE Reolink, configurarla tramite l’interfaccia NVR. Reolink (non inclusi nella confezione). Italiano Italiano... - Page 33 Installare la Telecamera Montare la Telecamera a Parete L’istruzione dell’installazione prende la telecamera WiFi come un esempio, l’istruzione applica Suggerimenti per l’Installazione anche alla telecamera PoE. • Non puntare la telecamera verso qualsiasi fonte di luce. • Non puntare la telecamera verso una finestra di vetro, altrimenti causare un’immagine scadente a causa dell’abbagliamento dalle luci a infrarossi, luci dell’ambiente e dalle luci di stato. • Non posizionare la telecamera in un’area ombreggiata e puntarla in un’area ben illuminata, altrimenti ciò comporterebbe una visualizzazione scarsa. La telecamera deve essere posizionata nella stessa condizione di illuminazione dove si cattura gli oggetti per ottenere i migliori risultati. • Con lo scopo di migliorare la qualità immagine, si consiglia di pulire l’obiettivo di tanto in tanto con tessuto morbido. • Assicurarsi che le porte di alimentazione non siano direttamente esposti all’acqua o all’umidità e non siano schermati dallo sporco o dagli altri elementi. • Con il grado dell’impermeabilità, la telecamera può funzionare in condizioni come pioggia Praticare i fori a seconda della dima per fori di montaggio, serrare la piastre di montaggio e neve. Tuttavia, ciò non significa che essa possa funzionare sott’acqua. a parete con le due vitinella parte superiore e attaccare la telecamera su di essa. E poi • Non esporre la telecamera dove pioggia e neve colpiscono direttamente l’obiettivo. fissare la telecamera in posizione con la vite nella parte inferiore. • La telecamera è in grado di funzionare in condizioni estreme fino a -25°, visto che la telecamera produce calore quando viene avviata. Si consiglia di accenderla qualche minuto NOTA: Utilizzare il cartongesso anchor nella confezione quando c’è bisogno. prima di posizionarla all’esterno. •Mantenere l’obiettivo sinistro a livello dell’obiettivo destro.
- Page 34 Montare la Telecamera al Soffitto Per ottenere un migliore campo visivo, allentare la vite di regolazione sulla staffa di sicurezza e ruotare la telecamera. Praticare i fori a seconda della dima per fori di montaggio, serrare la piastre di montaggio Avvitare la vite di a soffitto con le due viti nella parte superiore e appendere la telecamera su di essa. E poi regolazione per fissare la telecamera in posizione con la vite nella parte inferiore. fissare la telecamera. Italiano Italiano...
-
Page 35: Risoluzioni Dei Problemi
• Utilizzare un altro adattatore di Per ottenere un La Telecamera Non Si Accende alimentazione da 12V 2A per alimentare la migliore campo visivo, telecamera. allentare la vite di Se la tua telecamera non è accesa, regolazione sulla staffa Se non funziona ancora, bisogna bisogna applicare le soluzioni seguenti: di sicurezza e ruotare contattare il gruppo di assistenza Reolink. la telecamera. Per la Telecamera PoE L’Immagine Non Chiara • Assicurarsi che la telecamera è alimentata in modo corretto. La Se l’immagine della telecamera non è telecamera PoE deve essere alimentata chiara, prova le soluzioni seguenti: all’iniettore o switch PoE, all’NVR Reolink o all’adattatore d’alimentazione da 12V. • Controllare l’obiettivo della telecamera se Avvitare la vite di • Se la telecamera viene collegata a un... - Page 36 Peso: 590g NOTA: le note seguenti sono solo adottando una o più delle seguenti misure: impostazioni di fabbrica e controllare di Temperatura di Esercizio: applicabili alla telecamera WiFi. Questa nuovo l’immagine. -10°C~+55°C (14°F~131°F) apparecchiatura è stata testata ed • Riorientare o riposizionare l’antenna Umidità di Esercizio: 10% ~ 90% è risultata conforme ai limiti per un ricevente. Se non funziona ancora, bisogna • Aumentare la distanza tra dispositivo digitale di Classe B, ai sensi contattare il gruppo di assistenza Reolink. Per ulteriori dettagli sulle specifiche, andare della Parte 15 delle norme FCC. Questi l’apparecchiatura e il ricevitore. https://reolink.com/. limiti sono progettati per fornire una • Collegare l’apparecchiatura a una presa su un circuito diverso da quello a cui è Specifiche protezione ragionevole contro interferenze dannose in un’installazione residenziale. collegato il ricevitore. Notifica di Conformità Questa apparecchiatura genera, utilizza • Consultare il rivenditore o un tecnico e può irradiare energia a radiofrequenza radio/TV esperto per assistenza.
- Page 37 Dichiarazione Semplificata di acquistato. Possono rilevare questo Termini e Privacy Dichiarazione sulla Esposizione prodotto per un riciclo sicuro per Conformità UE alle Radiazioni ISED l’ambiente. (Per la versione WiFi) L’utilizzo del prodotto è soggetto Reolink dichiara che la telecamera WiFi all’accettazione dei Termini di servizio e è in conformità con i requisiti essenziali e La telecamera WiFi è conforme ai limiti Garanzia Limitata dell’Informativa sulla privacy su altre rilevanti disposizioni della Direttiva di esposizione alle radiazioni RSS-102 reolink.com. Tenere fuori dalla portata dei 2014/53/EU, la telecamera PoE è in impostati per un ambiente non controllato.
-
Page 38: Contenido De La Caja
Contenido de la Caja Contenido Contenido de la Caja Introducción de Cámara Cámara Antena * Tapa Impermeable Adaptador de Corriente* Diagrama de Conexión Configure la Cámara Monte la Cámara Cable de Extensión Plantilla de Montaje Plantilla de Montaje Cable de Ethernet de Alimentación de Agujeros Solución de Problemas Especificaciones Notificación de Cumplimiento... - Page 39 Introducción de Cámara Cámara WiFi Antena Ranura para Tarjeta Micro SD Sensor de Luz Solar Botón de Reinicio *Presione el botón de reinicio con un alfiler para Micrófono restaurarla a la configuración de fábrica. Objetivo Focos Luces Infrarrojas Altavoz Soporte de Montaje Tapa Impermeable Puerto de Ethernet Puerto de Alimentación Español Español...
- Page 40 PoE Cámara Sensor de Luz Solar Ranura para Tarjeta Micro SD Micrófono Objetivo Botón de Reinicio *Presione el botón de reinicio con un alfiler para restaurarla a la configuración de fábrica. Focos Luces Infrarrojas Soporte de Montaje Altavoz Tapa Impermeable Puerto de Ethernet Puerto de Alimentación NOTA : La apariencia y los componentes reales de la cámara están sujetos al modelo que compró. Español Español...
-
Page 41: Diagrama De Conexión
2. Utilice el adaptador de corriente para alimentar la cámara. Adaptador de • En Teléfono Inteligente Cámara Corriente Escanee para descargar la aplicación de Reolink. Rúter • En Computadora Cable de Ruta de descarga de Reolink Client: vaya a https://reolink.com > Soporte > App & Client. Alimentación Cable de Red NOTA : • Al configurar la cámara WiF, primero debe seguir las instrucciones en pantalla para... - Page 42 Monte la Cámara Monte la Cámara a la Pared con un paño suave de vez en cuando. • Asegúrese de que los puertos de alimentación no estén expuestos Los siguientes métodos de instalación toman la cámara WiFi como ejemplo y también se Consejos de Instalación directamente al agua o la humedad y aplican a la cámara PoE. que no estén bloqueados por suciedad u otros elementos. • No enfrente la cámara hacia ninguna • Con grado de protección IP que certifica fuente de luz. resistencia al agua, la cámara puede • No dirija la cámara hacia una ventana de funcionar correctamente en condiciones vidrio. En cambio, podrá causar mala como lluvia y nieve. Sin embargo, no calidad de imagen debido al resplandor de significa que la cámara pueda funcionar la ventana por LED infrarrojos, luces bajo el agua.
- Page 43 Monte la Cámara en el Techo Para obtener el mejor campo de visión, afloje el tornillo de ajuste del soporte de seguridad y gire la cámara. Taladre agujeros de acuerdo con la plantilla de montaje, asegure la placa de montaje a la Apriete el tornillo de pared con los dos tornillos superiores y cuelgue la cámara en ella. Luego, bloquee la cámara ajuste para bloquear en su posición con el tornillo inferior. la cámara.
-
Page 44: Solución De Problemas
Si su cámara no se enciende, aplique las de CC de 12 V 2 A que funcione y soporte de seguridad compruebe si funciona. siguientes soluciones: y gire la cámara. Para Cámara PoE Si no funcionan, comuníquese con el soporte de Reolink. • Asegúrese de que su cámara esté alimentada correctamente. La cámara PoE La imagen no es clara debe ser alimentada por un comutador / inyector PoE, un NVR de Reolink o un Si la imagen de la cámara no es clara, adaptador de corriente de 12V. pruebe las siguientes soluciones: Apriete el tornillo de •... -
Page 45: Especificaciones
Humedad de funcionamiento 10% ~ 90% expresamente por la parte responsable del encendiendo y apagando el equipo, se cumplimiento podría anular la autoridad recomienda al usuario que intente corregir Si no funcionan, comuníquese con el Para más informaciones, visite del usuario para operar el equipo. la interferencia mediante una o más de las soporte de Reolink. https://reolink.com/. siguientes medidas: NOTA : Las siguientes notas son solo • Reoriente o traslade la antena receptora. Especificaciones Notificación de para la cámara WiFi. Este equipo ha • Aumente la distancia entre el equipo y el sido probado y cumple con los límites Cumplimiento receptor. - Page 46 (la potencia máxima transmitida) cumple con la Directiva 2014/30 / EU. Contrato de Licencia de Usuario Final Este producto viene con una garantía limitada de 2 años que es válida solo si se 2412MHz --- 2472MHz (19dBm) Al utilizar el Software del producto que Deshecho Correcto compra en las tiendas oficiales de Reolink 5150MHz --- 5350MHz (18dBm) está integrado en el producto Reolink, o en un revendedor autorizado de este Producto 5470MHz --- 5725MHz (18dBm) usted acepte los términos de este Contrato de Reolink. Descubra más: de Licencia de Usuario Final (“EULA”) entre Esta marca indica que este producto https://reolink.com/warranty-and-return/. usted y Reolink. Obtenga más información: no debe desecharse con otros https://reolink.com/eula/.
Need help?
Do you have a question about the Duo PoE and is the answer not in the manual?
Questions and answers