Advertisement
Quick Links
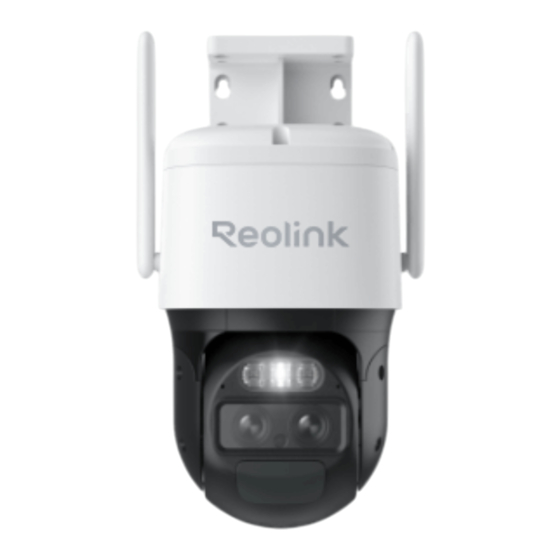
TrackMix Series B770
With 4K 8MP high resolution, TrackMix Series B770 can capture sharper and finer
details, bringing you a better visual experience. The wide-angle lens and the
telephoto lens of the camera bring you a broad overview and a clear closeup
simultaneously. With rechargeable battery and solar panel, this camera realizes
flexible power supply.
1. Specs
1
Antenna
2
Mount
Advertisement

Subscribe to Our Youtube Channel
Related Manuals for Reolink TrackMix B770


Summary of Contents for Reolink TrackMix B770
- Page 1 TrackMix Series B770 With 4K 8MP high resolution, TrackMix Series B770 can capture sharper and finer details, bringing you a better visual experience. The wide-angle lens and the telephoto lens of the camera bring you a broad overview and a clear closeup simultaneously.
- Page 2 Status LED Spotlight Infrared LED Lens Daylight Sensor PIR Sensor Power port Speaker microSD Card Slot...
- Page 3 Quick Start Guide Set up the camera on the App Please follow the steps below to do initial setup for the battery-powered cameras via Reolink App. Step 1. Power on the camera. Remember to turn on the power switch on the...
- Page 4 Note: The voice prompt you will hear may be "Welcome to Reolink, please install Reolink App and scan the QR code on the camera" in multilingual versions, or "please run Reolink App, add the camera and set it up".
- Page 5 Step 4. Select Wi-Fi Not Configured. If you hear a voice prompt played by the camera, please tick correspondingly and then tap Next. Step 5. Enter the WiFi password of the selected WiFi network (you may tap the right...
- Page 6 eye icon to see and double-check the password) and tap Next. Note: TrackMix Series B770 supports 5/2.4 GHz dual-band WiFi. Step 6. Tap Scan Now. Place the QR code on your phone in front of the camera’s lens at a distance of about 20 cm (8 inches) and let the camera scan the QR code. Tick correspondingly and tap Next.
- Page 7 Step 7. Wait around 60 seconds for the camera to connect to the router. After hearing "connection to the router succeeded", tick correspondingly and tap Next. Step 8. Create a login password and then name your camera.
- Page 8 Step 9. Read the note below and then tap Finish to complete the initialization of your camera. Once the initial setup is completed, you may choose a good position to mount your...
- Page 9 Step 1. Stick the mounting hole template on the wall and drill holes correspondingly. Step 2. Screw the mount base to the wall using the screws included in the package. Step 3. You may control the camera to pan and tilt via Reolink App or Client to adjust the camera's direction.
- Page 10 Step 1. Stick the mounting hole template on the ceiling and drill holes correspondingly. Step 2. Install the mount base to the wall using the screws included in the package. Step 3. Adjust the camera's direction by controlling the camera to pan and tilt via the Reolink App or Client.
- Page 11 Note: Use the drywall anchors included in the package if needed.
Need help?
Do you have a question about the TrackMix B770 and is the answer not in the manual?
Questions and answers