BETCO OPTIMA XR Series Operator's Manual
21”, 27" propane burnishers
Hide thumbs
Also See for OPTIMA XR Series:
- Operator and parts manual (18 pages) ,
- Operator and parts manual (18 pages)
Table of Contents
Advertisement
Quick Links
E12800
E12830
OPTIMA XR SERIES
OPTIMA XR SERIES
Customer Service: 888-GO-BETCO • Fax: 800-445-5056 • Technical Service: 877-856-5954 • www.betco.com
400 Van Camp • Bowling Green, Ohio 43402
21", 27"
Propane Burnishers
Optional
Emissions
Kit Available
(SERIAL NUMBERS 60000 AND GREATER)
Operator and Parts
Manual
1
Advertisement
Table of Contents

Related Manuals for BETCO OPTIMA XR Series


Summary of Contents for BETCO OPTIMA XR Series
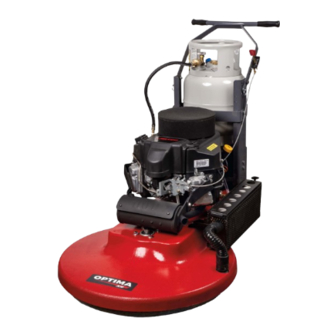
- Page 1 OPTIMA XR SERIES 21”, 27" Propane Burnishers Optional Emissions Kit Available (SERIAL NUMBERS 60000 AND GREATER) Operator and Parts Manual 400 Van Camp • Bowling Green, Ohio 43402 Customer Service: 888-GO-BETCO • Fax: 800-445-5056 • Technical Service: 877-856-5954 • www.betco.com...
-
Page 2: Table Of Contents
TABLE OF CONTENTS Carbon Monoxide Warning ............3 Safety .................... 4 Tank Use and Storage ..............5 Technical Specifications ..............5 Operator Preparation ..............5 - 6 Starting and Stopping the Kawasaki Engine ........6 Belt Tensioning................7 Pad Change Methods ..............8 Pad Driver Removal .............. -
Page 3: Carbon Monoxide Warning
WARNING - CARBON MONOXIDE LETHAL EXHAUST GAS - MUST READ THIS! - Never Run The Engine In A Closed Building Or Confined Area Exhaust gases contain poisonous carbon monoxide. Carbon monoxide is odorless, colorless, and can cause death if inhaled. Carbon Monoxide Poisoning Symptoms Train your employees to know the warning signs of carbon monoxide poisoning. -
Page 4: Safety
SAFETY lmportant Safety Information All LPG (Liquified Petroleum Gas) powered engines, including this engine, produce Carbon Monoxide (CO). It is a Lethal Poison that is colorless, odorless, tasteless, and non-irritating gas. You must read “Danger: Lethal Exhaust Gas” information above. Keep hands, feet, and loose clothing away from all moving parts while the machine is in operation. -
Page 5: Tank Use And Storage
TANK USE AND STORAGE Propane Tank Use We use OPD gas cylinders designed for vapor withdrawal. The fuel lock offs, regulators, and engines are also designed for vapor withdrawal. • We recommend that you use the OPD (Overflow Protection Device) vapor withdrawal type cylinder. These style tanks have a triangle shaped valve handle. -
Page 6: Operator Preparation
OPERATOR PREPARATION Adjust the handle for comfortable operation. Remove detent pins from the handle, and adjust to the hole alignment that gives the most comfortable height. Replace detent pins. Tighten nuts and bolts if needed. Make sure pad is not torn, pad is well attached and centering device is tightened. Check Oil Level: Starting the engine without the proper amount of oil will cause severe engine damage. -
Page 7: Belt Tensioning
BELT TENSIONING Use 15/16" socket with extension to tighten tensioner in direction of arrow. Test tension by pushing or pulling on belt or belt tensioner. With proper belt tension the pulley on the belt tensioner should only move about 1". Use 9/16"... -
Page 8: Pad Change Methods
PAD CHANGE METHODS Caution: Muffler May Be Hot! 1. Close valve and remove propane tank from the Tilt the machine back on its caster. Tilt the machine on either side. machine. Unscrew the pad center threaded hold. Unscrew the pad center threaded hold. 2. -
Page 9: Major Assemblies
MAJOR ASSEMBLIES UPPER HANDLE ASM PROPANE TANK KEY SWITCH ASM E88550 LOWER HANDLE ASM ENGINE ASM DECK ASM BELT DRIVE ASM PAD DRIVER ASM... -
Page 10: Handle Bar
HANDLE BAR E88808 E12696 E12476 E10120 E83145 E86228 E11420 E86125 E11146 E87986 E86114 (38") - Page 11 PART Description QTY. NUMBER E10120 Nut, #10-32, Nylon Lock, Grade 5, Zinc E11146 Nut, 3/8"-16, Nylon Lock, Grade 5, Zinc E11420 Washer, #10 SAE, Zinc E12476 Screw, Shoulder 1/2" x 1/2" Socket Head E12696 Hand Grip E83145 Washer, Nylon 1/2" ID X 1.25" OD E86114 Kawasaki Throttle Cable 38"...
-
Page 12: Lower Handle Support
LOWER HANDLE SUPPORT E86120 E10457 (13") E89825 E86125 E11702 E89823 E81089 E10141 E89822 E86119 E10457 (4") E10120 E81072 E88807 E89826 E11353 E10734 E81062 E81062 E89824 E11146 E89827 E88550 - PROPANE TANK NOT SHOWN... - Page 13 E88550 Propane Tank, Steel, 20#, OPD Note: Not available for purchase assembled.
-
Page 14: 12V Key Switch Box
12V KEY SWITCH BOX E10550 E12290 E10449 E86125 E86121 E10204... - Page 15 PART Description QTY. NUMBER E10204 Wire Clamp, 3/8" Romex Connector E10449 5 Wire Keyed Ignition Switch E10550 Decal, OFF/ON/START E12290 Ignition Switch Key E86121 Key Switch Box E86125 Screw, #10-32 x 1.000 Hex Head, Zinc Note: Not available for purchase assembled.
-
Page 16: Kawasaki Engine Assembly
KAWASAKI ENGINE ASSEMBLY E13983 E13985 E13993 E13994 E13981 E13984 E13976 E13986 E13987 E13997 E13975 E13998 E13987 E13997 E13974 E13999 E13977 E13973 E13978 E13990 E13980 E88325 E88484 E13988 E13982 E13992 E88469 E13979 E13991 E88470 E88479 E13996 E88475 E88474 E88476 E13960 E89618 E13968 E13972 E13971... - Page 17 PART NUMBER DESCRIPTION E13960 Catalyst Muffler ASM, 603cc E13968 Oil Drain ASM, 3/8 NPT E13969 Oil Drain Valve E13970 Spring Wire Clamp - 10mm, Zinc E13971 Oil Drain Hose E13972 Cap - Oil Drain Hose E13973 O-ring - 7.5mm ID x 1.8mm E13974 Inline Propane Filter - 10 Micron E13975...
-
Page 18: Deck Assembly
DECK ASSEMBLY E80135 (STANDARD) E80140 (EMISSIONS) E81089 E81067 E11281 - 21 INCH DECK E11840 - 27 INCH DECK E10122 E10120 E11772 E81088 E12983 E86118 E83520 E86225 E10902 E12689 E10141... - Page 19 PART DESCRIPTION QTY. NUMBER E10120 NYLOC HEX NUT 10-32 E10122 HEX HEAD BOLT 1/4-20 x 1.00 LG E10141 NYLOC HEX JAM NUT 0.3125-18 ZINC E10902 HEX HEAD BOLT 5/16-18 x 2-1/2 LG ZINC E11772 SOLENIOD 12 VDC E11840 DECK 27 INCH BURNISHER E12689 WHEEL 6 INCH DIA E12983...
-
Page 20: 27" Dust Control Deck Assembly
27" DUST CONTROL DECK ASSEMBLY E83520 E11772 E81088 E10120 E81089 E81078 E81067 E83520 E10122 E88979 E81078 E81713 E88772 E89594 E81078 E81713 E88982 E88983 E81713 E10902 E89592 E81078 E89604 E81064 E87985 E86118 E89608 E10122 E86225 EP50257 E10141 E12689... - Page 21 PART DESCRIPTION QTY. NUMBER E10120 NYLOC HEX NUT 10-32 E10122 HEX HEAD BOLT 1/4-20 x 1.00 LG E10141 NYLOC HEX JAM NUT 0.3125-18 ZINC E10902 HEX HEAD BOLT 5/16-18 x 2-1/2 LG ZINC E11772 SOLENIOD 12 VDC E12689 WHEEL 6 INCH DIA E81064 HEX BOLT1/4-20 x 0.75 LG ZINC E81067...
-
Page 22: Belt Drive System
BELT DRIVE SYSTEM REF ENGINE ASSEMBLY E83629 E81066 E10135 E10116 E10117 E80130 E12447 REF FRAME E81066 EP50208 E87644 E29048 E11289 E12547 E12459 E12546 E12981 E12978 - 21" DECK E12979 - 27" DECK E12400 E81078 E11135 E10725 E81078 E81064... - Page 23 PART NUMBER DESCRIPTION QTY. E10116 SCREW, HEX HD, 7/16-14 x 1.250 LG, ZINC E10117 WASHER, LOCK, 0.440 ID x 0.770 OD, SPLIT, ZINC E10135 WASHER, FLAT, 0.438 ID x 1.000 OD, 0.079 THK, ZINC E29048 TENSIONER, BELT E10725 SCREW, HEX HD, 1/4-20 x 1.500 LG, ZINC E11135 WASHER, FLAT, 0.813 ID x 1.469 OD, 0.134 THK, ZINC E11289...
-
Page 24: Pad Drive System
PAD DRIVE SYSTEM EP50028 -- 21" Pad Drive Assembly EP50040 -- 27" Pad Drive Assembly E10112 E81067 E10586 E12444 E10250 -- 21" Pad Driver E10252 -- 27" Pad Driver E81063 E12517 2 Piece Set E10850 Transport Pad E12517 2 Piece Set... - Page 25 PART Description QTY. NUMBER E10112 Screw, 5/16"-18 x 1.250 Hex Head Grade 5, Zinc E10250 21" Pad Driver E10252 27" Pad Driver E10586 3/4" Pad Driver Shaft Coupling E10850 Rivet, 3/16" OD x 15/16" L with 3/8" Head E12444 Washer, 5/16" SAE, Zinc E12517 Pad Lock, Center Lok II ®...
-
Page 26: Centrifugal Clutch Assembly
CENTRIFUGAL CLUTCH ASSEMBLY E86122 E86122 is installed to align the belt drive section of the clutch to the pad driver pulley belt drive section. E89768 Remove and discard set screws from clutch before installing. Install key after pushing clutch E11289 onto the engine drive shaft and aligning keyways. - Page 27 PART Description QTY. NUMBER E10117 Washer, 7/16" Split Lock, Zinc E10598 Screw 7/16"-20 x 1.750 Hex Head, Grade 5, Zinc E11289 Key 1/4" x 1/4" x 1.500" E11501 Washer, 7/16" USS, Zinc E89768 Clutch, Centrifugal 1750 RPM 4" Dia. E12447 Washer, 7/16"...
-
Page 28: Electrical Schematic
ELECTRICAL SCHEMATIC E80135 WIRE HARNESS, STANDARD E10449 KEY SWITCH ORANGE 14 GA RED 14 GA GREEN 14 GA E13996 OIL PRESSURE SWITCH BLACK 14 GA RED 14 GA YELLOW 14 GA YELLOW 14 GA WIRE HARNESS E80135 1N5402 BLACK 14 GA RED 14 GA LPG SOLENOID VALVE... - Page 29 ELECTRICAL SCHEMATIC (emissions) 80140 WIRE HARNESS, EMISSIONS E10449 KEY SWITCH ORANGE 14 GA RED 14 GA E13996 OIL PRESSURE SWITCH BLACK 14 GA GREEN 14 GA RED 14 GA YELLOW 14 GA WIRE HARNESS E80140 YELLOW 14 GA 1N5402 RED 14 GA BLUE 14 GA O2 SENSOR CONTROLLER...
-
Page 30: Engine Maintenance
ENGINE MAINTENANCE KAWASAKI FS481V ENGINE MAINTENANCE KAWASAKI FS481V PERIODIC MAINTENANCE EVERY EVERY DAILY PLEASE REFER TO ENGINE OWNERS MANUAL HOURS HOURS FOR MORE INFORMATION Check engine oil level and add if necessary Check and clean engine intake foam and intake paper filter Check and clean engine cooling air intake filter and replace if necessary (Part Number: E12360) -
Page 31: Troubleshooting
TROUBLESHOOTING PROBLEM CAUSE POSSIBLE SOLUTION Battery is dead Recharge battery or replace if necessary Loose wire or bad connection Check wires and connections Engine will not turn over Bad electrical component Replace bad component Refer to engine owner’s manual and read Fuel system problem IMPORTANT below Propane tank shut off valve in off... -
Page 32: Emissions Warranty
Betco Corporation recommends that you retain all receipts covering maintenance of your SORE engine, but Betco Corporation cannot deny warranty solely for the lack of receipts or for your failure to ensure the performance of all scheduled maintenance. As the SORE owner you should however be aware that Betco Corporation may deny your warranty if your SORE or its part has failed due to abuse, neglect, improper maintenance or unapproved modification. - Page 33 6. The SORE owner will not be charged for diagnostic labor that is directly associated with diagnosis of a defective, emission- related warranted part, provided that such diagnostic work is performed at a warranty station. 7. Betco Corporation is not liable for damages to other engine or equipment components proximately caused by a failure under warranty of any warranted part.
-
Page 34: Serial Number Locations
SERIAL NUMBER LOCATIONS OPTIMA XR: SERIAL NUMBER LOCATION Locate the hour meter on the operator’s RH side of the machine near the bottom of the handle support. Look down and to your right. The serial number will be stamped into the side of the red deck. HOUR METER HOUR METER SERIAL NUMBER... -
Page 36: Warranty
Service Distributor. If the original part is returned within the warranty policy period from date of delivery for inspection by Betco and is found to be defective the owner will be credited for the cost of replacement parts plus shipping and handling.
Need help?
Do you have a question about the OPTIMA XR Series and is the answer not in the manual?
Questions and answers