Advertisement
Table of Contents
- 1 Table of Contents
- 2 Receiving the Machine
- 3 Technical Specifications
- 4 General Safety Regulations
- 5 Machine Preparation
- 6 Operation
- 7 At End of Work
- 8 Daily Maintenance
- 9 Weekly Maintenance
- 10 Irregular Maintenance
- 11 Troubleshooting
- 12 Choosing and Using the Brushes
- 13 Stealth Brush Options and Common Parts
- 14 Warranty
- Download this manual
See also:
Parts & Maintenance Manual
Advertisement
Table of Contents

Subscribe to Our Youtube Channel
Related Manuals for BETCO STEALTH DRS21BT MicroRider


Summary of Contents for BETCO STEALTH DRS21BT MicroRider
- Page 1 E29961-00 E29963-00 E29962-00 STEALTH DRS21BT 21” MicroRider ™ Automatic Scrubber Operator Manual 1001 Brown Avenue • Toledo, Ohio 43607-0127 Customer Service: 888-GO-BETCO • Fax: 800-445-5056 • Technical Service: 877-856-5954 • www.betco.com...
-
Page 2: Table Of Contents
TABLE OF CONTENTS RECEIVING THE MACHINE..........3 TECHNICAL SPECIFICATIONS ........4 GENERAL SAFETY REGULATIONS ......... 5 MACHINE PREPARATION ........6 - 14 OPERATION ............15 - 16 AT END OF WORK ............17 DAILY MAINTENANCE ...........18 - 19 WEEKLY MAINTENANCE ..........20 IRREGULAR MAINTENANCE ........ -
Page 3: Receiving The Machine
RECEIVING THE MACHINE Immediately check, when receiving the machine, that all the materials indicated on delivery documents have been received and also that the machine has not been damaged in transit. If it has been damaged, this damage must be immediately reported to the shipper and also to our customer service department. -
Page 4: Technical Specifications
TECHNICAL DESCRIPTION Measurement Unit Stealth DRS21BT MicroRider ™ Working Width Inches Rear Squeegee Width Inches Work Capacity Sq. Ft. / Hour 31,000 Brush & Pad (diameter) Inches Brush Speed Brush Pressure Lbs. Brush Motor V / HP 24 / 0.6 Drive Type Automatic Vacuum Motor... -
Page 5: General Safety Regulations
• Before using the machine make sure that all doors and covers are positioned as shown in this operating and maintenance manual. • When your BETCO machine is ready to be retired, the machine must be disposed of properly. It contain oils and electronic components. The machine was built using totally recyclable materials. -
Page 6: Machine Preparation
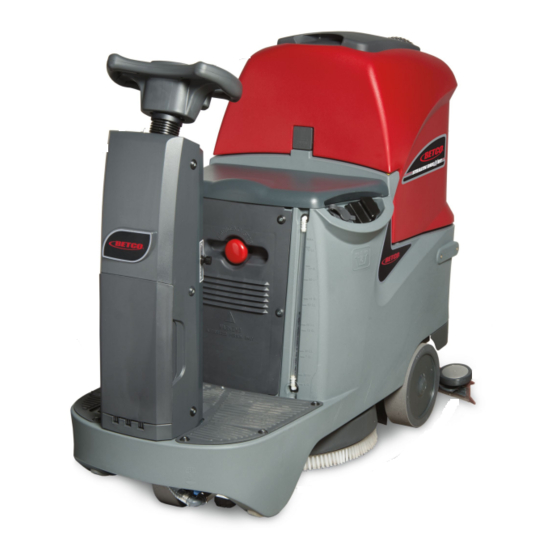
MACHINE PREPARATION 1. HANDLING THE PACKED MACHINE The machine is contained in specific packaging with a pallet for handling with fork trucks. The packages cannot be placed on top of each other. The dimen- sions of the packaging is as follows: A: 47”... - Page 7 MACHINE PREPARATION 3. HOW TO TRANSPORT THE MACHINE The instrument panel components are identified as follows: 1. Level indicator for battery/hour meter 2. Horn button 3. Reverse button 4. Brush coupling/uncoupling button 5. "ECO" function button 4. STEERING COLUMN ELEMENTS The elements on the left side of the steering column are: 6.
- Page 8 MACHINE PREPARATION The components on the rear part of the footboard are: 11. Emergency button 12. Detergent solution level tube 13. Recovery tank release button 6. SIDE MACHINE ELEMENTS The elements on the left-hand side of the machine are: 14. Solution Sink Fill Hose 15.
- Page 9 Weight 68 lb. (31 kg) WARNING: Your charger must be set according to the type of bat- tery you install. Call BETCO customer service to ensure correct charger setting after replacement batteries are installed. • The batteries must be handled using lifting and transportation means suitable for the weight and dimensions.
- Page 10 MACHINE PREPARATION 10. BATTERY CONNECTION AND BATTERY CONNECTORS 1. Open the battery compartment by pressing the lock device. 2. Connect the battery cable (2) to the machine connector (1) 3. Lock the seat back into position. WARNING: All installation and maintenance operations must be carried out by trained personnel.
- Page 11 MACHINE PREPARATION 12. BATTERY CHARGE LEVEL INDICATOR On the instrument panel of the machine there is a monitor (1) indicating (amongst other things) the battery charge status. If the lower line contains ten light indicators, the battery charge level is 100%. If the battery charge percent- age is at 00% and flashing, this means the batteries are discharged.
- Page 12 WARNING: Only use Betco detergents suitable for scrubbing ma- chines. Do not use acid or alkaline products or solvents without this indication. pH values between four and ten are acceptable as long as the detergent does not contain oxidizing agents, chlo- rine, bromine, formaldehyde, or mineral solvents.
- Page 13 MACHINE PREPARATION 3. Remove the key from the instrument panel. 4. Loosen the knobs (2) and (3) in the squeegee pre-assembly. 5. Insert the left-hand squeegee pin in the left-hand slit of the squeegee connec- tion, then tighten the knob (2), making sure the washer and spring adhere in the upper part of the squeegee support.
- Page 14 MACHINE PREPARATION 3. Position the brush on the floor, near the machine brush head. 4. Lower the brush head, turning the right-hand lever (6) to move it clockwise. 5. Press the brush release button (2) intermittently. WARNING: During this operation, check there are no people or objects near the brush.
-
Page 15: Operation
MACHINE OPERATION 24. PREPARING TO WORK Before beginning to work, it is necessary to: 1. Make sure the recovery tank is empty, otherwise empty it completely. 2. Check the key switch (3) is on “0”; if this is not the case, turn the key of the main switch counterclockwise to “0”. - Page 16 MACHINE OPERATION 13. To drive the machine in reverse, press the arrow button (9) on the steering wheel. Once finished traveling in reverse, press the arrow button (9) again to switch the drive gear into forward. WARNING: During reverse movements, the squeegee must be lifted off the floor.
-
Page 17: At End Of Work
AT THE END OF WORK 28. END OF WORK At the end of the work, and before carrying out any type of maintenance, per- form the following operations: 1. Close the solution valve by moving the knob (1) upward. 2. Lift the brush head by turning the right lever (2) counterclockwise, then lift the squeegee turning the left lever (3) clockwise. -
Page 18: Daily Maintenance
DAILY MAINTENANCE PERFORM ALL MAINTENANCE OPERATIONS IN SEQUENCE 29. CLEANING THE RECOVERY TANK 1. Remover the recovery drain hose (1) from its carriage and empty the recov- ery tank. 2. Press the release button (2) to raise the recovery tank. WARNING: Before performing any maintenance, remove the keys from the panel and disconnect the battery connector of the ma- chine. - Page 19 DAILY MAINTENANCE 31. CLEANING THE SQUEEGEE Careful cleaning of the vacuum system ensures better drying and cleaning of the floor. Proceed as follows for cleaning: 1. Remove the vacuum hose from the squeegee shoe (1). 2. Remove the squeegee assembly from the carriage by unscrewing the hand wheels (3).
-
Page 20: Weekly Maintenance
WEEKLY MAINTENANCE 33. CLEANING THE VACUUM HOSE Whenever the vacuum seems to be unsatisfactory, check that the vacuum hose is not obstructed. If necessary, clean with a jet of water as follows: 1. Make sure the recovery tank is empty, otherwise empty it completely 2. -
Page 21: Irregular Maintenance
IRREGULAR MAINTENANCE 34. REPLACING THE FRONT SQUEEGEE BLADE Vacuum will be poor and the machine will not dry well if the front squeegee rubber is worn. To replace: 1. Check that the main key switch is on "0". 2. Disconnect the squeegee assembly by loosening the hand wheels (1). WARNING: Before performing any maintenance, remove the keys from the panel and disconnect the battery connector. -
Page 22: Troubleshooting
5/8" long. Working with worn brushes or pads may cause damage to the floor. 2. Use a more aggressive brush or pad for cleaning. For cleaning floors where the dirt is particularly resistant, a specific Betco detergent will help with clean- ing. 40. EXCESSIVE FOAM PRODUCTION 1. -
Page 23: Choosing And Using The Brushes
CHOOSING AND USING THE BRUSHES POLYPROPYLENE BRUSH Used on all types of floors. Good resistance to wear and hot temperatures (no greater than 140° F). The polypropylene brush is non- hygroscopic and therefore retains it characteristics in wet working conditions. NYLON BRUSH Used on all types of floors. -
Page 24: Warranty
Service Distributor. If the original part is returned within the warranty policy period from date of delivery for inspection by Betco and is found to be defective the owner will be credited for the cost of replacement parts plus shipping and handling.
Need help?
Do you have a question about the STEALTH DRS21BT MicroRider and is the answer not in the manual?
Questions and answers
How do you remove the seat on drs21bt