Advertisement
What's in the box

Connect and power on the camera unit
 NOTES
NOTES
- Use only the power adapters supplied with this product.
- Make sure the parent unit and the camera unit are not connected to the switch controlled electric outlets.
- Connect the power adapters in a vertical or floor mount position only. The adapters' prongs are not designed to hold the weight of the parent unit and the camera unit, so do not connect them to any ceiling, under-the-table, or cabinet outlets. Otherwise, the adapters may not properly connect to the outlets.
- Make sure the parent unit, the camera unit and the power adapter cords are out of reach of children.
- Connect the power adapter to the camera unit and a power supply.

- Slide the
![]() ON/OFF switch leftward to power on your camera.
ON/OFF switch leftward to power on your camera.
![]()


Before use
Pair a new camera unit
Each newly purchased camera unit (RM5722) must be paired to your system (RM5762).
NOTES
- You can pair a maximum of four camera units to your parent unit. Each new camera unit must be paired to the parent unit before use.
- Make sure you power on the parent unit before pairing.
- Press MENU when the parent unit is idle.
- Press
![]() ,
, ![]() ,
, ![]() or
or ![]() to choose General Settings, then press SELECT.
to choose General Settings, then press SELECT. - Press
![]() or
or ![]() to choose Pair/Unpair CAM, then press SELECT.
to choose Pair/Unpair CAM, then press SELECT. - Press SELECT again to select Pair CAM, and then select an empty camera slot.
- Follow the instructions shown on screen to add the camera. When the camera is successfully added to your parent unit, the parent unit displays the camera image.
 ,
,  ,
,  or
or  to choose General Settings, then press SELECT.
Test the location for the camera unit
Before you install your camera unit, you need to test which of your selected monitoring areas within the house have good Wi-Fi signal strength. After you have powered on your parent unit, you can use your parent unit's Wi-Fi signal strength indicator to assist in checking. Once you have identified the suitable location, you can install your camera unit. Adjust the distance between your camera unit and the Wi-Fi router if needed.
Tip
- Depending on surroundings and obstructing factors, such as the effect distance and internal walls have on signal strength, you may experience reduced Wi-Fi signal. To improve the Wi-Fi signal strength, adjust the distance or direction of your parent unit. Check with your parent unit again.


Positioning the HD video monitor

- Keep the camera unit out of the reach of your baby. Never place or mount the camera unit inside the baby's crib or playpen.
- Place the camera unit more than 1 metre away from your baby.
![]()
- Adjust the angle of the camera to aim at your baby. Refer to the online manual of RM5762 on how to use the Pan/tilt and Zoom functions of the camera.
![]()
- To avoid causing high-pitched screeching noise from your HD video monitor:
- Make sure your camera unit and parent unit are more than 3 metres apart; OR
- Turn down the volume of your parent unit.


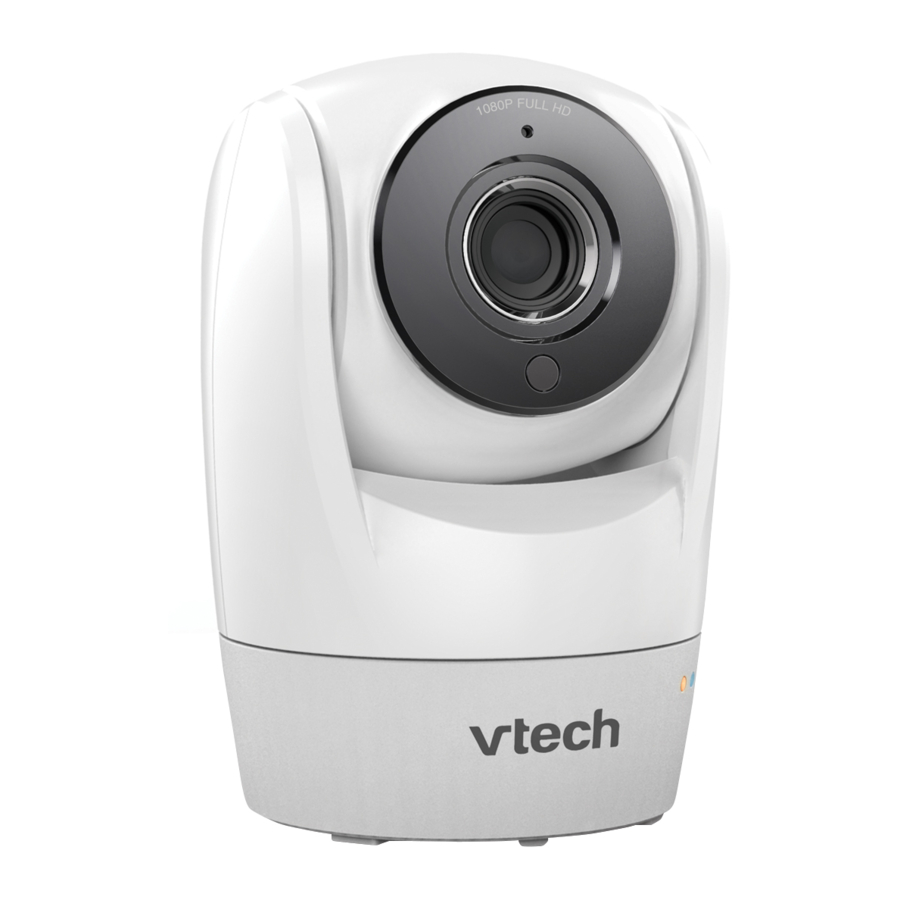
Camera unit overview

- Microphone
- Camera lens
- Light sensor
- LED indicators
- Flash yellow and blue alternately when the camera unit is in pairing mode.
- Yellow is steady on when the camera unit is connecting to the Internet.
- Yellow and blue are steady on when the camera unit is idle.
- Flash yellow and blue slowly during video streaming.
- Flash yellow and blue quickly and alternately when the camera unit is updating its firmware.
- Infrared LEDs
Allow you to see clearly in a dark surrounding. - ON/OFF switch
- Antenna
Connect to router with Wi-Fi. - Speaker
![]()
For hearing protection, do not stand close to the HD camera when the camera's alarm goes off. The loud alarm may damage your hearing.
![]()

- Temperature sensor
- Power jack
- Threaded socket
- Pair/reset button
- Press and hold for three seconds to enter pairing mode.
- Check for reception strength and camera angle before drilling the holes.
- The types of screws and anchors you need depend on the composition of the wall. You may need to purchase the screws and anchors separately to mount your camera units.
Mount the camera unit (optional)
Notes
- Check for reception strength and camera angle before drilling the holes.
- The types of screws and anchors you need depend on the composition of the wall. You may need to purchase the screws and anchors separately to mount your camera units.
- Place the wall mount bracket on a wall and then use a pencil to mark the top and the bottom holes as shown. Remove the wall mount bracket and drill two holes in the wall (7/32 inch drill bit).
![]()
- If you drill the holes into a stud, go to step 3.
![]()


- If you drill the holes into an object other than a stud, insert the wall anchors into the holes. Tap gently on the ends with a hammer until the wall anchors are flush with the wall.
- Align the wall mount bracket and screws with the holes in the wall as shown. Tighten the screw in the middle hole first, so that the wall mount bracket position is fixed. You can tighten the other screw in the top hole.
![]()
- Place the camera unit on the wall mount bracket. Tighten the screw into the threaded socket at the bottom to secure the camera unit.
![]()


- You can maximize your camera unit's viewing angles by tilting the wall mount bracket. Hold the camera unit, and then rotate the knob in anticlockwise direction. This will loosen the joint of the wall mount bracket. Tilt your camera unit up or down to adjust to your preferred angle. Then, rotate the knob in clockwise direction to tighten the joint and secure the angle.
![]()

OR
- Insert the screws into the holes and tighten the screws until only 1/4 inch of the screws are exposed.
![]()
- Place the camera unit on the wall mount bracket. Tighten the screw into the threaded socket at the bottom to secure the camera unit. Align the holes on the wall mount bracket with the screws on the wall, and slide the wall mount bracket down until it locks into place.
![]()


- You can maximize your camera unit's viewing angles by tilting the wall mount bracket. Hold the camera unit, and then rotate the knob in anticlockwise direction. This will loosen the joint of the wall mount bracket. Tilt your camera unit up or down to adjust to your preferred angle. Then, rotate the knob in clockwise direction to tighten the joint and secure the angle.
![]()
General product care
To keep this product working well and looking good, follow these guidelines:
- Avoid putting it near heating appliances and devices that generate electrical noise (for example, motors or fluorescent lamps).
- DO NOT expose it to direct sunlight or moisture.
- Avoid dropping the product or treating it roughly.
- Clean with a soft cloth.
- DO NOT immerse the parent unit and the camera unit in water and do not clean them under the tap.
- DO NOT use cleaning spray or liquid cleaners.
- Make sure the camera unit and parent unit are dry before you connect them to the mains again.
Storage
When you are not going to use the baby monitor for some time, remove the rechargeable battery from the parent unit. Store the parent unit, the camera unit and the adapters in a cool and dry place.

Documents / ResourcesDownload manual
Here you can download full pdf version of manual, it may contain additional safety instructions, warranty information, FCC rules, etc.
Advertisement


Need help?
Do you have a question about the RM5722 and is the answer not in the manual?
Questions and answers