
Related Manuals for SystemAir fantech bathfan Simple SMPL Series


Summary of Contents for SystemAir fantech bathfan Simple SMPL Series
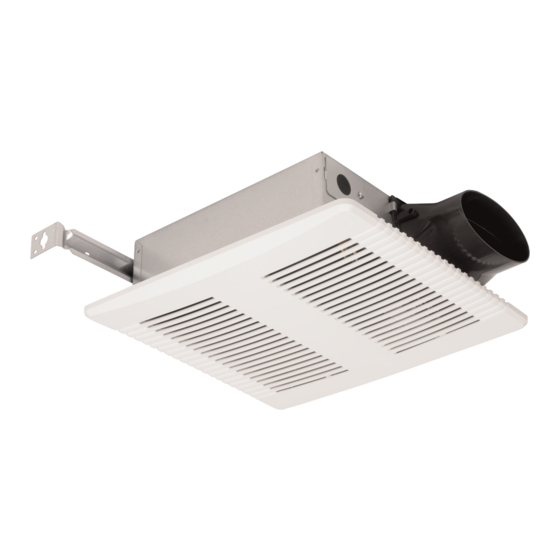
- Page 1 Installation, Operations, and Maintenance instruction bathfan Simple SMPL Series Ceiling Mount Exhaust Fan with Metal Casing...
-
Page 2: Table Of Contents
Table of contents 1 Introduction ............. 1 Product Description ........1 Intended Use..........1 Document Description ........1 Fantech Warranty........... 1 Product Overview ........... 1 Type Designation ........... 1 2 Safety ..............2 Safety definitions..........2 Safety Instructions.......... 2 Personal protective equipment ......2 3 Installation .............. -
Page 3: Introduction
Introduction Product Overview Product Description This product is a ceiling mount exhaust fan with a metal casing. This fan has rotating parts and personnel must exercise safety precautions during installation, operations, and maintenance. Intended Use Casing, quantity 1 Use this product only in the manner intended by Fantech. If you have any questions, please contact a Fantech representative. -
Page 4: Safety
• Never place a switch where it can be reached from a tub or Safety shower. • Do not use this product with any solid-state speed control Safety definitions device. Warnings, cautions and notes are used to point out specially •... -
Page 5: Installation
Installation To Mount the Product Note: Before this product is mounted, and if applicable, Fantech recommends to install a Ceiling Radiation Damper (#98599) to this product. To see how to install a radiation damper to this product, refer to section 3.9 To Mount the Radiation Damper. -
Page 6: To Mount To The Wall
Using (1) B screw, attach the end tab of the hanger bar to the framing. Using (1) A screw, attach the hanger bar onto the product’s casing. B Screw A Screw Hanger Bar Minimum Distance 13–3/8 inch (340mm) B Screw A Screw To Plan the Duct Run Hanger Bar... -
Page 7: To Manage The Duct Run
Note: For quiet operation, and to maximize performance, Fantech recommends the following: • Use insulated flexible duct for quiet operation • If rigid duct is used, use 1–3 feet (0.3–0.91 meters) of in- sulated flexible duct. • Insulate the duct to minimize energy losses. •... - Page 8 Align the (4) screw holes of the radiation damper with the Screw Hole (4) screw holes of the radiation damper casing. Screw With the arrow on the nameplate in the “up” position, en- gage the radiation damper with the bottom of the radiation damper casing.
-
Page 9: Electrical Connection
Electrical connection Legend for Diagram To do before the electrical English Terminology Meaning connection ON/OFF SWITCH On/Off Switch • Make sure that the electrical connection agrees with the LINE IN Line In product specification on the motor name plate. BLACK (BLK) (Line) Black (Line) •... -
Page 10: To Attach The Ceiling Grille
SMPL80 & SMPL100 BLACK (BLK) WHITE (WHT) GROUND (GRD) WIRE UNIT PANEL SWITCH RECEPTACLE SWITCH BOX POWER SUPPLY 120V AC SMPL80L & SMPL100L LIGHT LIGHT SWITCH NIGHT NIGHT LIGHT LIGHT SWITCH SWITCH LINE SWITCH BOX UNIT SMPL80L & SMPL100L BLACK (BLK) WHITE (WHT) BLUE (BLU) GROUND (GRD) -
Page 11: Operation
Operation To Start the Product Make sure that 120 volts of Alternate Current (AC) wiring are attached to the product. Set the switch to the ON position. After a soft start (5–10 seconds), make sure that the prod- uct works as intended. 5.1.1 To Stop the Product Set the switch to the OFF position. -
Page 12: Maintenance
Maintenance Technical data Technical Data Overview Warning Set the installed switch(es) in the OFF Voltage, Motor Power, Frequency Refer to the mo- position before you do the maintenance tor nameplate on unless the instructions tell you differently. the blower Make sure that the switch(es) is not assembly. - Page 14 last page Canada Latin America (800) 747 1762 (800) 565 3548 +52 55 1328 7328 support@fantech.net support@fantech.net support@fantech.net © Copyright Fantech All rights reserved Fantech reserves the rights to alter their products without notice. This also applies to products already ordered, as long as it does not affect the previously agreed specifications.
Need help?
Do you have a question about the fantech bathfan Simple SMPL Series and is the answer not in the manual?
Questions and answers