
Related Manuals for Hunter Revolution Series


Summary of Contents for Hunter Revolution Series
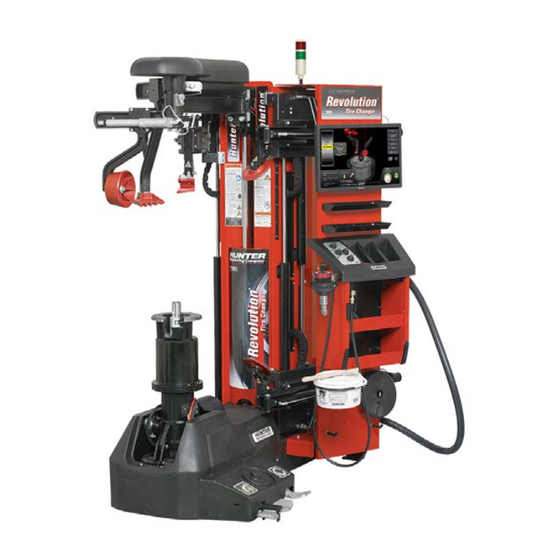
- Page 1 Hunter Revolution™ Series Tire Changer Model TCR1, TCR1S, TCR1X and TCRH Operation Instructions Form 6700-T 11-21...
-
Page 2: Table Of Contents
Hunter Revolution™ Series Tire Changer Table of Contents 1. Getting Started ........................... 3 1.1. Corporate Information ......................3 1.1.1. Domestic Support Documents .................. 3 1.1.2. Export Support Documents ..................3 1.2. For Your Safety ........................ 3 1.2.1. Hazard Definitions ....................3 1.2.2. -
Page 3: Getting Started
Hunter Revolution™ Series Tire Changer 1. Getting Started 1.1. Corporate Information If an extension cord is necessary, it must have a current rating equal to or more than that of the equipment. Cords Hunter Engineering Company rated for less may overheat. Arrange the cord so that it will not be tripped over or pulled. -
Page 4: Power Source Precaution
Hunter Revolution™ Series Tire Changer Keep hair, loose clothing, neckties, jewelry, fingers, and all 1.4. Equipment Specification parts of body away from all moving parts. ALWAYS WEAR OSHA APPROVED SAFETY GLASSES. Eyeglasses that have only impact resistant lenses are NOT safety glasses. -
Page 5: Decal Information
Hunter Revolution™ Series Tire Changer 1.6. Decal Information 1.6.3. Revolution Decal Front View 1.6.1. Revolution Decal Left Side View 1.7. Revolution Equipment Compo- nents 1.6.2. Revolution Decal Right Side View Page 5 of 12... -
Page 6: Touch Screen Display Components
Hunter Revolution™ Series Tire Changer 1.8. Touch Screen Display Compo- nents 1.11. Wheel Lift / GO Pedal NOTE During normal operation, the GO ped- al is pressed the majority of the time to complete procedures. Releasing 1.9. Turning Power ON/OFF... -
Page 7: Press Arms
Hunter Revolution™ Series Tire Changer 1.14. Tool Control Joysticks To move the tools for operations such as setting rim diam- eter, manual controls, etc., use the joystick that corre- sponds to the appropriate tool. 1.13. Press Arms The bead pushers assist with e mounting. The pushers moves in tandem with the mount / demount tool head. -
Page 8: Clamping The Wheel
TPMS unit. Setting rim diameter is the most important step of the tire changing process on the Hunter Revolution™ Tire Chang- 2.2. Clamping the Wheel er. Setting the diameter correctly ensures that all following steps can be performed correctly and automatically. -
Page 9: Complete The Process
Hunter Revolution™ Series Tire Changer 2.6. Bottom Bead Demount 2.3.4. Complete the Process Once the upper roller is correctly positioned, press and re- Press and hold the right “GO” side of the pedal to de- lease the right “GO” side of the pedal to set the rim diame- mount the bottom bead. -
Page 10: Top Bead Mount
Hunter Revolution™ Series Tire Changer 2.9. Inflation WARNING Activate blast inflation nozzle only when seating beads. Never point the blast inflation nozzle at yourself or oth- ers. Using a clenched fist, push down on the sidewall of the Do not lean or reach over tire changer tire while pressing and holding the right “GO”... -
Page 11: Blast Inflator
Annually: Change hydraulic fluid and filter once per year. • All circuit boards are warranted for a period of three (3) Contact your Hunter Service Representative for this serv- years. ice. • PC’s and options installed inside the PC are warranted Periodically: Check for loose bolts and tighten per speci- for a period of three (3) years. - Page 12 • Tire Changers are fully warranted for a period of three (3) years with the exception of consumable parts and TCR1 power units. • All lift and Hunter TCR1 power units are warranted for a period of two (2) years. • Normal wear items are not covered with the exception of batteries, which are covered for a period of six (6) months.
Need help?
Do you have a question about the Revolution Series and is the answer not in the manual?
Questions and answers