
Related Manuals for Hunter TCX50C


Summary of Contents for Hunter TCX50C
- Page 1 4-144228 - 01/2022 TCX50C Tire Changer Operations Manual ©Copyright 2016 Hunter Engineering Company...
- Page 3 If you have any questions concerning the proper use or maintenance of your Tire Changer, please call your authorized Hunter Engineering Company representative.. You can also contact Hunter Engineering Company at Tel: 800-448-6848 or 314-731-3020, Fax. 314-731-1776 or use Sincerely,...
- Page 4 OWNER INFORMATION Owner Name _____________________________________________________________________ Owner Address ___________________________________________________________________ Model Number ____________________________________________________________________ Serial Number ____________________________________________________________________ Date Purchased ___________________________________________________________________ Date Installed ____________________________________________________________________ Service and Parts Representative _____________________________________________________ Phone Number ___________________________________________________________________ Sales Representative ______________________________________________________________ Phone Number ___________________________________________________________________ Training Checklist Safety Precautions Trained Declined Warning and Caution Labels Pinch Points and Other Potential Hazards Safe Operating Procedures...
- Page 5 Mounting Trained Declined Standard Wheels Mounting of Stiff, Low Profile Tires Reverse Drop Center Wheels Proper Bead Lubrication for Mounting Protection Inflation Trained Declined Safety Precautions Lubrication and Removal of Valve Core Bead Sealing and Seating Individuals and Dates Trained ___________________________________ ___________________________________ ___________________________________...
-
Page 6: Table Of Contents
Contents 1. Getting Started..................8 1.1 Introduction ..................... 8 PURPOSE OF THE MANUAL ..............8 1.2 For Your Safety ....................9 Hazard Definitions ................... 9 1.3 General Warnings and Instructions ............... 9 Electrical Indications ................13 Specific Precautions/Power Source ............14 Equipment installation and service ............ - Page 7 3.2 Advanced Demounting Procedures ............. 35 Demounting Tire from Rim Using the Bead Lever Tool without the Plastic Sleeve Protector ..................35 Demounting Upper Bead ............... 35 Demounting Lower Bead ............... 35 3.3 Advanced Mounting Procedures ..............36 3.4 Mount/Demount Head Assembly ..............36 Checking Mount/Demount Head Calibration For Steel Heads ....
-
Page 8: Getting Started
In addition, so we can contact our customers with any necessary safety information, please ask the new owner to complete and return to Hunter the change of ownership form attached to the last page of this manual. Alternately, the new owner can send an email to newuser@hunter.com. -
Page 9: For Your Safety
Throughout this manual reference is made that “an accident” could occur. Any accident could cause you or a bystander to sustain severe personal injury or death, or result in property damage. Operation Instructions for TCX50C Tire Charger... - Page 10 • Only one operator may work with the machine at a time. • Keep all bystanders clear of tire changer. • Keep hands and fingers clear of rim edge during demounting and mounting process. • Keep hands and fingers clear of mount/demount head during operation. Operation Instructions for TCX50C Tire Charger...
- Page 11 21. This machine may only be used, maintained or repaired by properly trained employees of your company. Repairs should only be performed by qualified personnel. Your Hunter service representative is the most qualified person. The employer is responsible for determining if an employee is qualified to safely make any repairs to the machine should repair be attempted by users.
- Page 12 DECAL PLACEMENT HUNTER ENGINEERING COMPANY 11250 HUNTER DRIVE BRIDGETON, MISSOURI 63044 Model TCX500E SERIES MADE IN ITALY Code ANNO DI COSTRUZIONE/ XX/XX ac MANUFACTURED 20XX XX/XX 0-11XXXXXX/XX Serial N. bar/psi /XX-XX Port.max IIAXXXXXX Operation Instructions for TCX50C Tire Charger...
-
Page 13: Electrical Indications
RP11-4-136663 DECAL-WARNING SOCKET-OUTLET Electrical Indications The TCX50C family is manufactured to operate at a specific voltage and amperage rating. Make sure that the appropriate electrical supply circuit is of the same voltage and amperage ratings as marked on the TCX50C. -
Page 14: Specific Precautions/Power Source
To prevent the possibility of electrical shock injury or damage to the equipment when servicing the TCX50C, power must be disconnected by removing the power cord from the electrical power outlet. Specific Precautions/Power Source The TCX50C is equipped with motoinverter, (220VAC/ 1 PH / 50-60Hz), and standard plug 220V L6-20P plug. -
Page 15: Air Pressures
5. Only use supplied inflation hose with a properly functioning regulator. 6. Never inflate using “shop air” on the tire changer. 7. Use a safety cage in accordance with tire manufactures recommendations if inflation pressures beyond the tire changer equipped regulated air is required. Operation Instructions for TCX50C Tire Charger... -
Page 16: Special Rim/Tire Considerations
Walk around the machine to ensure that all components are in good condition and operational and that there are no foreign objects or debris (rags, tools, etc…) in or about the machine which could affect its operation. Operation Instructions for TCX50C Tire Charger... -
Page 17: During Use
The PowerOut system provides bead breaking controls on the handle for convenience, particularly with larger diameter assemblies. 1.10 Wheel Rotation Pedal Step down on the rotation pedal to rotate the wheel clockwise. Lift up on the pedal to rotate the wheel counterclockwise. Operation Instructions for TCX50C Tire Charger... -
Page 18: Tire Bead Breaker Shovel Control
Refer to illustrations on page 30. The pedal controls the air going to the inflation hose and the air inflation jets. DANGER • EXPLOSION HAZARD • Never exceed tire pressure recommended by tire manufacturer. Always match the tyre and rim dimensions. • Take care to avoid any damage to the tyre. Operation Instructions for TCX50C Tire Charger... -
Page 19: Moving Parts
If tires being mounted require more than the tire manufacturer’s maximum bead seating pressure, the wheel should be removed from the tire changer, placed in an inflation cage, and inflated per manufacturer’s instructions. Operation Instructions for TCX50C Tire Charger... -
Page 20: Mount / Demount Head
DEMOUNTING MOUNTING demounting lip mounting lip is on the right is on the left side of the head. side of the head. STEEL MOUNT PLASTIC HEAD MOUNT HEAD Operation Instructions for TCX50C Tire Charger... -
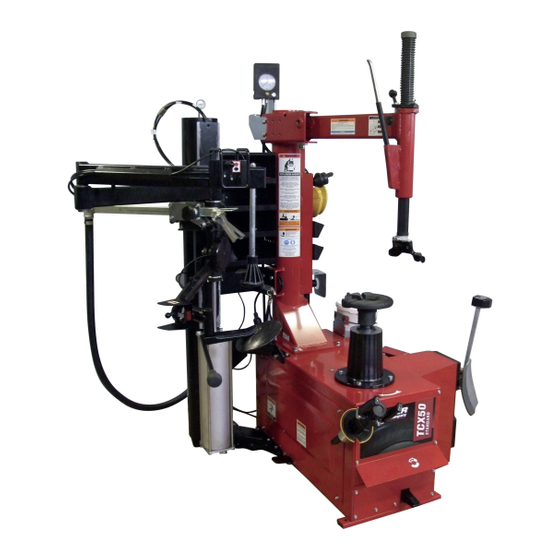
Page 21: Equipment Components
POSITION CENTER FASTBLAST ADJUSTMENT PIN CLAMP NOZZLE BEAD LIFTER LOCK BEAD PRESSER INFLATION HOSE BEAD LIFTER BEAD BREAKER ARM AND SHOVEL MOUNTING PASTE AIR INFLATION / FASTBLAST PEDAL WHEEL CLAMPING HANDLE WHEEL ROTATION PEDAL Operation Instructions for TCX50C Tire Charger... -
Page 22: Basic Procedures
Locate the blade close, but not contacting, the edge of the rim. Press the “In” button again to close bead breaker arm and loosen bead. “Out” button “In” button Operation Instructions for TCX50C Tire Charger... -
Page 23: Placing Wheel On Tyre Changer
Turn the device for correct engagement with the turntable (B). Move the centring cone manually into position on the rim by moving the retainers 1 (C). Tighten the clamping device by turning the handles 2 clockwise (D). Operation Instructions for TCX50C Tire Charger... -
Page 24: Demounting Tire From Rim
Position the bead lever between the demounting lip of the head and bead of tire. The demounting lip is on the right side of the head. Push down on the tire sidewall 180 degrees from the mount/demount head to slip the bead into the drop center of rim. Operation Instructions for TCX50C Tire Charger... - Page 25 Remove the bead lever tool from the tire when it easily slides out, approximately after a quarter rotation of the wheel. Continue to press the wheel rotation pedal to rotate the wheel clockwise until the entire bead is lifted from the rim. Operation Instructions for TCX50C Tire Charger...
-
Page 26: Difficult Tires
Use the hook on the bead press head to help lift the tire during demount. With upper bead demounted, use the bead lever and position the bead press head hook under the upper bead on the opposite side of the tire. Operation Instructions for TCX50C Tire Charger... -
Page 27: Bottom Bead Demounting With Disc
Return the tool head to the “resting” position. Lower and align the lower disc to touch the bottom of the rim edge. Lock the disc in place using the disc lock lever. Operation Instructions for TCX50C Tire Charger... - Page 28 With the tire in position, press the wheel rotation pedal to rotate the wheel clockwise and demount the bottom bead. Some of the more difficult tires may have the tendency to “fold” under the lower disc. “FOLDING” UNDER DISC Operation Instructions for TCX50C Tire Charger...
-
Page 29: Mounting Tire To Rim
Twist tire clockwise by hand to lock the tire into the mounting position. Push down on tire at about the 6 o’clock position to slip the bead into drop center. Operation Instructions for TCX50C Tire Charger... - Page 30 Position the tire such that the back of the tire is over the mount / demount head and the front of the tire under the finger of the mount / demount head. Operation Instructions for TCX50C Tire Charger...
-
Page 31: Mount Difficult Tires
By emitting a powerful air jet in a very short time, the FastBlast device generates a series of forces inside the tire which help rapid insertion of the bead onto the rim. The device is activated using the inflation pedal. Operation Instructions for TCX50C Tire Charger... - Page 32 • Adjust the position of the FastBlast nozzle to suit the diameter of the rim. Use the knob to adjust the distance between the nozzle and the rim; use knob to lock nozzle at desired position. Operation Instructions for TCX50C Tire Charger...
- Page 33 If tire is over-inflated, air may be removed from the tire by pressing the brass manual air release button located below the air pressure gauge. Disconnect inflation hose from valve stem. Operation Instructions for TCX50C Tire Charger...
-
Page 34: Advanced Procedures
3. Advanced Procedures The capabilities of the TCX50C tire changer family allow the user to utilize numerous advanced procedures on a variety of rims and tires. For the operator to take advantage of these features, this section explains in detail what additional steps can be taken. -
Page 35: Advanced Demounting Procedures
Firmly pull bead lever straight Step down on the wheel rotation pedal to rotate wheel clockwise until the entire bead is lifted from the rim. Operation Instructions for TCX50C Tire Charger... -
Page 36: Advanced Mounting Procedures
3.4 Mount/Demount Head Assembly There are plastic and steel mount/demount head assemblies available for the TCX50C tire changer family. Both use standard procedures for mounting and demounting. - Page 37 7. Fully tighten the set screws, checking when done that both sides of the tool head are still the same distance from the edge of the rim. 8. When the correct position has been achieved, tighten the adjustment bolts alternately to lock it in position. 9. Tighten the head retaining bolt. Operation Instructions for TCX50C Tire Charger...
-
Page 38: For Tilting Plastic Heads
2. Fully tighten the head retaining bolt being sure to insert the relevant washer and bushing. SPACERS HEX SHAFT ADJUSTMENT BOLTS ADJUSTMENT BOLTS HEAD BUSHING RETAINING BOLT WASHER HEAD RETAINING BOLT 3. Fully tighten the adjustment bolts being sure to insert the two relevant spacers. Operation Instructions for TCX50C Tire Charger... -
Page 39: Adjust The Offset Of Lock Mechanism - Steel And Plastic Heads
Change the offset by removing the plastic cover and adjusting the nuts located on front of the locking mechanism. Replace the plastic cover. Confirm head clearances to the 17 in rim are correct. Position the mount/demount head on the outer edge and lock in this position. Check clearances. Operation Instructions for TCX50C Tire Charger... -
Page 40: Maintenance
CRUSH HAZARD EXPLOSION HAZARD 4-402023 CRUSH HAZARD. Before making any adjustments or carrying out maintenance, disconnect the electricrical and compressed air supplies from the equipment and make sure that all moving parts are suitably immobilized. Operation Instructions for TCX50C Tire Charger... - Page 41 The components of Hunter Engineering Company products are designed as a single integrated system. To avoid compromises in terms of safety, performance, durability and function, and to prevent voiding of the warranty, do not substitute Hunter Engineering Company components with components manufactured by other companies. Use only ORIGINAL replacement PARTS supplied by Hunter Engineering Company.
-
Page 42: Maintenance And Replacement Parts
Weekly Do not use cleaning solvents to clean pressure regulator and oiler (if present). If present, refill oiler using only Hunter Lubri-Oil, 148-133-2, as needed. Petroleum-based oils should never be used in the oiler and may void all warranties. Adjust the oiler to release one drop... -
Page 43: Glossary
5. Glossary 5.1 Rim Diagram Operation Instructions for TCX50C Tire Charger... -
Page 44: Illustrations Of Various Rim Designs
5.2 Illustrations of Various Rim Designs Operation Instructions for TCX50C Tire Charger... - Page 45 Operation Instructions for TCX50C Tire Charger...
- Page 46 Prior Owner Address _______________________________________________________________ Model Number ____________________________________________________________________ Serial Number ____________________________________________________________________ Date Purchased ___________________________________________________________________ Date Installed _____________________________________________________________________ Return Completed Form To: HUNTER ENGINEERING COMPANY 11250 Hunter Drive Bridgeton, Missouri 63044 Tel: 800-448-6848 or 314-731-3020 Fax: 314-731-1776 e-mail: Customerservice@hunter.com Operation Instructions for TCX50C Tire Charger...
- Page 47 Operation Instructions for TCX50C Tire Charger...
-
Page 48: Warranty
In case of any warranty claim it will be necessary to contact your local authorized Hunter Service Representative. To have an item considered for warranty it must be returned to Hunter Engineering Company for inspection and evaluation. This must be done on a freight prepaid basis. - Page 50 Hunter Research and Training Center HUNTER TRAINING Hunter operates the most advanced, up-to-date Training Center in the industry today. The courses have been designed to meet the needs of new and experienced technicians who want to increase their mechanical and diagnostic capabilities. The low student-teacher ratio (average 7 to 1) and the emphasis on “hands-on”...
Need help?
Do you have a question about the TCX50C and is the answer not in the manual?
Questions and answers