Advertisement
FEATURE
- Frequency Range: GMRS
- Dual Band, Dual Display, Dual Standby
- High Power, middle power, low power switching to meet the different talking distance, save power
- Up to 60 memory channels for programming frequency and other various data
- Multiple display modes such as channel number, frequency, channel frequency, channel name, etc.
- CTCSS/DCS, DTMF signaling reject unnecessary calls from other stations
- The tail tone is eliminated to avoid the noise from the speaker after the call is over
- VOX sound activated, no need to press the PTT button to talk
- Emergency alarm, ANI identification and other functions through DTMF
- DTMF, CTCSS (60.0 -259.9 HZ), DCS signaling codec function
- 8-step frequency selection (2.5K, 5.0K, 6.25K, 10.0K, 12.5K, 20.0K, 25.0K, 50.0K)
- Automatic power saving function to extend battery life
- SOS emergency alert function
- Digital FM radio (receiving 65-108MHz)
- Menu item keyboard number direct selection function, transmit and receive frequency can be manually input
- Fashlight lighting function
- Frequency measurement function, copy the frequency of other devices at any time
- USB charging function, you can use the USB charging cable to charge
Unpacking and Checking Equipment
The box contains the following items. If any items are missing or damaged, please contact the dealer where you purchased the product.
| Product | Quantity | Product | Quantity |
| Radio | 1 | Charging Base | 1 |
| Battery | 1 | Belt clip | 1 |
| Manual | 1 | ||
| Hand Strap | 1 |
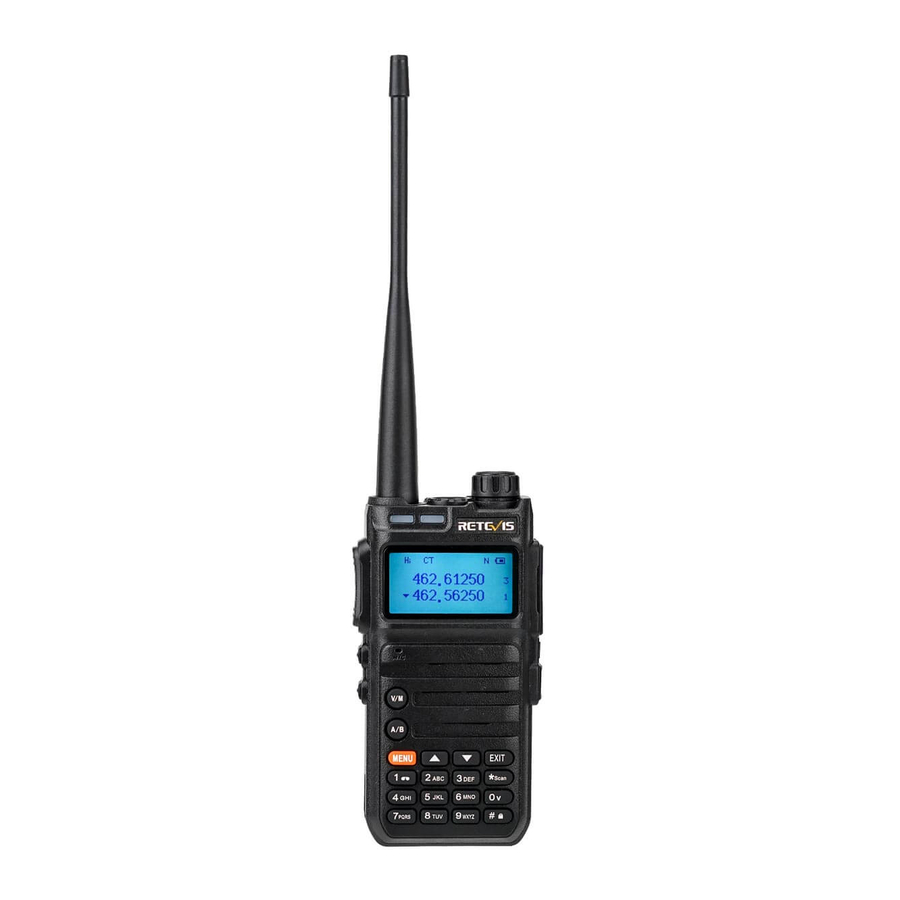
Radio Introduction

Status Indicator
Status Icon

| NO. | Icon | Product Status |
| 1 |  | Channel strength indicator, the more the number, the stronger the signal |
| 2 |  | The current transmitting power is high power (the longest communication distance, the highest power consumption) |
 | The current transmitting power is medium power (more power saving, relatively moderate communication distance) | |
 | The current transmitting power is low power (the most power saving, relatively close distance) | |
| 3 |  | This symbol appears when the side tone switch is set to button side tone/button+identity code/identity code |
| 4 |  | This symbol indicates that the current status is DCS |
 | This symbol indicates that the current status is CT | |
| 5 |  | This symbol indicates that dual frequency waiting is on and it is in a dual-waiting status. |
| 6 |  | This symbol appears whne the buttonboard is locked, press # button to unlock and it disappears |
| 7 |  | This symbol indicates that the VOX function is activated, and the emission will start when the sound pressure level of the microphone reaches the set value |
| 8 |  | Receiving and transmitting frequency inversion in frequency mode/channel mode |
| 9 |  | It appears whne the channel is working in a narrowband mode |
| 10 |  | Display the current remaining power of battery |
| 11 |  | A/B band pointer, indicating the current working frequency or working channel |
| 12 | Aranbic No. | Band A current channel number in channel mode |
| 13 | Aranbic No. | Band B current channel number in channel mode |
LED Indicator
The LED indicators of this radio can let you easily grasp the current operating status.
| Indicator status | Radio Status |
| Red light long bright | Transmitting |
| Green light long bright | Receiving |
Preparation
Battery Installation

- Align the battery with the battery mount on the back of the radio
- Press the battery forcefully into the walkie-talkie, and slide the battery up until the lock plate is locked to the correct position
If you need to remove the battery, turn off the radio. Press the battery lock to the unlocked position and hold it down, then slide the battery down and away from the battery mount.
Belt Clip Installation
Align the two screw holes of the belt clip with the screw holes above the battery, install and tighten the screws.
If you need to remove the belt clip, loosen and remove the screws from the belt clip
Install an external headset/microphone (optional purchase separately)

- Open the earphone cover.
- Insert the headphone plug into the headphone jack.
When you don't need to use the earphones, pull out the earphone plug from the earphone hole and put on the earphone cover.
When the universal interface is not used, please put on the dust cover.
Do not shake the radio with the top of the antenna, otherwise it will reduce the working performance and service life of the antenna.
Radio Charging
Note:
- Please use the charging equipment designated by our company to charge. When charging the whole device, please turn off the radio first.
- According to the 2016 new requirements of the International Civil Aviation (IATA) "Technical Regulations for the Safe Air Transport of Dangerous Goods", the state of charge of lithium-ion batteries (cells) for air transport shall not exceed 30% of its rated capacity. Therefore, the first time the battery is used with the host, there will be a low battery warning with the voice prompt "Please charge"phenomenon, please charge the battery before use.
When using the radio for the first time, a low battery alarm may appear. Please charge the battery before using, follow the steps:

- Insert the power adapter interface into the jack on the back of the charging base.
- Insert the plug of the power adapter into the power socket.
- Put the battery into the charging cradle.
- Observe the LED indicator of the charging base to understand the current charging status, as shown in the table below.
| Charing Base LED Indicator | Current Charging Status |
| Red light flashing | Lower battery voltage |
| Red light is on | Charging |
| Green ligjt on | Finished charging |
Check Battery Power
This function allows you to know the current battery voltage and remaining power.
Long press【0】key to display the current voltage.
The current battery level is displayed on the upper right of the screen, and the battery level icons are as follows:
| Battery Icon | Batter Power |
 | High |
 | Middle |
 | Low |
 | insufficient |
Basic operation
| Knobs, Switches, Buttons | Instructions |
| Power/volume Switch | Turn on/off: Turn the [Power/Volume Switch] knob clockwise to turn on the radio and adjust the volume to the maximum.
|
| Select Channel | The channel is the aisle through which the signal is transmitted. After power on, press the [V/M] key to switch to the channel mode, press [/] to select the channel, and the channel number will be displayed on the right side of the screen.
|
| PTT Button Call |
|
| SK1 (Side Key 1) | The side buttons have two modes: short press and long press, and the following functions can be selected: off, flashlight, alarm, radio, NOAA weather forecast, monitoring, and frequency sweeping. Off: No function Flashlight function: Short press the [SK1] key to turn on the flashlight function and the flashlight light is always on; short press the [SK1] key again to turn off the flashlight function. If you choose to operate the flashlight function in the menu mode, short press the [SK1] key the first time the flashlight lights up, short press the second time the flashlight light continues to flash, short press three times the flashlight light to turn off. Alarm: SOS emergency alarm function: Short press the [SK1] key to turn on the alarm function. At this time, the green indicator light and the red indicator light flash at the same time. Short press the [SK1] key again to release the alarm. Radio: Short press the [SK1] key to turn on the radio function, and short press the [SK1] key again to turn off the radio. The radio frequency can be entered through the keyboard or tap the "#" key to automatically search for radio stations. In radio mode, press the [EXIT] key to switch between 65-75/76-108MHz frequency band. NOAA weather forecast: Short press the [SK1] key to turn on the NOAA function, and short press the [SK1] key again to turn off the NOAA function. Press the up and down keys to select the channel: 10 channels for selection: see Appendix 1 for details Monitoring function: Short press the [SK1] key to turn on the monitoring function, and release the [SK1] key to cancel the monitoring. Sweep: Short press [SK1] to turn on the sweep function, and directly measure the frequency of other devices. |
| SK2 (Side Key 2) | Same side key SK1, with short press and long press function to choose |
| V/M Key | Frequency mode or channel mode switching.
|
| A/B Key | A/B upper and lower frequency band switch selection. Press the PTT button to transmit in the frequency band pointed to by the pointer. |
| Keyboard Lock and Unlock | Manual lock: Long press # key to lock the intercom. Automatic lock: After the automatic keyboard lock is turned on, when there is no operation on the buttons and knobs, the automatic lock will be delayed for 10 seconds. Unlock: Long press # key to unlock the keyboard. |
Function Description
Menu Settings
You can enter "Menu Settings" through the menu key to set some common functions. The specific instructions and operation methods are as follows:
| Menu No. | Primary menu display characters | Secondary menu display characters | Secondary menu setting description |
| 0 | Squelch | 0,...,9 | Squelch level, the lower the level, the easier it is to interfere, the higher the level the worse the sensitivity, the default value is 3. |
| 1 | Step | 2.5KHz | In frequency mode, press ▲ / ▼ key to change the step value |
| 5.0KHz | of frequency, the value range is 2.5~50KHz | ||
| 6.25KHz | |||
| 10.00KHz | |||
| 12.50KHz | |||
| 20.0KHz | |||
| 25.0KHz | |||
| 50.0KHz | |||
| 2 | Tx Power | High | High power transmission |
| Middle | Medium power transmission | ||
| Low | Low power transmission | ||
| 3 | Power save | OFF | Turn off power saving mode |
| ON | Turn on power saving mode | ||
| 4 | Vox Level | OFF | Turn off VOX |
| 1,2,... 10 | The level intensity of voice activation, the value range is 1~10. | ||
| 5 | Backlight | Bright | Backlight is always on |
| OFF | Backlight off | ||
| 5Sec, 10Sec,... 60Sec | Automatic backlight delay time, the range is 5~60 seconds | ||
| 6 | Menu Exit Time | 5Sec, 10Sec,... 60Sec | Automatic backlight delay time, the value range is 5~60 seconds |
| 7 | Dual Standby | OFF | Dual Standby off |
| ON | Dual Standby on | ||
| 8 | Beep Prompt | OFF | Beep Prompt off |
| ON | Beep Prompt on | ||
| 9 | VOICE | OFF | Prompt voice off |
| ON | Prompt voice on | ||
| 10 | Tx over time | OFF | Press and hold the PTT button to keep transmitting |
| 15,30,...600 | Value range 15~600, step value 15 | ||
| 11 | Rx DCS | OFF | DCS off |
| D023N,...,D754I | DCS Standard sequence | ||
| 12 | Rx CTCSS | OFF | CTCSS off |
| 67.0HZ,...,254.1HZ | CTCSS Standard sequence, At the same time, you can directly type standard or non-standard CTCSS by keyboard | ||
| 13 | Tx DCS | OFF | DCS off |
| D023N,...,D754I | DCS Standard sequence | ||
| 14 | Tx CTCSS | OFF | CTCSS off |
| 67.0HZ,...,254.1HZ | CTCSS Standard sequence, At the same time, you can directly type standard or non-standard CTCSS by keyboard | ||
| 15 | DTMFST | OFF | |
| DT-ST | |||
| ANI-ST | |||
| DT+ANI | |||
| 16 | TONE | 1000hz, 1450hz, 1750hz, 2100hz | Repeater activation audio |
| 17 | S-CODE | 1,2...,15 | When needed, send out this group of information codes (information codes can only be written by frequency writing software) |
| 18 | Scan Mode | TO | Time scan |
| CP SE | Carrier scan Search mode scan | ||
| 19 | PTT-ID | OFF | Press PPT to not send ID code |
| BOT | Press PPT to send ID code (ID code is set by frequency writing software) | ||
| EOT | Release PPT to send ID code | ||
| BOTH | ID cose is sent when you press and release the PTT button | ||
| 20 | MDF-A | Frequency | In the channel mode of section A, the channel displays the frequency |
| Name | In the channel mode of section A, the channel displays the channel name (the specific name is set in the frequency writing software) | ||
| 21 | MDF-B | Frequency | In the channel mode of section B, the channel displays the frequency |
| Name | In the channel mode of section B, the channel displays the channel name (the specific name is set in the frequency writing software) | ||
| 22 | Busy Lockout | OFF | Allowed to transmit when channel is occupied and |
| ON | Forbide to transmit when channel is occupied | ||
| 23 | Key Auto Lock | OFF | Automatic keyboard lock off |
| ON | Automatic keyboard lockon | ||
| 24 | Key1 sp | OFF | No function |
| LAMP | Turn on the flashlight function | ||
| SOS | Turn on the alarm function | ||
| FM | Turn on the radio function | ||
| NOAA | Turn on NOAA weather forecast function | ||
| MONI | Turn on the monitoring function | ||
| SEARCH | Turn on the searching function | ||
| 25 | Key1 LP | Same function as side key 1 short press | |
| 26 | Key2 sp | Same function as side key 1 short press | |
| 27 | Key2 LP | Same function as side key 1 short press | |
| 28 | Alarm Mode | On site | |
| Send sound | |||
| Send code | |||
| 29 | TAIL | OFF | After the PTT is released, the radio does not send a shutdown code, usually when it is relayed through the relay, let it make noise to confirm whether the signal of the radio is relayed |
| ON | After releasing the PTT button, the radio sends a shutdown code to suppress the instantaneous noise of the listener | ||
| 30 | PROGER | OFF | Turn off the call end alert tone |
| ON | Turn on the call end alert tone | ||
| 31 | Language | Chinese English | |
| 32 | Reset | VFO | Menu initialization only |
| ALL | Menu and channel initialization | ||
| 33 | SPECIAL DCS | OFF | Turn off special DCS |
| ON | Turn on special DCS Only the same DCS code can talk to each other | ||
Main Function Description
The functions supported by the walkie-talkie are shown in the table below.
| Name | Function Description |
| Squelch level | Squelch level adjustment is to adjust the signal strength required when receiving signal. The adjustment squelch level (0 open to 9 is the highest) is selected by the local environment, and 3 is generally selected. |
| DCS/CTCSS | Used to avoid listening to unrelated calls of the same frequency. Only when the transmitted DCS/CTCSS matches the received DCS/CTCSS, the radio can listen to the voice through the speaker. |
| TOT | The timeout timer can limit the single transmission time (the default is 60 seconds) to prevent the communication parties from occupying channel resources for a long time, and to prevent the terminal from being damaged due to overheating. After the duration of pressing the [PTT] key expires, the terminal will automatically terminate the transmission and emit a warning tone. If you need to talk again, please transmit after the preset time. |
| Power saving | When the walkie-talkie has no receiving or transmitting, no button or knob operation reaches the power saving time, it will automatically enter the power saving mode. |
| Low battery | When the battery power is low, it can be charged in time through the sound reminder. When the warning battery is too low, transmission will be prohibited. |
| Emergency | An emergency alert is when you encounter an emergency, you can ask your companion or the alert control center for help. |
| SCAN | After the scan is turned on, the terminal will scan according to the scan list. When it finds activity on a certain channel, it will stay on the channel to listen, so as to understand the current activity status of the relevant group members. |
| Busy channel lock | Channel busy can prevent interference from other terminals on the same channel during lock transmission. When other terminals occupy the current channel, press and hold the [PTT] key, and the terminal will emit a "beep" tone, indicating that it cannot be transmitted. If the current channel is free, press and hold the [PTT] key to start transmission. |
| Power level | The power level refers to the transmit power level of the walkie-talkie, which can be set to high power or low power. High power can increase the signal strength of the current transmitted voice of the terminal, and it can also communicate with the remote terminal. Low power can save power. |
| MONI | Monitoring is a listening method used to receive more signals or weak signals, which helps to distinguish and listen to the faint sounds in the speakers. |
| Channel broadcast | It is used to indicate the sequence of the current channel. |
| VOX | After turning on the voice control, when the voice detected by the microphone meets the transmission conditions, the terminal will automatically transmit the voice, and you can speak directly without pressing the [PTT] key. The voice control gain is used to control the sensitivity of the microphone's voice control emission, which is configured by the dealer. |
VOX
press the [PTT] key to call, then this function can be enabled. Operation method:
- In the standby mode, press the [MENU] key, the voice prompt "menu setting", enter the function menu setting;
- Press [▲] or [▼] key to select 4 menu number forward or backward; or directly enter the number 4 to enter 4 menu number;
- Press the [MENU] key, the voice prompt "Voice-activated emission", press the [▲] or [▼] key, select 1~10 (the larger the value, the higher the sensitivity; such as selecting 3)
- Press the [MENU] key, the voice prompt "OK", save and return to the previous menu.
- Repeat the above operation, select OFF to turn off the voice-activated transmission function.

After turning on the voice-activated transmission function, speak into the microphone, and the voice can be sent out; stop speaking, and the transmission will also stop. You can select the VOX sensitivity level according to the quietness of the environment. If the environment noise is too large, long emission will occur after the VOX function is activated.
If the dual-standby is enabled on this machine, the VOX function is turned off by default, and the VOX function cannot be activated.
Keyboard Lock function
The keyboard lock function disables the number keys to prevent you from activating a function by mistake. This radio can be set to automatic keyboard lock function, the operation is as follows:
- In the standby mode, press the [MENU] key, the voice prompt "menu setting", enter the function menu setting; 2) Press the [▲] or [▼] key to select the 23 menu number forward or backward; or directly enter the numbers 2 and 3 to enter the 23 menu number;
- Press [MENU] key, press [▲] or [▼] key to select ON;
- Press the [MENU] key, the voice prompt "OK", save and return to the previous menu. The automatic keyboard lock function is activated.
- Repeat the above operation, select OFF to turn off the automatic keyboard lock function, and select manual keyboard lock. The operation is as follows:
- In the standby state, long press the 《#》 key for more than 2s, the keyboard lock function is activated (voice prompt "keyboard lock");
- Long press the 《#》key repeatedly for more than 2s, the keyboard lock function is closed (voice prompt "keyboard unlock").
After the automatic keyboard lock function is turned on, when it is not locked, the numeric keyboard is automatically locked without any keyboard operation for 10 seconds.
Dual Standby
When in dual standby mode, the two-way radio can receive the frequency set by the A or B channel. The operation is as follows:
- In the standby mode, press the [MENU] key, the voice prompt "menu setting", enter the function menu setting;
- Press the [▲] or [▼] key to select the 7 menu number forward or backward; or directly enter the number 7 to enter the 7 menu number;
- Press the [MENU] key, the voice prompt "Dual Standby", press [▲] or [▼] key, select ON
- Press the [MENU] key, the voice prompt "OK", save and return to the previous menu. The dual-frequency waiting function is turned on.
Repeat the above operation and select OFF to turn off the dual-frequency standby function. In the menu mode, the dual-frequency standby is temporarily turned off, and recover after exiting.
Since the dual-standby mode is in the main and sub-channel scanning state, in the dual-standby mode, even if the power saving function of the unit is turned on, its power saving function is still invalid, and the standby time of the walkie-talkie will be shortened.
CTCSS/ DCS
CTCSS/ DCS is mainly used to avoid listening to unrelated calls on the same frequency. If CTCSS/DCS is set, within the effective communication range, only calls with the same CTCSS/DCS set in the channel can be received; but if CTCSS/DCS signaling is not set, you can listen to the effective communication range All calls on the same channel.
Side Tone Switch
Key side tone: The radio emits key side tone when sending key side tone
ID code side tone: When sending the ID code, the radio will emit the ID code side tone
Button side tone + ID code side tone: When sending button side tone and ID code side tone, the radio emits the corresponding sound
Note: Button side tone: including number key side tone and TONE tone
USB charging
The walkie-talkie can be directly plugged into the USB charging cable and charging with a power bank.
Frequency Measurement Function
Press ![]() +〖*〗key to enter the frequency measurement mode, press【▲】or【▼】key to select U segment or V segment. When the signal is received, if the current frequency has CTCSS/DCS, it will be displayed on the screen at the same time, press
+〖*〗key to enter the frequency measurement mode, press【▲】or【▼】key to select U segment or V segment. When the signal is received, if the current frequency has CTCSS/DCS, it will be displayed on the screen at the same time, press ![]() the key, you can save the current frequency. Or you can select the shortcut operation method by pressing the side button.
the key, you can save the current frequency. Or you can select the shortcut operation method by pressing the side button.
Optional Accessories
Please use the accessories specified by our company.
If you use unlicensed accessories without authorization, all consequences caused by this will be the responsibility of the user.
Please consult your local dealer for optional accessories of the walkie-talkie.
Main Technical Specifications
| Frequency Range | GMRS |
| Memory channels | 60 |
| Frequency step | 12.5kHz |
| Input voltage | 7.4 VDC |
| Battery(standard configuration) | 1800mAH(Li-Ion) |
| Battery life (5-5-90,high power transmission) | About 14 Hours |
| Power: | |
| Consumption in standby | ≤65mA |
| Consumption in reception | ≤450 mA |
| Consumption in transmission | ≤1.8 A @high power 850 mA @ low power |
| Frequency stability | ±2.5ppm |
| Operating temperature | -20 to +60 |
| Antenna impedance | 50Ω |
| Dimensions (With battery, but without antenna) | 121×61×33mm |
| Weight (Including antenna and battery) | 223g |
| Transmit output power | 5W/0.5W |
| Modulation | 11K0F3E@12.5KHz |
| Spurious emission | -36dBm 1GHz -30dBm 1GHz |
| FM signal-to-noise ratio | 40dB @12.5KHz |
| Audio distortion | ≤5% |
| Modulation limit | ±2.5 KHz@12.5 KHz |
| Adjacent channel power | 60dB @ 12.5KHz |
| Audio response (300-3000Hz) | +1~3dB |
| Receiving sensitivity | 0.25μV (12dB SINAD) |
| Adjacent channel selectivity | ≥55dB@12.5KHz |
| Intermodulation immunity | ≥55dB@12.5KHz |
| Conducted spurious emissions | ≤-57dB @12.5KHz |
| FM signal-to-noise ratio | ≥40dB @12.5KHz |
| Audio output power | 1W @16ohms |
| Audio distortion | ≤5% |
| Audio response(300-3000Hz) | +1 -3dB |
All specifications are subject to change without notice or responsibility.
| CH | TX | RX | GMRS | CTC/DCS | |
| Power | W/N | ||||
| 1 | 462.5625 | 462.5625 | 5W | 12.5KHz | 67 |
| 2 | 462.5875 | 462.5875 | 5W | 12.5KHz | 118.8 |
| 3 | 462.6125 | 462.6125 | 5W | 12.5KHz | 127.3 |
| 4 | 462.6375 | 462.6375 | 5W | 12.5KHz | 131.8 |
| 5 | 462.6625 | 462.6625 | 5W | 12.5KHz | 136.5 |
| 6 | 462.6875 | 462.6875 | 5W | 12.5KHz | 141.3 |
| 7 | 462.7125 | 462.7125 | 5W | 12.5KHz | 146.2 |
| 8 | 467.5625 | 467.5625 | 0.5W | 12.5KHz | D243N |
| 9 | 467.5875 | 467.5875 | 0.5W | 12.5KHz | D032N |
| 10 | 467.6125 | 467.6125 | 0.5W | 12.5KHz | D047N |
| 11 | 467.6375 | 467.6375 | 0.5W | 12.5KHz | D051N |
| 12 | 467.6625 | 467.6625 | 0.5W | 12.5KHz | D053N |
| 13 | 467.6875 | 467.6875 | 0.5W | 12.5KHz | D065N |
| 14 | 467.7125 | 467.7125 | 0.5W | 12.5KHz | D116N |
| 15 | 462.55 | 462.55 | 5W | 12.5KHz | 123 |
| 16 | 462.575 | 462.575 | 5W | 12.5KHz | D743I |
| 17 | 462.6 | 462.6 | 5W | 12.5KHz | D332I |
| 18 | 462.625 | 462.625 | 5W | 12.5KHz | 127.3 |
| 19 | 462.65 | 462.65 | 5W | 12.5KHz | D243I |
| 20 | 462.675 | 462.675 | 5W | 12.5KHz | D606N |
| 21 | 462.7 | 462.7 | 5W | 12.5KHz | D731I |
| 22 | 462.725 | 462.725 | 5W | 12.5KHz | 136.5 |
| 23 | 467.55 | 462.55 | 5W | 12.5KHz | 136.5 |
| 24 | 467.575 | 462.575 | 5W | 12.5KHz | 136.5 |
| 25 | 467.6 | 462.6 | 5W | 12.5KHz | 136.5 |
| 26 | 467.625 | 462.625 | 5W | 12.5KHz | 136.5 |
| 27 | 467.65 | 462.65 | 5W | 12.5KHz | 136.5 |
| 28 | 467.675 | 462.675 | 5W | 12.5KHz | 136.5 |
| 29 | 467.7 | 462.7 | 5W | 12.5KHz | 136.5 |
| 30 | 467.725 | 462.725 | 5W | 12.5KHz | 136.5 |
| 31 | 462.5625 | 462.5625 | 5W | 12.5KHz | 67 |
| 32 | 462.5875 | 462.5875 | 5W | 12.5KHz | 118.8 |
| 33 | 462.6125 | 462.6125 | 5W | 12.5KHz | 127.3 |
| 34 | 462.6375 | 462.6375 | 5W | 12.5KHz | 131.8 |
| 35 | 462.6625 | 462.6625 | 5W | 12.5KHz | 136.5 |
| 36 | 462.6875 | 462.6875 | 5W | 12.5KHz | 141.3 |
| 37 | 462.7125 | 462.7125 | 5W | 12.5KHz | 146.2 |
| 38 | 467.5625 | 467.5625 | 0.5W | 12.5KHz | D243N |
| 39 | 467.5875 | 467.5875 | 0.5W | 12.5KHz | D032N |
| 40 | 467.6125 | 467.6125 | 0.5W | 12.5KHz | D047N |
| 41 | 467.6375 | 467.6375 | 0.5W | 12.5KHz | D051N |
| 42 | 467.6625 | 467.6625 | 0.5W | 12.5KHz | D053N |
| 43 | 467.6875 | 467.6875 | 0.5W | 12.5KHz | D065N |
| 44 | 467.7125 | 467.7125 | 0.5W | 12.5KHz | D116N |
| 45 | 462.55 | 462.55 | 5W | 12.5KHz | 123 |
| 46 | 462.575 | 462.575 | 5W | 12.5KHz | D743I |
| 47 | 462.6 | 462.6 | 5W | 12.5KHz | D332I |
| 48 | 462.625 | 462.625 | 5W | 12.5KHz | 127.3 |
| 49 | 462.65 | 462.65 | 5W | 12.5KHz | D243I |
| 50 | 462.675 | 462.675 | 5W | 12.5KHz | D606N |
| 51 | 462.7 | 462.7 | 5W | 12.5KHz | D731I |
| 52 | 462.725 | 462.725 | 5W | 12.5KHz | 136.5 |
| 53 | 462.55 | 462.55 | 5W | 12.5KHz | 136.5 |
| 54 | 462.575 | 462.575 | 5W | 12.5KHz | 136.5 |
| 55 | 462.6 | 462.6 | 5W | 12.5KHz | 136.5 |
| 56 | 462.625 | 462.625 | 5W | 12.5KHz | 136.5 |
| 57 | 462.65 | 462.65 | 5W | 12.5KHz | 136.5 |
| 58 | 462.675 | 462.675 | 5W | 12.5KHz | 136.5 |
| 59 | 462.7 | 462.7 | 5W | 12.5KHz | 136.5 |
| 60 | 462.725 | 462.725 | 5W | 12.5KHz | 136.5 |

Documents / ResourcesDownload manual
Here you can download full pdf version of manual, it may contain additional safety instructions, warranty information, FCC rules, etc.
Download Retevis RA85 - 5W Long Range GMRS Handheld Radio Manual
Advertisement


Need help?
Do you have a question about the RA85 and is the answer not in the manual?
Questions and answers