Advertisement
- 1 Antenna
- 2 Battery
- 3 Unpacking and checking device
- 4 Package Contents
- 5 Features and specifications
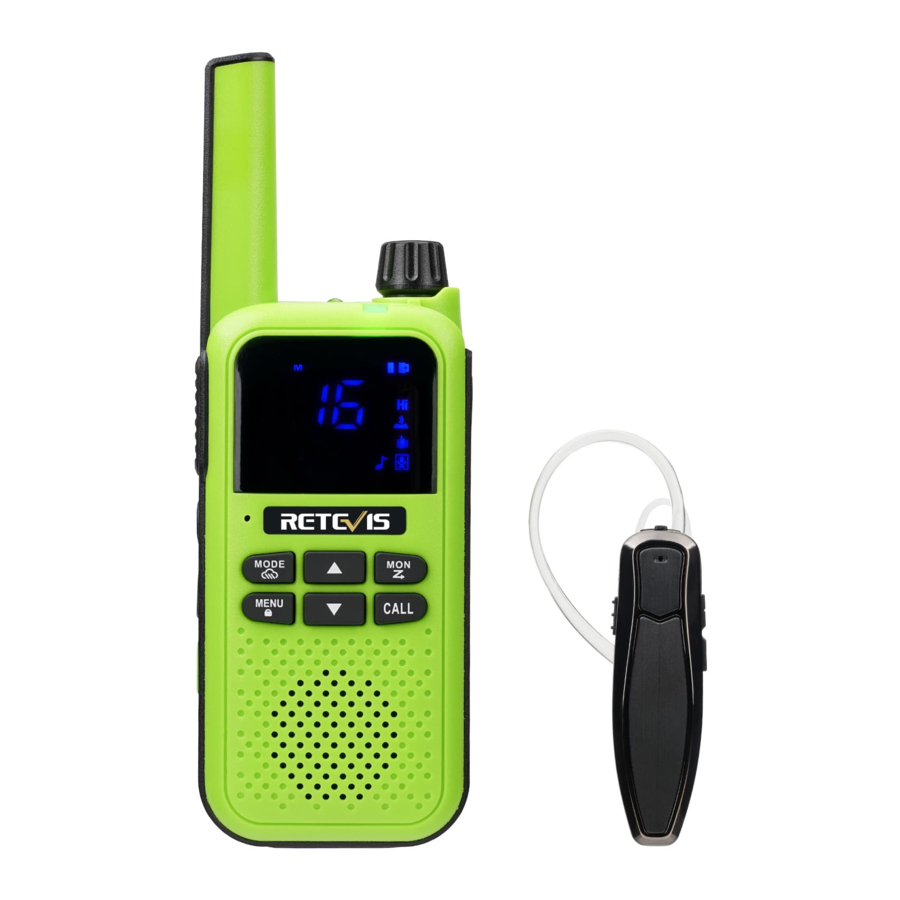
- 6 Familiar with walkie-talkie
- 7 Install the battery
- 8 Battery capacity maintenance
- 9 Turn on and off the walkie-talkie
- 10 Setting the volume
- 11 Send and Receive
- 12 Select channel
- 13 Select subcode
- 14 Set the squelch level
- 15 Set Transmission Call Alert Tone
- 16 Voice control level selection
- 17 Dual channel monitoring settings
- 18 Key tone switch settings
- 19 Side button function
- 20 Description of Easy pairing function
- 21 Description of Bluetooth pairing function
- 22 Keyboard key function
- 23 NOAA mode
- 24 Frequency table
- 25 NOAA
- 26 Documents / Resources
Antenna
Do not use portable walkie-talkies with damaged antennas. If the damaged antenna comes into contact with your skin, it will cause mild burns.
Battery
If some conductive material on your body comes into contact with the exposed battery terminals, it will cause damage to your property and cause personal injury such as burns. These conductive materials include jewelry, keys or bead necklaces, which can form a circuit with the battery (cause a short circuit) and rapidly heat up and cause burns. Be cautious when handling charged batteries, especially when you put them in your pockets, purses, or other containers with metal objects.
Unpacking and checking device
Please take the walkie-talkie out of the box carefully. We recommend that you confirm whether the packaging contains the items listed in the table below before discarding packaging materials. If any items are lost or damaged during delivery, please contact the dealer immediately.
Package Contents
| Serial number | Package Contents | Quantity |
| 1 | Walkie Talkie | 1 |
| 2 | Rechargeable Li-on battery | 1 |
| 3 | Battery cover | 1 |
| 4 | Back clip | 1 |
| 5 | USB split charger | 1 |
| 6 | Charging cable | 1 |
| 7 | Cowhide box | 1 |
| 8 | Bluetooth headset | 1 |
| 9 | Manual | 1 |
Features and specifications
- 155 Subcodes
- Easy pairing
- Bluetooth headset intercom
- Vibration reminder
- Room monitoring
- LED flashlight
- 10 kinds of optional call prompt tone prompt
- Segmented LED display
- USB charging
- Channel monitoring
- Dual channel monitoring
- Keyboard lock
Familiar with walkie-talkie


Install the battery
Each walkie-talkie can use the random lithium battery pack, or nickel-metal hydride rechargeable battery pack or three A alkaline batteries, and it will sound a beep when the battery is low, and the battery icon and red indicator light will flash.
- When the back of the walkie-talkie faces you, push the battery lock button backward and lift it up to remove the battery pack.
- When installing the battery, insert the lithium battery pack into the battery slot, press the battery down, and install it in place when you hear a "click" sound.
- When using Ni-MH rechargeable battery pack or three A alkaline batteries, please use the battery cover. Walkie-talkie battery meter
The number of power bars (0-3) on the displayed radio battery icon indicates the remaining battery power. When the walkie-talkie battery meter shows a grid on the right, the walkie-talkie has about 30% power left. When the battery icon flashes and indicates that the battery is low, it needs to be charged in time.
Battery capacity maintenance
When not in use, charge the battery every 3 months, and remove the battery from the walkie-talkie when storing.
Store the battery in a place with a temperature between -20°C and 35°C and low humidity. Avoid moisture and corrosive materials. Using the micro USB charger USB split charger allows you to charge the lithium battery pack.
- Turn off the power of the walkie-talkie before starting charging.
- Insert the micro USB cable into the USB split charger, insert the lithium battery or the walkie-talkie with the battery into the corresponding slot of the charger, the red light turns on to start charging, when the green light turns on, it means the battery is full, please take it Lower the battery. You can also directly plug the micro USB cable into the USB charging port on the walkie-talkie. Connect the other end of the micro USB charger to the corresponding charging adapter.
Turn on and off the walkie-talkie
To turn on the radio, turn the knob clockwise. To turn off the radio, turn the knob counterclockwise.
Setting the volume
To increase the volume, turn the knob clockwise. To lower the volume, turn the knob counterclockwise. Do not let the walkie-talkie close to your ears. If the volume setting is not appropriate, it may damage your hearing.
Send and Receive
All walkie-talkies in your group must be set to the same channel and subcode to communicate.
- Take the walkie-talkie 2-3 cm away from your mouth.
- Press and hold the PTT button, speak into the microphone, and the machine indicator will light up in red.
- Release the PTT button to answer the call, and the green light of the walkie talkie will light up.
Select channel
Channel refers to the frequency used by the walkie-talkie for transmission.
- Press the
![]() button until the
button until the ![]() icon is displayed, Channel number starts to flash.
icon is displayed, Channel number starts to flash. - Press
![]() or
or ![]() to change the channel. Long pressing these buttons will quickly scroll through the channels.
to change the channel. Long pressing these buttons will quickly scroll through the channels. - Press the PTT button to save and exit the menu, or press the
![]() menu to continue setting.
menu to continue setting.
 button until the
  icon is displayed, Channel number starts to flash.
 or
or  to change the channel. Long pressing these buttons will quickly scroll through the channels.
 menu to continue setting.
Select subcode
The subcode can minimize interference by preventing transmission from unknown sources. Your walkie-talkie has 155 sub codes. To set the code of the channel, do the following
- Press the
![]() button until the
button until the ![]() icon is displayed, Subcode number starts to flash.
icon is displayed, Subcode number starts to flash. - Press
![]() or
or ![]() to select the code. You can press and hold this button to speed up scrolling through the code.
to select the code. You can press and hold this button to speed up scrolling through the code. - Press the PTT button to save and exit the menu, or press the
![]() to continue setting.
to continue setting.
 button until the
  icon is displayed, Subcode number starts to flash.
 to continue setting.
Set the squelch level
- 1. Press the
![]() button until the
button until the ![]() icon is displayed, squelch level number starts to flash.
icon is displayed, squelch level number starts to flash. - Press
![]() or
or ![]() to select the level.
to select the level.
 button until the
  icon is displayed, squelch level number starts to flash.
Press the PTT button to save and exit the menu, or press the to continue setting.
Set Transmission Call Alert Tone
Your walkie-talkie can transmit different call prompts to other walkie-talkies in your group. Your walkie-talkie has 10 call prompt tones for you to choose. To set the call alert tone, do the following:
- Press the
![]() button until the
button until the ![]() and
and ![]() icon is displayed, Call alert tone code starts to flash.
icon is displayed, Call alert tone code starts to flash. - Press
![]() or
or ![]() to change and listen to the call alert tone
to change and listen to the call alert tone - Press the PTT button to save and exit the menu, or press the
![]() to continue setting.
to continue setting.
 button until the
  and
and  to continue setting.
In order to transmit your call alert tone to other walkie-talkies, please set the same channel and sub-code on your walkie-talkie, and then press the call alert tone.
Voice control level selection
- Press the
![]() button until the VOX icon is displayed. VOX sensitivity level code(OFF, 01-09) starts to flash.
button until the VOX icon is displayed. VOX sensitivity level code(OFF, 01-09) starts to flash. - Press
![]() or
or ![]() to change the sensitivity level.
to change the sensitivity level. - Press the PTT button to save and exit the menu, or press the
![]() to continue setting.
to continue setting.
 button until the VOX icon is displayed. VOX sensitivity level code(OFF, 01-09) starts to flash.
Dual channel monitoring settings
Allows you to alternately scan the current channel and another channel.
- Press the
![]() until the 2CH icon is displayed, and the current setting will flash.
until the 2CH icon is displayed, and the current setting will flash. - Press
![]() or
or ![]() to change the channel for dual watch.
to change the channel for dual watch. - Press the PTT button to save and exit the menu, or press the
![]() to continue setting.
to continue setting.
After setting the dual standby channel, the screen will alternately display the main channel and dual-channel monitor channel during standby.
Key tone switch settings
- Press the
![]() until the
until the ![]() icon is displayed, The current setting will flash.
icon is displayed, The current setting will flash. - Press
![]() or
or ![]() to change the tone on or off
to change the tone on or off - Press the PTT button to save and exit the menu, or press the
![]() to continue setting.
to continue setting.
 icon is displayed, The current setting will flash.
Side button function
![]() function description
function description - Short this button to switch the LED flashlight switch.
- Long press the button to switch the vibration function switch. When the vibration function is turned on, the
![]() icon is displayed, and the vibration is triggered when the call is answered for 3 seconds. If there is no operation within 30 seconds after the previous call, it will be triggered again when calling again.
icon is displayed, and the vibration is triggered when the call is answered for 3 seconds. If there is no operation within 30 seconds after the previous call, it will be triggered again when calling again.
![]() function description
function description - Short press the button to enter the easy pairing state, and the
![]() icon is displayed. See the easy pairing function for details.
icon is displayed. See the easy pairing function for details. - Long press the button to enter the Bluetooth pairing state, and the
![]() icon is displayed. See the description of Bluetooth pairing function for details.
icon is displayed. See the description of Bluetooth pairing function for details.
- Short press the button to enter the easy pairing state, and the
![]() functions description
functions description - Short press the button, the machine enters the emergency alarm state, press PTT to exit the alarm state. If it is a remote alarm, when the alarm sounds, the red indicator light is on, and the alarm sound will be transmitted to the receiving group
(![warning]() Note: The receiving group must be on the same channel as you and have the same channel settings). If it is a local alarm, only the unit can sound the alarm.
Note: The receiving group must be on the same channel as you and have the same channel settings). If it is a local alarm, only the unit can sound the alarm. - Long press the button, the transmission end prompt sound switch is switched, and the
![]() icon is displayed when the function is turned on, and the walkie-talkie can be set to transmit a unique prompt sound after the transmission is completed. This is like saying "Roger" or "Over" to let others know that you have finished the call.
icon is displayed when the function is turned on, and the walkie-talkie can be set to transmit a unique prompt sound after the transmission is completed. This is like saying "Roger" or "Over" to let others know that you have finished the call.
- Short press the button, the machine enters the emergency alarm state, press PTT to exit the alarm state. If it is a remote alarm, when the alarm sounds, the red indicator light is on, and the alarm sound will be transmitted to the receiving group
 function description
  icon is displayed, and the vibration is triggered when the call is answered for 3 seconds. If there is no operation within 30 seconds after the previous call, it will be triggered again when calling again.
 function description
  icon is displayed. See the easy pairing function for details.
 icon is displayed. See the description of Bluetooth pairing function for details.
 functions description
  icon is displayed when the function is turned on, and the walkie-talkie can be set to transmit a unique prompt sound after the transmission is completed. This is like saying "Roger" or "Over" to let others know that you have finished the call.
Description of Easy pairing function
The easy pairing function allows a group of walkie-talkie users to quickly and simultaneously program all their walkie-talkies to the same channel and sub-code settings.
Any walkie-talkie in the group can be designated as a "leader walkie-talkie", and its channel and sub-code settings are transmitted to all other walkie-talkies (member walkie-talkies) in the group for copying.
Choose any walkie-talkie as the "leader walkie-talkie". On this walkie-talkie, program the channel and subcode to copy the combination of channel and subcode to all other "member walkie-talkies";
- Press the pairing button on the member walkie-talkie, you will see the
![]() icon flashing on the display. This confirms that the radio is in easy pairing mode and is waiting to receive the channel and subcode settings from the leader radio.
icon flashing on the display. This confirms that the radio is in easy pairing mode and is waiting to receive the channel and subcode settings from the leader radio. - Groups containing many walkie-talkies should have all users perform this step at the same time, so that all walkie-talkies can be programmed at the same time, and all member walkie-talkies will remain in this mode for 2 minutes.
- On the leader walkie-talkie, press the pairing button once, the
![]() icon flashes on the display, and then press the button again. The red indicator light is on, the leader walkie-talkie starts to transmit settings to the member walkie-talkie, the red light is off, and the transmission is complete.
icon flashes on the display, and then press the button again. The red indicator light is on, the leader walkie-talkie starts to transmit settings to the member walkie-talkie, the red light is off, and the transmission is complete.
 icon flashing on the display. This confirms that the radio is in easy pairing mode and is waiting to receive the channel and subcode settings from the leader radio.
Description of Bluetooth pairing function
(this function can only be used on devices with Bluetooth function).
The machine enters the  mode display, the blue light flashes, and the machine enters the pairing state.
- Turn the Bluetooth headset switch to ON, the Bluetooth headset prompts to turn on, the blue light and red light flash alternately, and the Bluetooth headset enters the pairing state.
- After the pairing is successful, the blue light of the machine stops flashing, and the indicator light of the Bluetooth headset stops flashing.
- You can start the radio transmission by short pressing the button on the Bluetooth headset, and then press the button on the Bluetooth headset again to stop transmitting and be in the receiving mode.
( Note: After the pairing is successful, you need to wait about 20 seconds to start the transmission for the first time, and there is no need to wait in the subsequent.)
Keyboard key function
- Press
![]() button shortly to switch"RoomMonitor"function on/off, when"Room-Monitor"is turned on, the
button shortly to switch"RoomMonitor"function on/off, when"Room-Monitor"is turned on, the ![]() icon is displayed
icon is displayed - Press the channel mode and NOAA modelongerto switch (Only forthe US version).
- Press
![]() buttonshortly to enter the menu. However, press the keyboard to lock/unlock, when the keyboard is locked, the
buttonshortly to enter the menu. However, press the keyboard to lock/unlock, when the keyboard is locked, the ![]() icon will appear.
icon will appear. - Press the
![]() or
or ![]() button to change the parameter setting.
button to change the parameter setting. - Press
![]() button for longer to turn on "Monitor".
button for longer to turn on "Monitor". - Press
![]() button shortly to enter "Scan", searching all channels. Once you turn "Scan" on, the
button shortly to enter "Scan", searching all channels. Once you turn "Scan" on, the ![]() icon will display. Or else, Press any button( except the up/down button ) to exit scanning.
icon will display. Or else, Press any button( except the up/down button ) to exit scanning. - Press
![]() buttonshort to send the call tone, However, press thebutton longer to quickly enter the call tone selection menu.
buttonshort to send the call tone, However, press thebutton longer to quickly enter the call tone selection menu.
 button shortly to switch"RoomMonitor"function on/off, when"Room-Monitor"is turned on, the
  icon is displayed
 icon will appear.
 button for longer to turn on "Monitor".
 icon will display. Or else, Press any button( except the up/down button ) to exit scanning.
 buttonshort to send the call tone, However, press thebutton longer to quickly enter the call tone selection menu.
NOAA mode
Long press the button  to enter the NOAA mode, and the
  icon will display.
- In NOAA mode, press the
![]() button to enter the NOAA channel selection, press
button to enter the NOAA channel selection, press ![]() or
or ![]() to change the channel.
to change the channel. - Press the
![]() button to enter the NOAA emergency state switch setting. When the function is turned on, the
button to enter the NOAA emergency state switch setting. When the function is turned on, the ![]() icon is displayed. After the change function is turned on, when the 1050HZ audio signal is received, the machine will forcibly switch to NOAA mode and emit an alarm sound. Press other buttons to cancel the alarm and receive the information from NOAA normally.
icon is displayed. After the change function is turned on, when the 1050HZ audio signal is received, the machine will forcibly switch to NOAA mode and emit an alarm sound. Press other buttons to cancel the alarm and receive the information from NOAA normally.
 button to enter the NOAA channel selection, press
  button to enter the NOAA emergency state switch setting. When the function is turned on, the
  icon is displayed. After the change function is turned on, when the 1050HZ audio signal is received, the machine will forcibly switch to NOAA mode and emit an alarm sound. Press other buttons to cancel the alarm and receive the information from NOAA normally.
 Note :You can find companding, whisper and more features in the software
Frequency table
| Serial number | Frequency | Sub audio | Power | |||
| 1 | 462.5625 | OFF | 2W | |||
| 2 | 462.5875 | OFF | 2W | |||
| 3 | 462.6125 | OFF | 2W | |||
| 4 | 462.6375 | OFF | 2W | |||
| 5 | 462.6625 | OFF | 2W | |||
| 6 | 462.6875 | OFF | 2W | |||
| 7 | 462.7125 | OFF | 2W | |||
| 8 | 467.5625 | OFF | 0.5W | |||
| 9 | 467.5875 | OFF | 0.5W | |||
| 10 | 467.6125 | OFF | 0.5W | |||
| 11 | 467.6375 | OFF | 0.5W | |||
| 12 | 467.6625 | OFF | 0.5W | |||
| 13 | 467.6875 | OFF | 0.5W | |||
| 14 | 467.7125 | OFF | 0.5W | |||
| 15 | 462.5500 | OFF | 2W | |||
| 16 | 462.5750 | OFF | 2W | |||
| 17 | 462.6000 | OFF | 2W | |||
| 18 | 462.6250 | OFF | 2W | |||
| 19 | 462.6500 | OFF | 2W | |||
| 20 | 462.6750 | OFF | 2W | |||
| 21 | 462.7000 | OFF | 2W | |||
| 22 | 462.7250 | OFF | 2W | |||
NOAA
| Serial number | Frequency |
| 1 | 162.5500 |
| 2 | 162.4000 |
| 3 | 162.4750 |
| 4 | 162.4250 |
| 5 | 162.4500 |
| 6 | 162.5000 |
| 7 | 162.5250 |
| 8 | 161.6500 |
| 9 | 161.7750 |
| 10 | 161.7500 |
| 11 | 162.0000 |

Documents / ResourcesDownload manual
Here you can download full pdf version of manual, it may contain additional safety instructions, warranty information, FCC rules, etc.
Advertisement


Need help?
Do you have a question about the RA19 and is the answer not in the manual?
Questions and answers