Advertisement
- 1 Features
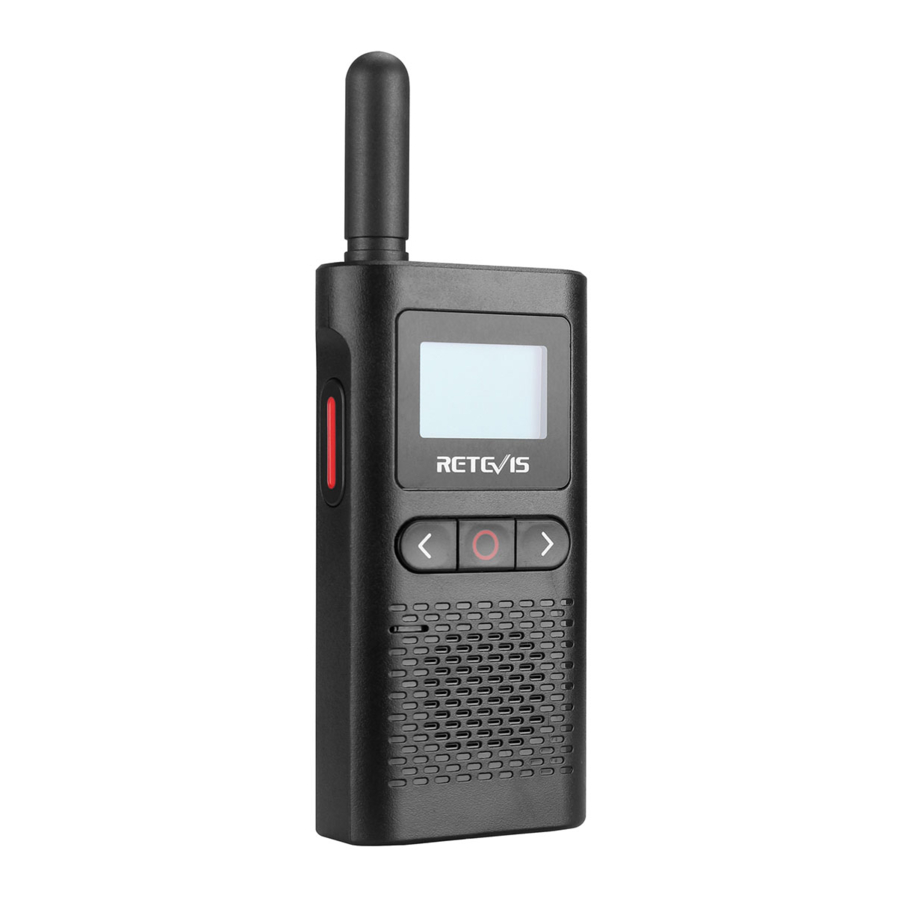
- 2 Buttons and functions
- 3 LCD display
- 4 Battery installation
- 5 Battery display and low battery warning
- 6 Use the charger to charge
- 7 Turn on/off the radio
- 8 Volume setting
- 9 Transmit and receive
- 10 TOT function
- 11 Set the channel
- 12 Tone code selection
- 13 Set the calling tone
- 14 Vox function
- 15 Set high/low power
- 16 Scan function
- 17 Roger beep
- 18 Button control
- 19 Lock key
- 20 Power saving function
- 21 Weather forecast
- 22 Enter weather mode
- 23 Set up weather alerts
- 24 Headphone function
- 25 Specification Table
- 26 Programme
- 27 Frequency table(FRS)
- 28 Weather channel and frequency
- 29 Documents / Resources
Features
- LCD backlight display
- 22 channels
- 121 subtone codes (38 analog, 83 digital)
- Busy lock
- Headphone jack
- 10 optional calling tones
- (VOX) Vox function
- High and low power
- Roger beep
- Companding function
- Battery display
- Scanning function
- Keypad lock
- Voice prompt
- Power saving function
- Low battery alarm
- Keypad tones
- TOT function
- Weather forecast stations (please refer to the weather forecast frequency table), only the US version and the Canadian version are supported.
- Weather forecast function, only supported by the US and Canadian versions.
Buttons and functions

LCD display

 - Weather forecast
 - Battery power
 - Vox
- Vox
 - Scan
 - High power
 - Lock
 - Volume mute
 - Status(tx/rx)
Battery installation
- Battery: Li-ion battery.
- Press the battery upwards to remove the battery.
- Put the battery into the battery slot, pay attention to install the battery strictly according to the positive + negative-instructions in the slot, and press down firmly.
- Reinstall the battery.
Battery display and low battery warning
The battery icon shows the battery level, from full display to space (0 battery). The 0 battery reminds the user to charge in time, and is accompanied by a low battery reminder (once 30 seconds). When the battery power is low, the intercom will be shut down.
Note: When storing the radio for a long time, please remove the battery first.
Long-term corrosion of the battery will cause damage to the radio.
Use the charger to charge
- Make sure the radio is closed.
- Insert the Type-c charging plug into the jack of the radio with the rechargeable battery, and plug the other end of the charger into the power socket on the wall.
- During the charging process, the battery symbol is displayed on the mobile to indicate the charging state. When the battery is fully charged, the battery symbol stops.
Flashing, Advise to keep the radio closed when it's charging, if you try to perform an intercom operation during charging, some abnormal phenomena may occur when the battery is almost empty.
Turn on/off the radio
Press the button to turn on or off the radio. When turn on the radio, the horn of radio sounds a boot prompt and displays all the icons on the full screen. After the power-on done, the radio is in the walkie-talkie mode by default, displaying the currently used channel number and subtone code, etc.
Volume setting
- In the standby or receiving state, press the ˂ or ˃ key, the LCD of the radio will display the current volume.
- Then press ˂ or ˃ to increase or decrease the volume of the radio. 0,1-9 level the volume can be adjusted.
- Press the key to decrease the volume to level 0, the mute icon (
![]() ) will be displayed on the LCD of the walkie-talkie, and the speaker sound will be turned off.
) will be displayed on the LCD of the walkie-talkie, and the speaker sound will be turned off.
Note: When the volume is not adjusted to a proper state, Don't put the speaker of the walkie-talkie too close to your ears to avoid damage to your ears due to too much sound.
Transmit and receive
- Press and hold the [PTT] key, keep a distance of 3 to 5 cm from the micro- phone, and talk at a normal speaking rate. When the display launches When the icon (
![]() ) is displayed, it means that a message is being sent. In order to avoid cutting off your call, please press the [PTT] button to pause for a while, and then start speaking.
) is displayed, it means that a message is being sent. In order to avoid cutting off your call, please press the [PTT] button to pause for a while, and then start speaking. - When you finish the call, please release the [PTT] key. You can receive the signal. When receiving, the icon (
![]() ) will be displayed.
) will be displayed.
TOT function
When you press and hold the [PTT] button for more than 15-180 seconds, the intercom will emit a continuous warning tone and the intercom will automatically stop transmitting.
Set the channel
- In the standby state of the radio mode, press the key once, the current channel will flash.
- Press the ˂ or ˃ key to select the channel number you want to set.
- Press PTT key to save the current setting and exit the menu or press ◎ key to skip to the next menu setting.
- The radio can only be communicated when the radio is set to the same channel, and the radio is clear and no noise.
Tone code selection
The distribution of tone codes can reduce the mutual interference between radios, but the radios with different tone codes cannot make calls. Each channel has 0 to 121 tone codes, so that your communication is more confidential. The analog subtone codes Code 1-38 are available, and the digital subtone codes Code 39-121 are available. Code 0 is the closed state of the tone code.
- In the standby mode of the radio mode, press the ◎ key twice, the current tone code will flash.
- Press the ˂ or ˃ key to select the tone code you want to set. Press and hold the ˂ or ˃ key to quickly switch tones
- Press【PTT】key to save the current setting and exit the menu or press ◎ key to skip to the next menu setting.
Set the calling tone
- In the standby state of the radio mode, press the ◎ key 3 times, the current call tone setting interface will flash "CA"
- Press ˂ or ˃ to select the calling tone you want to set, and the intercom speaker will emit the corresponding set calling tone sound
- Press【PTT】key to save the current setting and exit the menu or press ◎ key to skip to the next menu setting.
Note: When the calling tone menu setting is set to 0, it means that the setting is no calling tone, and the calling function will be invalid when the ˃ key is long pressed.
Vox function
When the VOX function is set to on, you can use the radio to talk without pressing the [PTT] key, and speaking directly into the microphone will automatically start the transmission.
- In the standby mode of the walkie-talkie mode, press the ◎ key 4 times, VOX will appear on the screen, and the VOX level can be set.
- Press ˂ or ˃ key to select sensitivity level 1-9:
9 = High sensitivity level 5 = Medium sensitivity level
1 = Low sensitivity level 0 = OFF - Press【PTT】key to save the current setting and exit the menu or press ◎ key to skip to the next menu setting.
- Select sensitivity 0, turn off the VOX function, and the VOX icon will disappear.
- The transmitter can be launched into the microphone. There is a short delay between the start of speaking and the launch of the radio
- Stop speaking, you can enter the receiving state.
Set high/low power
In the standby state of the radio mode, press the ◎ key 5 times, and "Pr" will be displayed on the screen.
Press ˂ or ˃ key to select power LO or HI. (LO: low power / HI: high power) Press【PTT】key to save the current settings and exit the menu.
Scan function
In the standby state of the radio mode, press the ◎ key 6 times, and "SC" will be displayed on the screen.
Press ˂ or ˃ key to select on and off
Press【PTT】key to save the current settings and exit the menu to start
The scanning function of the radio scans the effective signal channels, which can easily scan 22 channels
Note: When the scan menu setting is selected as OF, the scan function will be invalid when you press the [Power Switch/Scan] key.
Start scanning:
- In the radio standby mode, press the [Power Switch/Scan] key to enter the scan mode, the channel number will be displayed in upward increments, and the SCAN icon will be displayed on the LCD.
- When an active channel is detected, the intercom will automatically suspend receiving signals on this channel until the signal disappears.
Lost. After the signal disappears and wait for 5 seconds, the intercom will continue to scan. - Press the [PTT] key during scanning, and the intercom will stop transmitting on the channel that started scanning. in the case of
When a valid signal is detected and the reception is stopped, press the [PTT] key, and the intercom will transmit on the current channel. release
Wait 5 seconds after 【PTT】key, the intercom will continue to scan - Press the [Power Switch/Scan] key again to exit the scan and return to the radio standby mode.
Roger beep
- In the standby state of the radio mode, press the ◎ key 7 times, the setting interface of the current call end tone will display "rb".
- Press ˂ or ˃ key to select on and off,
- Press【PTT】key to save the current setting and exit the menu or press ◎ key to end the setting.
Note: When the call end tone is turned on, press PTT after the call ends, the machine will give a prompt tone, and the receiver will also receive a prompt tone.
Button control
[Power switch/scan] key: long press this key to turn on or off the radio; short press this key to turn on or off the scan.
- 【˂ 】key: long press this key to switch between radios and weather forecast modes; short press this key to increase the volume.
- 【˃ 】key: long press this key to emit the calling tone; short press this key to decrease the volume.
- 【◎ 】key: long press this key to operate the lock or unlock function; short press this key to enter or exit the menu.
- 【PTT】key can be set: transmit or save settings (in menu mode).
Lock key
The keyboard lock function is to prevent users from misoperation when they don't want to change the settings of the radio
- Press and hold the 【◎ 】key until the icon (
![]() ) appears to enter the keyboard lock state.
) appears to enter the keyboard lock state. - Long press and hold the 【◎ 】key until the icon (
![]() ) disappears to exit the keyboard lock state.
) disappears to exit the keyboard lock state.
Note: When the keyboard is locked, except for pressing the [PTT] and [Power Switch/Scan] keys, any key press will sound a key failure tone.
Power saving function
The radio has a unique function to extend the service life of the battery. If there is no call or voice reception within 10 seconds, the walkie-talkie will automatically enter the power saving mode. In this mode, the radio can still receive information.
Weather forecast
The weather function can be used in the United States and Canada
You can listen to the weather channel (see the "Weather Channels and Frequencies" table for details). When you listen to the weather channel, you cannot use radio communication in scan mode or two-way.
Both NOAA and Environment of Canada have transmitters throughout the United States and Canada. These transmitters broadcast, forecast and other information 24 hours a day.
Enter weather mode
In the radio standby mode, press and hold the [˂] button for 1 second to enter the weather mode.
Set up a weather channel
Weather frequency on your radio:
- In the weather mode, press the (MENU) button until the weather channel number flashes.
- Press the ˂ or ˃ button to select a suitable channel with good reception in your area.
- Press【 ◎ 】button to set and exit the menu.
Set up weather alerts
Your radio can be set to respond to NOAA weather broadcast emergencies. A special alarm sound will sound an alarm and turn on the weather receiver to provide you with real-time weather and emergency information.
In the weather mode, press the [◎] button twice until the icon is ![]() displayed.
displayed.
- Press the ˂ or ˃ button to select on/off.
- Press the 【◎】button to exit the weather menu setting.
- Press and hold the [˂] button for 1 second to return to the radio mode. If you activate the weather alarm and return to the walkie-talkie mode, the icon will be
![]() displayed.
displayed.
Note: After the weather channel is enabled, if you receive an alarm, press and hold the [˂] button for 1 second, the weather mode will automatically return to the radio mode.
Headphone function
- Connect the earphone to the walkie-talkie (radio A&B).
- Press the PTT button of the headset of the radio A to send a voice to the MIC of the headset, and the radio B should be able to receive normally. Repeat the same operation on radio B.
Specification Table
| GENERAL | |
| Frequency Rang | 462.5500~467.7125MHz |
| Channel capacity | 22 CH |
| Working Voltage | 3.7 V |
| Antenna impedance | 50Ω |
| Step frequency | 12.5KHz |
| TRANSMITTER | |
| Output power | 2 W / 0.5 W |
| Adjacent channel power | ≥60dB |
| TX current | ≤1.35A |
| Spurious radiation | ≤7.5µW |
| Modulation limited | ≤2.5kH |
| RECEIVER | |
| RF sensitivity | ≤0.25uV |
| Opening sensitivity | ≤0.20uV |
| Audio output | ≥300mW |
| Receive current | ≤410 mA |
| Waiting current | ≤20mA |
Programme

The programming software can quickly change and expand the function.
Frequency table(FRS)
| Channel | Frequency | Max Power Output | Channel | Frequency | Max Power Output |
| 1 | 462.5625MHz | 2 W | 12 | 467.6625MHz | 0.5 W |
| 2 | 462.5875MHz | 2 W | 13 | 467.6875MHz | 0.5 W |
| 3 | 462.6125MHz | 2 W | 14 | 467.7125MHz | 0.5 W |
| 4 | 462.6375MHz | 2 W | 15 | 462.5500 MHz | 2 W |
| 5 | 462.6625MHz | 2 W | 16 | 462.5750 MHz | 2 W |
| 6 | 462.6875MHz | 2 W | 17 | 462.6000 MHz | 2 W |
| 7 | 462.7125MHz | 2 W | 18 | 462.6250 MHz | 2 W |
| 8 | 467.5625MHz | 0.5 W | 19 | 462.6500 MHz | 2 W |
| 9 | 467.5875MHz | 0.5 W | 20 | 462.6750 MHz | 2 W |
| 10 | 467.6125MHz | 0.5 W | 21 | 462.7000 MHz | 2 W |
| 11 | 467.6375MHz | 0.5 W | 22 | 462.7250 MHz | 2 W |
Weather channel and frequency
| Channel | Frequency | Channel | Frequency |
| WX1 | 162.550MHz | WX7 | 162.525MHz |
| WX2 | 162.400MHz | WX8 | 161.650MHz |
| WX3 | 162.475MHz | WX9 | 161.775MHz |
| WX4 | 162.425MHz | WX10 | 161.750MHz |
| WX5 | 162.450MHz | WX11 | 162.000MHz |
| WX6 | 162.500MHz |

Documents / ResourcesDownload manual
Here you can download full pdf version of manual, it may contain additional safety instructions, warranty information, FCC rules, etc.
Advertisement


Need help?
Do you have a question about the RB28 and is the answer not in the manual?
Questions and answers