Retevis RT388 - Kids Walkie Talkie Manual
- User manual (14 pages) ,
- User manual (39 pages)
Advertisement
- 1 Introduction
- 2 Product Inspection
- 3 Radio Parts and Controls
- 4 Product Features
- 5 Product Features
- 6 Product Features
- 7 Installation
-
8
Operation
- 8.1 Turning on the radio
- 8.2 Turning off the radio
- 8.3 Adjusting volume level
- 8.4 Receiving
- 8.5 Transmitting
- 8.6 Channel Lock
- 8.7 Flashlight
- 8.8 Select Channel
- 8.9 Set CTCSS Code
- 8.10 VOX for Hands-free
- 8.11 Select Call Tone
- 8.12 Channel Scan
- 8.13 Call Another Party
- 8.14 Monitor
- 8.15 Battery Level Indicator
- 8.16 External Headset/Microphone Jack
- 8.17 Charging(Optional)
- 8.18 Simple Maintenance Tips
- 9 Troubleshooting
- 10 Documents / Resources
Introduction

Read this operating instruction carefully before using your Retevis RT388 two way radio, including the part on Product Safety and RF Energy Exposure Compliance
Product Inspection
| Item Included | Quantity(Pcs) |
| Walkie Talkie | 2 |
| Belt Clip | 2 |
| User's Guide | 1 |
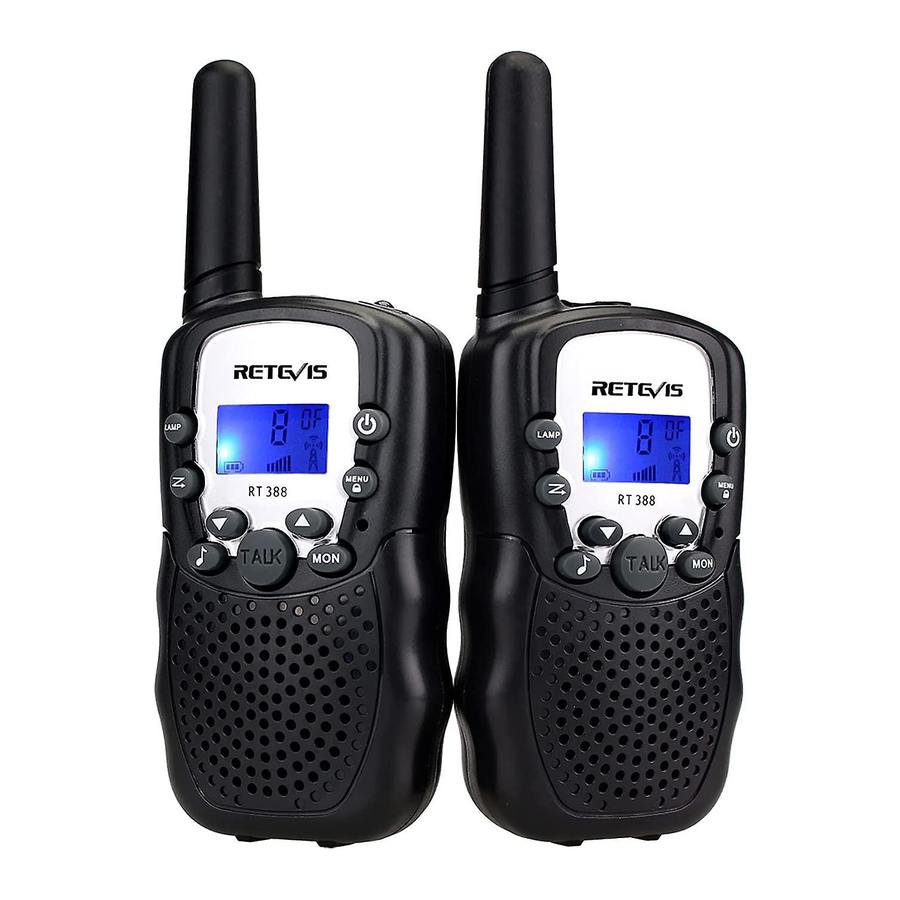
Radio Parts and Controls


Product Features
Each unit takes 4 AAA batteries
Batteries are not included in the package. You need to prepare batteries first to get the units work, and we recommend you always using high quality AAA Alkaline batteries.
Belt Clip
Kids can clip the units to their pocket or elsewhere while they are on the go.
Call Tone Button
By pressing button ![]() , you can inform other radio users in your group that you want to talk or have finished talking. When button
, you can inform other radio users in your group that you want to talk or have finished talking. When button ![]() is pressed, a tone would be transmitted.
is pressed, a tone would be transmitted.
LCD Display
Various information accessible at one glance, including channel number, CTCSS code, volume level and other status of the radio.
On/Off Power Button
Press and hold this button ![]() to turn on/off the radio.
to turn on/off the radio.
Lamp Button
By pressing "LAMP" button to turn on/off the flashlight.
Convenient for those who use the radio at night.
Scan Button
Press button ![]() to detect channels with activities or stop scanning.
to detect channels with activities or stop scanning.
MENU/ Button
Switch on/off the functions you want to start or stop.
You can also lock the channle by this button.
Monitor Button
Enable you to continuously monitor weak signals.
Talk Button
Press and hold this button to talk and let go to listen.
Up and Down Key
To select channels, set CTCSS code, adjust volume level, listening volume and other usage.
Speaker/Mic/Charger Jack
You can use the unit with external speaker/ Mic, or give the unit a charge through this jack.
Product Features
| TECHNICAL PARAMETERS | |
| Product number | RT388 |
| Frequency range | FRS |
| Channel number | 22 |
| Channel spacing | 12.5KHz |
| Working voltage | 4.8V |
| Frequency stability | ±2.5ppm |
| Operating temperature range | -20 ~50 |
| The antenna impedance | 50Ω |
| Overall dimensions | 140*55*28mm |
| Weight | 79g |
| TRANSMITER | |
| Rf power | 0.5W |
| Modulation method | 11kΦF3E |
| Noise and harmonic | -40dB |
| Residual Radiation | ≤-35dB |
| Modulation distortion | ≤7% |
| Maximum deviation | ≤±5KHz |
| RECEIVER | |
| The sensitivity | ≤0.2uV |
| Modulation receiver bandwidth | ±5KHz |
| Adjacent selective | ≥40dB |
| Intermodulation interference resistance | ≥35dB |
| Spurious response inhibition | ≥70dB |
| Audio output power | ≥300mW |
| Audio distortion | ≤8% |
Product Features
| Channel | Frequency | Channel | Frequency |
| 1 | 462.5625 | 12 | 467.6625 |
| 2 | 462.5875 | 13 | 467.6875 |
| 3 | 462.6125 | 14 | 467.7125 |
| 4 | 462.6375 | 15 | 462.5500 |
| 5 | 462.6625 | 16 | 462.5750 |
| 6 | 462.6875 | 17 | 462.6000 |
| 7 | 462.7125 | 18 | 462.6250 |
| 8 | 467.5625 | 19 | 462.6500 |
| 9 | 467.5875 | 20 | 462.6750 |
| 10 | 467.6125 | 21 | 462.7000 |
| 11 | 467.6375 | 22 | 462.7250 |
Installation
How to assemble and remove the belt clip
Slide the clip into the slot on the back of the radio until it is snapped into place.
To remove
Gently pull the lock tab, and then push up the belt clip to remove it from the radio.
How to install or replace batteries
Make sure the radio is turned off; Remove the belt clip; Slide and lift the battery compartment cover; Insert 4 AAA batteries with correct polarity into per radio; Close the battery cover and attach the belt clip. (Note: Please remove the batteries if the units are not used for a long time)
How to attach the strap to the belt clip

Thread the strap through the hole on the belt clip; Thread the other end of the strap through the string, then pull it to secure (See Pic 3).
Operation

Turning on the radio
Press and hold button ![]() for three seconds. A short audible beep and a display of the LCD screen shows that the radio is on.
for three seconds. A short audible beep and a display of the LCD screen shows that the radio is on.
Turning off the radio
Press and hold ![]() until an audible beep is heard and the screen disappears.
until an audible beep is heard and the screen disappears.
Adjusting volume level

Use the up/down key to increase or decrease the volume. And you can always find the volume level indicator in the lower right corner of the screen.
Receiving
The radio is ready to receive signals when it is tuned to the channel that has the same frequency and CTCSS code as the one that is transmitting. To receive signals, you also need to leave this very radio's TALK button untouched. When signals have been received on the current channel, RX icon will appear in the lower right corner of the screen.
Transmitting

Press and hold "TALK" button to talk to another person. Release the button for response.
TX Icon will appear in the lower right corner of the screen when radio is transmitting.
To get maximum clarity, please speak directly to the microphone and hold the mic 2 inches from your mouth.
Note: RT388 can only work together when the units are tuned to the same channel and have the same CTCSS code on that channel.
Channel Lock

Press and hold MENU button until icon ![]() appears on the screen, which indicates that the radio is locked to the current channel, namely, you cannot switch it to another channel under this status.
appears on the screen, which indicates that the radio is locked to the current channel, namely, you cannot switch it to another channel under this status.
To unlock the channel lock function, press MENU button again for about 2 seconds.
Flashlight

The radio is equipped with flashlight function, which will bring a lot of convenience in the dark. Press "LAMP" button to turn the flashlight on. And the process to turn it off is the same as turning it on, just press "LAMP" button, that's it.
Select Channel
These units have 22 Channels available for US and Canada market.
To select any among the 22, you need press MENU button once, then the channel number on the screen will blink;
Using up/down key to select the channel you want to communicate on;
Press TALK button to choose the desired channel and return to normal mode. Or press MENU button to confirm the channel and go to set CTCSS code.
Set CTCSS Code

Within a channel, you can partly avoid interference from other radios by setting CTCSS code (01-38) while code 00 refers to no privacy code is selected. To select any among the 38, you need press MENU button twice, then the CTCSS code on the screen will blink;
Using up/down key to select the code; Press TALK button to confirm the desired code and go back to normal mode.
Note: RT388 can only work together when the units are tuned to the same channel and have the same CTCSS code on that channel.
VOX for Hands-free

When VOX is activated, there is no need to press TALK button to talk. Tap MENU button three times, then "VOX" and VOX sensitivity level (OF,01,02,03) will be displayed on the screen.
You can adjust VOX sensitivity level by pressing up/ down key.
Note: OF means VOX function is inactivated; 03 is the highest sensitivity setting and 01 the lowest.
Therefore, level 03 is recommended when the radio is used in quiet surroundings and 01 for noisy environment.
Select Call Tone

To inform other radio users in your group that you want to talk or you have finished talking by transmitting a tone to their radios.
Press MENU button four times, then "CA" and call tone number (01, 02, 03, 04, 05, 06, 07, 08, 09,10) will blink on the screen; Using up/down key to select the tone you prefer;
Press TALK button to confirm the desired tone and go back to normal mode.
As to how to send the desired call tone to another party, please go and check " Call another party" on Page.
Channel Scan
Convenient to detect channels with activities.

When button ![]() is tapped, the radio will automatically scan for channels with activities. The scanning will stop when channels with activities are found, and the radio will play what it detects on that channel.
is tapped, the radio will automatically scan for channels with activities. The scanning will stop when channels with activities are found, and the radio will play what it detects on that channel.
To continue the scan, just press button  .
.
Note: When a channel with activities is detected, you can join the conversation and back away from the scan by pressing TALK button.
Call Another Party

Press button  to transmit a call tone to other radios in your group so that they can be prepared when you want to talk or you have finished talking. (See how to select call tone on Page)
Note: Another party can only receive the call tone when the following requirements are met at the same time.
- The receiving unit is on the same channel and shares the same CTCSS code as the unit that sends the call tone;
- The receiving unit is within the communication range.
Monitor

To receive weak signals from other radios in your group, all you need to do is press MON button.
If you want to continue the monitoring, please press MON button for at least 3 seconds. And press MON button again to stop.
Battery Level Indicator
Displayed in the lower left corner of the screen, convenient to know how much battery power is remained.
When the indicator on the screen blinks, it means that the batteries need to be changed(when using regular AAA batteries) or charged(when using NiMH rechargeable batteries).
External Headset/Microphone Jack

The unit support external headset connection. To talk or listen through an external earpiece, you need to remove the rubber hole cap at the top of the unit, insert the favorable/suitable headphone plug into the accessory jack, and then put on your earpiece.
Charging(Optional)

If you want the units to be rechargeable, please use rechargeable AAA batteries (not included).
Then you can charge the units by plugging the charger(not included)'s connector into the accessory jack and then connect the other end of the charger to a general socket or somewhere else alike. Below is information on specially designated charger and rechargeable AAA batteries.
Note
When external earpiece is applied Please adjust volume level accordingly. Turn the radio off immediately if your ears feel uncomfortable or itchy with headsets on. Don't use the units in places that might cause explosion or fire
Such as gas stations, unshielded electrical installations and other unsafe places.
Simple Maintenance Tips
Gently wipe the dust or dirt off with a dry soft clean cloth. Don't use any cleaning chemicals, as they can damage the units.
When the radio is dropped into water, turn it off immediately. Dry the outside of the radio with a clean and soft cloth. Remove batteries and dry them, too. Put the unit in a cool dry place to dry out all moisture. In case that any other problem or malfunction occurs during your use, please don't dissemble the radio's circuit or hardware by yourself. You are welcome to send the unit back to the seller or contact our customer service for help.
Troubleshooting
- Couldn't turn the units on
- Check if batteries are installed properly;
- Check if batteries need to be changed (when using regular batteries), or charged (when using NiMH batteries)
- When reception or transmission is poor,
- Increasing volume level; Pressing Mon button to receive weak signals
- Check battery level
The Stylized RETEVIS logo are trademarks or registered trademarks of Shenzhen Retevis Technology Co., Ltd. And are used under license. All other trademarks are the property of their respective owners. 2017 Shenzhen Retevis Technology Co., Ltd. All rights reserved.
Remarks:
- This guarantee card should be kept by the user, no replacement if lost.
- Most new products carry a two-year manufacturer's warranty from the date of purchase. Further details, pls read http://www.retevis.com/after-sale/
- The user can get warranty and after-sales service as below:
- Contact the seller where you buy.
- Products Repaired by Our Local Repair Center
- For warranty service, you will need to provide a receipt proof of purchase from the actual seller for verification

Documents / Resources
References
Download manual
Here you can download full pdf version of manual, it may contain additional safety instructions, warranty information, FCC rules, etc.
Advertisement


Need help?
Do you have a question about the RT388 and is the answer not in the manual?
Questions and answers