Sage the Fast Slow GO BPR680 / SPR680 - Multi Cooker 1100W Manual
- Quick manual (28 pages)
Advertisement
- 1 COMPONENTS
- 2 CONTROL PANEL
- 3 FOOD PRESETS
- 4 BEFORE FIRST USE
- 5 CONTROL PANEL SETTINGS
- 6 FOOD PRESETS
- 7 MANUAL PRESSURE COOK MODE
- 8 PRESSURE COOKING TABLE
- 9 HANDS- FREE VARIABLE STEAM RELEASE
- 10 OTHER PRESET SETTINGS
- 11 KEEP WARM
- 12 DELAY START
- 13 ALTITUDE ADJUST
- 14 SETTING THE UNIT MEASURE
- 15 CARE & CLEANING
- 16 DISASSEMBLE LID
- 17 SILICONE RUBBER GASKET
- 18 STORAGE
- 19 TROUBLESHOOTING
- 20 Documents / Resources
COMPONENTS

- Pressure Release Valve Automatically controls the rate at which steam is released from the cooker
- Pressure Safety Valve
- Dishwasher Safe Removable Lid
- Safety Locking Pin Pin pops up once pressure is reached acting as a safety locking device
- Silicone Lid Seal Easy fitting for hassle free assembly and cleaning
- Sealing Nut
- 6L Removable Cooking Bowl
- Lid Arm
- Easy Clean Moat Catches condensation drips for a mess-free clean up.
- Condensation drip Cup
- Stainless Trivet Raises food out of liquid for roasting and steaming.
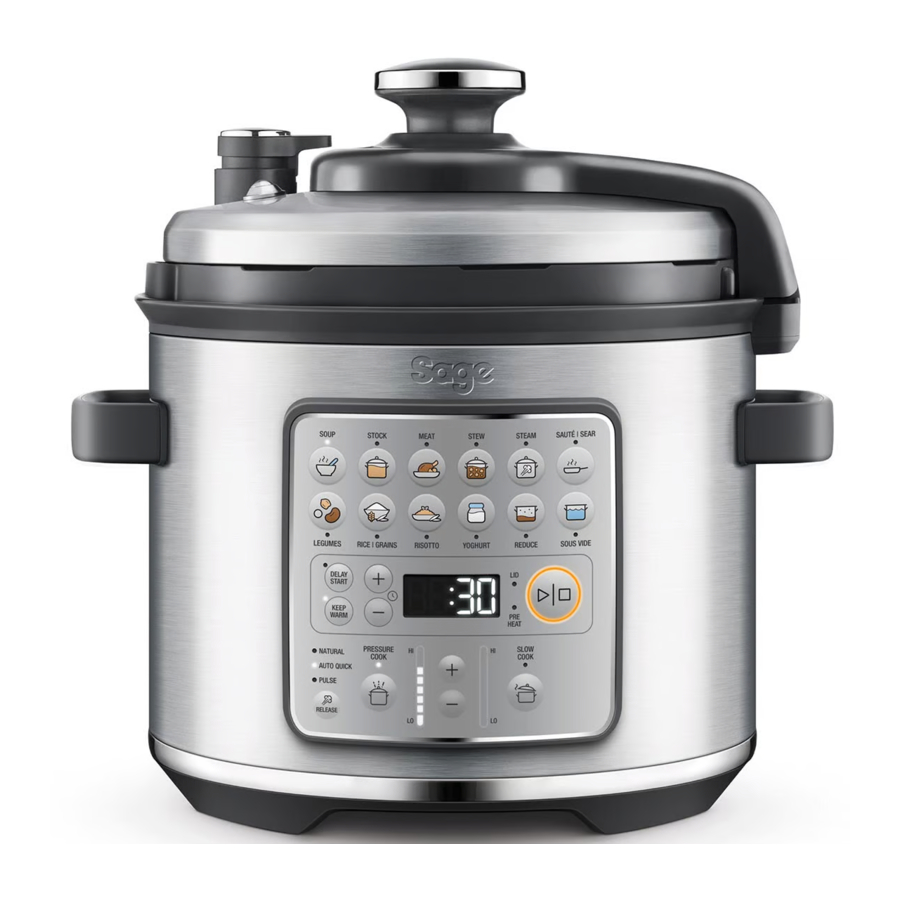
CONTROL PANEL

- Food Presets with light indicators
- Cooking Presets with light indicators
- DELAY START
- KEEP WARM
- TIME (+/-) adjustment buttons
- LED display
- Lid Lock/Unlock Warning Light Indicator
- Preheat Light Indicator
- START/CANCEL Button
- Pressure release button with modes selection indicator
- PRESSURE COOK with light indicator Pressure Level Indicator for Pressure Cooking Mode
- PRESSURE/TEMPERATURE (+/-) adjustment buttons
- SLOW COOK with light indicator Temperature Indicator for Slow Cooking Mode
FOOD PRESETS
SETTING: PRESSURE COOK
| FOOD MENU | DEFAULT PRESET | RANGE |
| Soup | 50 kPa - approx. 110°C 30 MINS AUTO QUICK | 10 kPA – 80 kPa Up to 2:00 HRS |
| Stock | 80 kPa - approx. 116°C 1 HOUR AUTO QUICK | 10 kPA – 80 kPa Up to 2:00 HRS |
| Meat | 80 kPa - approx. 116°C 1 HOUR AUTO QUICK | 10 kPA – 80 kPa Up to 2:00 HRS |
| Stew | 60 kPa - approx. 112°C 1 HOUR AUTO QUICK | 10 kPA – 80 kPa Up to 2:00 HRS |
| Legumes | 80 kPa - approx. 116°C 30 MINS NATURAL | 10 kPA – 80 kPa Up to 2:00 HRS |
| Rice | Grains | 50 kPa - approx. 110°C 10 MINS AUTO PULSE | 10 kPA – 80 kPa Up to 2:00 HRS |
| Risotto | 40 kPa - approx 108°C 7 MINS AUTO QUICK | 10 kPA – 80 kPa Up to 2:00 HRS |
SETTING: SLOW COOK
| FOOD MENU | DEFAULT PRESET | RANGE |
| Soup | HIGH - 95°C 4:00 HRS KEEP WARM | Time: 2 – 12 HRS Temp: High - Low Keep warm: on/off |
| Stock | HIGH - 95°C 4:00 HRS KEEP WARM | Time: 2 – 12 HRS Temp: High - Low Keep warm: on/off |
| Meat | LOW - 90°C 8:00 HRS | Time: 2 – 12 HRS Temp: High - Low Keep warm: on/off |
| Stew | LOW - 90°C 8:00 HRS | Time: 2 – 12 HRS Temp: High - Low Keep warm: on/off |
| Legumes | HIGH - 95°C 6:00 HRS | Time: 2 – 12 HRS Temp: High - Low Keep warm: on/off |
| YOGHURT | Stage 1 Scalding 10 MIN Temp: 83°C KEEP WARM OFF | Stage 2 Cooling* Up to 3 hours Temp: from 83°C to 43°C KEEP WARM OFF | Stage 3 Incubating 8 hours Temp: 43°C KEEP WARM OFF | Time: 8 – 16 HRS Temp: n/a Keep warm: n/a |
*Cool down time if the lid is open (for 2 litres of milk):
It can take up to 1hr 20mins to lower the temperature from 83°C to 43°C
Cool down time if the lid is closed (for 2 litres of milk):
It can take up to 3 hours to lower the temperature from 83°C to 43°C
COOKING PRESETS
| SETTING | TIME/TEMP PRESET | RANGE | |
| SAUTÉ / SEAR | COUNT UP TIME | Temp: High - (Sear) 168°C Med - (Sauté) 150°C Low - (Sauté) 130°C | Time: n/a Keep warm: off only |
| REDUCE | HIGH 10 MINS | Temp: Low - 105°C Med - 115°C High - 130°C | Time: 1 MIN – 2 HRS Keep warm: on/off |
| STEAM | 15 MINS | Temp: 100°C | Time: 1 MIN – 1 HR Temp: n/a Keep warm: off only |
| SOUS VIDE | 1 HOUR | Temp: 57°C | Time: 1 MIN – 24 HRS Temp: 30°C - 90°C Keep warm: n/a |
| KEEP WARM | 2 HOURS COUNT UP TIME | Temp: 70°C | |
BEFORE FIRST USE
- Remove and safely discard any packaging material, promotional labels and tape from the cooker.
- Open the lid by turning the lid knob counter clockwise and lifting lid up and off the appliance until it is in the hinged open position. Unscrew and remove the sealing nut from the centre of the lid and pull the lid away to remove from the lid arm.
- Wash the lid, removable cooking bowl and silicone lid seal in hot, soapy water, rinse and dry thoroughly. Wipe the inside and outside of the base with a soft, damp cloth and dry thoroughly.
- Attach the clean silicone lid seal securely around the wire ring on the underside of the lid. Adjust position if necessary, so that it sits comfortably and is free from any distortions.
![]()
- To reattach the lid, orient the lid so that the steam release valve housing is to the rear of the unit, and then align the centre of the lid with the bolt on the underside of the lid arm and push into position to expose the screw thread. Secure the lid by screwing on the sealing nut so that the red seal touches the lid surface.

- Clean and dry the bottom of the removable cooking bowl and the temperature sensor, making sure there are no unwanted materials on the surface. The removable cooking bowl must sit flat on the temperature sensor to ensure proper contact.
- Click condensation drip cup into place.
- Insert the connector end of the power cord into the cooker base, ensuring it is completely dry. Insert the power plug in to a 230/240 volt (grounded) power outlet.
- Set altitude level (above sea level) - machine will display Set - Alt - (distance) - metres
- Press the TIME (+/-) buttons to adjust to the closest altitude from 0 to 2000 metres.
- Press START to confirm


![]()
NOTE
The pressure cooker should not be used at altitudes above 2,000 metres. Longer cooking times are needed at higher altitudes to achieve the best food results. For these high altitude areas, use the longer end of the suggested cooking time window.
- The cooker alert will sound, and the LED will illuminate.
- We recommend running a 15-minute cooking cycle with water to get rid of any protective substances in the cooking bowl and on the heating element.

Only use the cooking bowl intended for this appliance; using vessels not provided will result in a non-resettable issue.
CONTROL PANEL SETTINGS
The Fast Slow GO™ features 6 Cooking
Preset Settings; Pressure Cook, Slow Cook, Reduce, Sauté/Sear, Steam and Sous Vide.
It also features 8 Food Presets: Soup, Stock, Meat, Stew, Legumes, Rice/Grains, Risotto and Yoghurt.
FOOD PRESETS
The control panel displays 8 available food presets for easy selection.
Pressing any of the 8 food presets will use the default settings to achieve the best food
results for that particular type of food. This includes changing to 'PRESSURE COOK' or 'SLOW COOK' mode.
Depending on the cooking mode, pressing a food preset button will adjust the PRESSURE or TEMPERATURE levels, the cooking time, and the pressure release mode, as well as turning on and off the KEEP WARM button.
The cooking time, KEEP WARM or DELAY START, can all be adjusted while remaining in selected food preset. However, any change to pressure or temperature levels, or pressure release setting (depending what mode the product is in) will change the unit to custom mode.
The table below shows, when selecting food menu, certain food can be cooked by either pressing 'PRESSURE COOK' or 'SLOW COOK'.
| FOOD MENU | PRESSURE COOK | SLOW COOK |
| Soup |  | |
| Stock | | |
| Meat | | |
| Stew | | |
| Legumes | | |
| Rice / Grains | |  |
| Risotto | | |
| Yoghurt | | |
SIMPLE PRESET STEPS
E.g. SOUP ![]()
- Press the SOUP icon
![]() on the interface.
on the interface. - The interface will automatically suggest a Pressure Cooking function (if relevant). To select a Slow Cooking function, press the SLOW COOK button
![]() .
. - The interface will automatically display the accurate cooking time and pressure level for soup.
- The cooking time can be modified by pressing the (+ / -) plus / minus time adjustment buttons.
- After ingredients are added, press START to begin cooking.
![]()
TIP
If desired, it is possible to sauté vegetables or sear meat with the SAUTÉ/SEAR function prior to cooking. When finished, press STOP to cancel the SAUTÉ/SEAR function and select the next cooking preset.
![]()
NOTE
- For first timers using pressure cooking method, pressure release can be overwhelming. As it releases big bold steam, always keep hands and face clear of the pressure release. (refer to instruction for the variable steam release description and caution).
- Refer to 'Food Presets' and 'Cooking Presets' section for preset settings recommendations.
- If there is no visible light on any of the food preset indicators, then the product is in manual mode. Press a food preset button to return to its default settings.
- The steam or pressure release mode programmed into the preset cooking modes are selected for best results. Any changes to the steam release mode may lead to food spillage.
MANUAL PRESSURE COOK MODE
Pressure Cooking is a method of cooking food in a small amount of liquid with a gasket sealed lid that retains steam inside and builds pressure. It is the increase in pressure that raises temperature of the liquid and steam inside to well above boiling point and therefore allows food to be cooked up to 70% faster. This means less energy is consumed and you will enjoy substantial savings in both time and cost. Because pressure cooked foods require very little cooking liquid, more vitamins, minerals, and other nutrients are retained, and the natural flavours are enhanced.
- To select the manual pressure cook mode, press and hold the PRESSURE COOK button
![]() for 2 seconds.
for 2 seconds. - Adjust the cooking pressure by using the PRESSURE/TEMPERATURE (+/-) buttons. Pressure can be adjusted from 10 kPa (LOW) to 80 kPa (HIGH).
- The figure on the LED screen indicates the preset cooking time for the selected setting. Adjust the cooking time by using the TIME (+/-) buttons (next to the 4 digit display) to reduce the cooking time or increase the cooking time. Time can be adjusted up to 2 hours.
- Press the STEAM RELEASE button to select between 'NATURAL', 'AUTO QUICK', and PULSE steam release.
- Place food into the removable cooking bowl. Ensure there is at least 1L of combined food and liquid in the bowl.
- Close the lid and turn the lid knob clockwise to lock into place. The cooker alert will sound when the lid has been locked.
- Ensure the pressure release valve is placed on the lid in the closed position.

- Press the START button to commence cooking. The START/CANCEL button will illuminate orange, 'PREHEAT' will be lit.

![]()
NOTE
It is normal for the cooker to release small bursts of steam as it stabilises.
- If the lid has not been locked correctly, 'LID' indicator will flash and the audio alert will beep, cooking will be paused until the lid is in the correct position. Turn the lid knob clockwise to lock the lid and commence cooking.
- Once the cooker has reached pressure, the 'PREHEAT' indicator light will disappear, the cooker alert will sound, the timer will start counting down.
- The time can be adjusted during the pressure cook cycle by pressing the TIME (+/-) buttons. The cycle can be paused at any time by pressing the START/ CANCEL button. To end the cycle press and hold START/CANCEL for 2 seconds. If there is already pressure in the vessel it will go immediately to the steam release cycle.
- At the end of the pressure cook cycle, the cooker alert will sound, and steam will be automatically released through the pressure release valve. The steam icon will blink, the timer will start counting up.
- If NATURAL steam release is selected, pressure will naturally subside in the vessel without forcing steam through the pressure release valve. The steam release setting can be changed during the steam release cycle by pressing the STEAM RELEASE button.
- At the end of the steam release cycle, the cooker alert will sound, the display will flash, and if 'KEEP WARM' is on, display timer will start counting up.
- Open the lid by turning the lid knob counter clockwise and carefully lift the lid into the hinged open position.
- After 5 minutes of inactivity, standby mode will be activated. The LED will no longer illuminate.

To avoid scalding from escaping steam, never place your face or hands over the cooker when removing the lid.
If the lid will not unlock this indicates the appliance is still under pressure. Do not force the lid open as any remaining pressure can be hazardous.
Press and hold the STEAM RELEASE button to manually release steam.
PRESSURE COOKING TABLE
Refer to this table for the approximate temperature for each kPa level:
| Pressure Level (kPa) | Temperature (°C) |
| 10 | 102 |
| 20 | 104 |
| 30 | 106 |
| 40 | 108 |
| 50 | 110 |
| 60 | 112 |
| 70 | 114 |
| 80 | 116 |
HANDS- FREE VARIABLE STEAM RELEASE
The Fast Slow GO™ features 3 steam release methods:
Auto Quick
Pressure is released quickly to minimise overcooking of foods or recipes with short cook times.
This is recommended only for food types that do not expand or foam when boiling.
Pulse
Pressure is released in bursts to reduce disturbance to the food inside.
This is recommended for food types that generate small amount of foam or do not foam at all when boiling.
Natural
Pressure naturally subsides inside without releasing steam through the vent to prevent the churning up or breaking apart of sensitive ingredients like stocks and beans during pressure release.
Natural pressure release mode is suitable for all types of food recipes.
![]()
NOTE
Some food type (e.g. legumes) that are known to generate excessive foam can only use 'Natural' Pressure release to prevent food spillage.
These can be selected using the Steam Release button ![]() on the control panel during the set up and steam release cycles. Once selected, the Pressure Release Valve will automatically release the steam at the end of the pressure cooking cycle.
on the control panel during the set up and steam release cycles. Once selected, the Pressure Release Valve will automatically release the steam at the end of the pressure cooking cycle.
Pressing and holding the steam release button during or after a cooking cycle will open the pressure release valve.
![]()
NOTE
The steam or pressure release mode programmed into each preset cooking modes are selected for best results. Any changes to the steam release mode may lead to food spillage.
Always keep hands and face clear of the pressure release valve when pressure cooking as hot steam and water may be emitted during operation.
MANUAL SLOW COOK MODE
The SLOW COOK setting is designed for long cook times at low temperatures. It is also ideal for breaking down tough cuts of meat and developing deep flavours.
- Select the Slow Cook
![]() on the interface.
on the interface. - The LED screen indicates the preset temperature for the selected food. But you may press the PRESSURE/ TEMPERATURE (+/-) buttons to reduce the temperature or to increase temperature. Temperature can be adjusted to two preset temperatures: HI - LO.
- The LED screen indicates the preset cooking time for the selected food. You may adjust the TIME (+/-) to reduce or increase the cooking time. Time can be adjusted between 2 and 12 hours.
- 'KEEP WARM' indicator will automatically switch on after the SLOW COOK cycle. Press the 'KEEP WARM' button on the control panel to select or deselect the function.
- Place food into the removable cooking bowl. Ensure there is at least 1L of combined food and liquid in the bowl.
- Close and lock the lid.
- Turn the pressure release valve to the open position.

- Press the START button to commence cooking. The START/CANCEL button will illuminate orange.
- The timer will be displayed and automatically begin to count down. The time can be adjusted during the slow cook cycle by pressing the TIME (+/-) button. The cycle can be paused at any time by pressing the START/CANCEL button. While paused, cooking settings can be adjusted. Pressing START/CANCEL button again, will continue cooking using the newly adjusted settings.
![]()
NOTE
To remove steam during pause, hold the steam release button. During slow cooking, there may be some pressure build up that makes the lid difficult to open. If this occurs, press the STEAM RELEASE button until all internal pressure is released, and the cooker can be opened.
- At the end of the slow cook cycle, the cooker will automatically switch to the KEEP WARM function. The KEEP WARM indicator will be lit, and the timer will start counting up to a maximum of 6 hours. The keep warm cycle can be paused at any time by pressing the START/ CANCEL button.
- If KEEP WARM has not been selected, the cooker alert will sound, the START/ CANCEL orange illumination will turn off.
- After 5 minutes of inactivity, standby mode will be activated. The light will go out.
TIPS FOR PRESSURE & SLOW COOKING
Soup
- The PRESSURE & SLOW COOK SOUP setting is suitable for cooking a variety of soups from light broths to hearty minestrone to pureed vegetable soups.
- Use the SAUTÉ/SEAR settings to brown meat and soften aromatics prior to cooking.
- To shorten the pressurizing time, add cold water/stock to bowl while still in the SAUTÉ
- Do not overfill the cooking bowl. The total volume of soup should not exceed the 'MAX' level marking inside the removable cooking bowl.
Stock
- The PRESSURE & SLOW COOK STOCK setting is suitable for making all kinds of stock, including chicken, beef and vegetable.
- To make a brown stock, use the SAUTÉ/ SEAR setting to brown bones and vegetables prior to pressure or slow cooking.
- Vegetables such as onions, carrots and celery should be cut into large pieces. This will help keep the stock clear and make it easier to strain at the end of cooking.
- To shorten the pressurising time, add cold water to bowl while still in the SAUTÉ/SEAR setting and allow the water to come to a simmer before pressure cooking.
- Do not overfill the cooking bowl. The total volume of water, bones and/or aromatics should not exceed the 'MAX' level marking inside the removable cooking bowl.
Meat
- The PRESSURE & SLOW COOK MEAT setting uses high temperature/pressure to dissolve connective tissue, producing forktender, succulent results. Sauces become thick and well developed.
- Choose well-marbled cuts of meat for the best flavor and texture.
- Cut larger pieces of meat into 2 or 3 pieces to better fit the cooking bowl.
- Use the SAUTÉ/SEAR setting to brown meat in batches, prior to cooking.
- Unlike traditional stewing or braising, pressure and slow cooking have almost no evaporation. For deeply flavored dishes, use less liquid than called for in traditional recipes, 1 – 1½ cups ( 250-375ml ) maximum.
- Do not overfill the cooking bowl. The total volume of uncooked ingredients should not exceed the 'MAX' level marking inside the removable cooking bowl.
Stew
- The PRESSURE & SLOW COOK STEW setting is ideal for cooking ground meat, meat sauces and hearty stews.
- Use the SAUTÉ/SEAR setting to brown meat and soften aromatics prior to cooking.
- Unlike traditional stovetop methods, pressure and slow cooking have almost no evaporation. For thick, rich chillies and stews use less liquid than called for in traditional recipes. Use the REDUCE setting after cooking to thicken foods that are too soupy.
- Do not overfill the cooking bowl. The total volume of uncooked stew ingredients should not exceed the 'MAX' level marking inside the removable cooking bowl.
Legumes
- The PRESSURE & SLOW COOK LEGUMES setting is suitable for cooking all types of legumes, lentils and dried beans.
- Legumes and other beans can produce a lot of foam during cooking. The preset NATURAL steam release setting ensures foam does not interfere with the steam release valve.
- Cooking times are based on unsoaked dried beans. To shorten the cooking time, soak beans in cold water overnight. Discard soaking water and cook with fresh cold water for half of the preset cooking time.
- Use a ratio of 1-part beans to 3 parts water.
- Beans and legumes swell and double in size after cooking. Do not overfill the cooking bowl. The total volume of uncooked legumes and water should not exceed the ½ level marking inside the removable cooking bowl.
Rice | Grains
- The PRESSURE COOK RICE setting is designed to cook rice and grains, so they remain separate and tender. It is suitable for all types of rice such as long grain, jasmine, basmati and brown rice.
- When pressure cooking brown rice, increase the cooking time to 20 minutes.
- Measure or weigh dry rice accurately and wash well with cold water until water runs clear. Drain well and place into the removable cooking bowl.
- Add corresponding water amount. Refer to the cooking table for rice/grains and legumes on the Sage webpage for more information.
- After cooking, allow rice to stand in bowl for 5 minutes before stirring and serving.
- Rice will double or triple in size after cooking. Do not overfill the cooking bowl. The total volume of uncooked rice and liquid should not exceed the ½ level marking inside the removable cooking bowl.
Risotto
- The PRESSURE COOK RISOTTO setting is ideal for making creamy risotto, without all the stirring and in a fraction of the time.
- Use the SAUTÉ/SEAR setting to soften onions and other aromatics, as well as deglaze the cooking bowl with wine.
- The key to creamy risotto is toasting the rice grains before the liquid is added. Use the SAUTÉ/SEAR setting to toast the rice, stirring frequently, for 3–5 minutes or until the edges become transparent and then turn white.
- With little or no evaporation during pressure cooking, it is important to keep to the ratio of 1-part rice to 3 parts stock. If adding a lot of vegetables to the risotto, reduce stock by a third.
- Rice will double or triple in size after cooking. Do not overfill the cooking bowl. The total volume of uncooked rice and stock should not exceed the ½ level marking inside the removable cooking bowl.
OTHER PRESET SETTINGS
SAUTÉ/SEAR
This preset has three levels: low sauté, medium sauté and sear.
The temperature level will be indicated on the Slow Cook temperature light indicator.
The SAUTÉ setting is ideal for softening and caramelizing garlic, onions or vegetables prior to pressure or slow cooking. The SAUTÉ setting corresponds to the MED and LOW temperature levels on your appliance.
The SEAR setting is designed to enhance and deepen the taste of meals by using the same cooking bowl for caramelizing and browning foods before pressure or slow cooking. The SEAR setting corresponds to the HIGH temperature level on your appliance.
REDUCE
This preset has three levels: low, medium and high.
The temperature level will be indicated on the Slow Cook temperature light indicator.
The REDUCE function is ideal for thickening and intensifying the flavor of sauces, syrups and stocks.
STEAM
The STEAM setting is ideal for steaming food such as vegetables, fish fillets and dumplings. When steaming for more than 30 minutes, it is recommended to add 1 cup (250ml) warm water into the cooking bowl at 30-minute increments to ensure consistent steaming performance.
To reduce condensation forming on the outside surfaces of the lid and handle, it is recommended to turn the pressure release valve to the open position.

SOUS VIDE
The SOUS VIDE setting is ideal for cooking food to a very precise temperature in a water bath.
What is Sous Vide?
Sous Vide is a cooking technique that allows you to cook food to the doneness you desire by heating water to a set temperature. Food items are placed in a heat-proof BPA food safe plastic bag, that is submerged and cooked to your preferred doneness without the risk of drying out through over cooking.
What do you need to cook food with the Sous Vide function?
Thick heat-proof BPA food safe plastic bags. Resealable bags will also work if the cooking temperature is under 70°C.
Do I need to vacuum seal?
You do not need to vacuum seal bags for SOUS VIDE, however, as much air as possible needs to be removed from the bag, and water prevented from entering the bag to provide accurate food results. To use the water displacement method, place food in a resealable bag with a double seal, then lower the bagged food into a water filled container. Once most of the air is out of the bag, carefully seal just above the water line.
Is the lid open or closed?
We recommend using the SOUS VIDE function with the lid closed and in locked position, and turn the pressure release valve to the open position to ensure consistent cooking temperature.

When do I sear?
You can sear items before or after cooking with the SAUTÉ/SEAR function. If searing prior to using the SOUS VIDE function, allow time for resting and cooling overnight in the refrigerator.
SOUS VIDE steps:
- Fill cooking bowl with cool water until it has reached the MAX line. To reduce preheat time, start with water close to your target temperature.
- Press SOUS VIDE and set temperature and time as desired. Close lid and press START to begin heating water.
- Place the food item or the produce in a plastic Sous Vide bag or a resealable bag. If you do not have specific Sous Vide sealed bag, we recommend using a double-sealed resealable bag. Add aromatics like bay leaves, rosemary, lemon slices or rind and oil as desired.
- When water has reached desired temperature (machine will beep once), carefully place bag into the water bath. If bag floats, place stainless trivet upside down over the bag to keep it fully submerged.
- Close and lock the lid but ensuring the pressure release valve is in the open position.
- When cooking time is completed, remove bag from water bath.
Temperature and Time:
- BEEF FILLET (2.5cm thick) – Medium rare – 54°C for 1 hour
- CHICKEN FILLET (2.5cm thick) – Tender – 65°C for 45 mins
- SALMON FILLET (2.5cm thick) – Medium – 50°C for 40 mins
- EGGS – poached egg – 64°C for 1 hour
YOGHURT
How to use the yoghurt shortcut auto program
Natural Yoghurt
Prep time: 10 minutes / Incubating: 8 hours (plus 1 hour 30 minutes cooling)
1 litre full-cream homogenised milk
2 tbsp full-cream natural yoghurt with live and active cultures
STEP 1 – Scald the Milk
Place the cooking bowl in the Fast Slow GO™. Add the milk. Close and lock the lid, and turn the pressure release valve to the open position.
Press YOGHURT then press START. The milk will heat to 83°C and hold at the temperature for 10 minutes.
The pasteurisation process kills any bad bacteria that can spoil the milk as well as to eliminate potential competitors of the active yoghurt cultures.
STEP 2 – Cool the Milk
Open the lid and do not press any controls. The cooling phase will automatically cool the milk to 43°C. This process ensures that the appliance reaches the temperature for optimal growth of yogurt starter cultures. If the temperature is too high your cultures might die. First the word 'COOL' will appear on the cooker screen. At the end of the cooling time the cooker will sound an alert when it has reached the correct temperature, about 1 hour 30 minutes.
![]()
TIP
Cooling the milk with the lid open will result in a skin forming on top. Removing this skin before adding the starter will help to ensure a smoother texture to the yoghurt.
STEP 3 – Incubate the Yoghurt
At the end of STEP 2, the word 'ADD' will appear in the cooker screen. Place the yoghurt starter in a bowl. Add ½ cup (125ml) of the cooled milk and whisk until smooth. Whisk the milk mixture into the cooled milk in the cooking bowl. Close and lock the lid press START to incubate for 5-8 hours. The longer it is incubated the tangier the yoghurt will be.
STEP 4 – Refrigerate
When the cooker sounds an alert that the yoghurt has finished incubating, remove the cooking bowl, cover with plastic wrap and refrigerate until cold. Once the yoghurt is completely cold, transfer to an airtight container and refrigerate for up to 2 weeks.
![]()
TIPS
- Using homogenised milk will produce a smoother yoghurt. If your result is slightly lumpy and separated, whisk the cooled yoghurt gently to combine.
- To cool scalded milk faster, place cooking bowlt in a larger bowl of iced water, check the temperature with a thermometer. When the milk has reached 43°C, add ½ cup (125ml) of the cooled milk to the yoghurt starter, whisk until smooth, then whisk in the mixture, wipe the bottom of the pot dry and insert the pot back into the pressure cooker.
- To increase tanginess of the yoghurt, increase the incubation time.
KEEP WARM
The KEEP WARM function maintains hot food at safe serving temperature of 60°C or above for up to 6 hours at the end of a cooking cycle. If using the KEEP WARM function as a standalone, the feature can be run for up to 24 hours.
- To use KEEP WARM as a standalone function, keep the lid close, then press and hold the KEEP WARM button on the control panel.
- The KEEP WARM function can be toggled on and off in both PRESSURE COOK and SLOW COOK using the KEEP WARM button on the control panel The 'KEEP WARM' light is lit, and the timer will start counting up to a maximum of 6 hours at the end of a cooking cycle.
![]()
NOTE
To not compromise food quality, it is recommended to use KEEP WARM function no longer than 1-2 hours.
DELAY START
The Fast Slow GO™ has a timer function to delay the start of cooking for up to 24 hours. This timer function does not apply to the keep warm and steam functions.
The DELAY START function is disabled for MEAT food preset.
Never allow meat, poultry, seafood, eggs or other goods that require refrigeration to sit at room temperature for more than two hours. Bacteria quickly multiplies in warm temperatures between 4°C and 60°C.
The following steps show how to program for delayed cooking:
- Adjust cooking cycle time and temperature/ pressure level as desired.
- Press 'DELAY START' button to enable DELAY START function.
- The screen will show the delay start time in hours and minutes.
- Use the TIME (+/-) buttons to adjust the time delay in 15-minute intervals for up to 24 hours.
- Press DELAY START again at any time to exit without saving the delay start setting.
- Press START/CANCEL to activate the current cooking settings with a delayed starting time.
- Time will start counting down and preheat LED will not be illuminated during DELAY START.
ALTITUDE ADJUST
Pressure builds and increases when the temperature inside the cooking bowl exceeds boiling point. As altitude increases, the temperature at which water boils decreases as a result of the drop in air pressure. This creates very different conditions for cooking when using a pressure cooker.
In order to maintain consistent cooking results at various altitudes, the Fast Slow GO™ has an Altitude Adjust feature that adjusts the settings based on the altitude of your current location.
- To enter Altitude press and hold both the DELAY START and KEEP WARM buttons for 2 seconds.
- Press the TIME (+/-) buttons or the PRESSURE/TEMPERATURE (+/-) buttons to adjust altitude.
- Four-digit display shows 'Alt' and number, switching every 1 second.
- Press START button to confirm and a beep will sound.
- The cooker's settings have now been adjusted for your current altitude. Pressing any button or quitting after timeout will save the current set altitude value. To change altitude to factory settings, adjust the altitude back to 0 metre.
![]()
NOTE
Exact altitude can be found at www.elevationmap.net or by contacting Sage Customer Service Centre.
SETTING THE UNIT MEASURE
The unit measure default is in Celsius (C). To change between metric and imperial units, press the PRESSURE/TEMPERATURE (+/-) buttons for 5 seconds and the display will show F for Fahrenheit. Press the PRESSURE/TEMPERATURE (+/-) buttons again for 5 seconds to revert to Celsius and the display will show C.
CARE & CLEANING
Before cleaning, ensure the cooker is turned off. Remove the power plug from the power outlet and remove the connector end of the power cord from the cooker base. Allow the cooker and all accessories to cool completely before disassembling and cleaning.
Wash removable cooking bowl with warm soapy water and a clean soft cloth or sponge. Rinse with clean water and dry thoroughly.
If limescale deposits develop over time, combine 2 tablespoons of white vinegar and 1 cup (250ml) hot water in the cooking bowl and heat using the steam function for 10 minutes before cooling and cleaning with a scrubbing brush.
![]()
NOTE
Removable cooking bowl can be washed in dishwasher, but it is recommended to wash cooking bowl in hot, soapy water using a mild household detergent. Rinse and dry thoroughly.
- Do not use abrasive cleaners, steel wool or scouring pads on the outer and inner body of the appliance.
- Do not immerse metal base or power cord in water or any other liquid as they may cause electrocution.
- Ensure removable cooking bowl is correctly positioned in the base before you commence cooking.
DISASSEMBLE LID
- Gently pull the silicone rubber gasket out from under the gasket holder. Check periodically that it is clean, flexible and not cracked or torn. If damaged do not use the appliance.
- Wash the inside of the lid with a wet, soapy sponge or cloth. Use a brush to remove oil residue if necessary. Wipe dry with a clean, damp cloth.
- Regularly inspect that Pressure Release Valve Cover is clean and free of liquid/food. Remove pressure release valve cover from the lid and wipe over with a soapy cloth and dry clean. Rinse well and replace by clipping back in place.
- Pressure Safety Valve will need to be regularly checked and cleaned in order to avoid any clogging which could result in blocking the safety valve. Wash and clean any oil or food residue. Ensure the valve moves in and out smoothly after cleaning.


SILICONE RUBBER GASKET
- Replace silicone rubber gasket every 1–2 years (see your nearest Sage Service Centre).
- Wash gasket in warm, soapy water. Rinse with clean water, dry thoroughly and place back in their original position.
- The silicone rubber gasket can be washed in the top rack of a dishwasher to eliminate odour from spices.
- Soak the silicone rubber gasket in a mixture of bicarbonate soda and water to help eliminate odours before cleaning.
If the silicone rubber gasket is not fitted correctly into the holder, the lid will not seal properly. This may cause the appliance to malfunction and leak steam or hot liquid which can cause burns or scalding.
![]()
TIP
A mixture of ½ cup (125ml) lemon juice, 1 tablespoon lemon rind plus 500ml hot water cooked at HIGH pressure for 5 minutes can help eliminate food odours.
STORAGE
- Ensure the cooker is turned off. The cooker is off when all lights are off on the display.
- Remove the power plug from the power outlet. Allow the cooker and all accessories to cool completely before disassembling and cleaning.
- Ensure the cooker and all accessories are clean and dry.
- Ensure the bowl is inserted into the cooker.
- Ensure the lid is closed and in the locked position.
- Store the appliance in an upright position standing level on its support legs. Do not store anything on top.
TROUBLESHOOTING
| PROBLEM | EASY SOLUTION |
| The lid cannot be opened at the end of the cooking cycle |
|
| The LID led is flashing and the buzzer is sounding |
|
| Steam is escaping from the lid OR Safety locking pin does not rise OR Cooker is not getting to pressure OR Timer will not count down OR The screen displays 'SEAL' |
|
| The cooker automatically switches to keep warm without going through a complete cooking cycle |
|
| Water is collecting on the benchtop |
|
| The screen displays "Err" |
|
| Factory Reset |
|

Documents / ResourcesDownload manual
Here you can download full pdf version of manual, it may contain additional safety instructions, warranty information, FCC rules, etc.
Download Sage the Fast Slow GO BPR680 / SPR680 - Multi Cooker 1100W Manual
Advertisement


Need help?
Do you have a question about the the Fast Slow GO BPR680 and is the answer not in the manual?
Questions and answers