Sage the Tea Maker BTM800 / STM800 - Electric Teapot 1.5L Manual
- Instruction book (25 pages) ,
- Quick start manual (16 pages) ,
- User manual (16 pages)
Advertisement
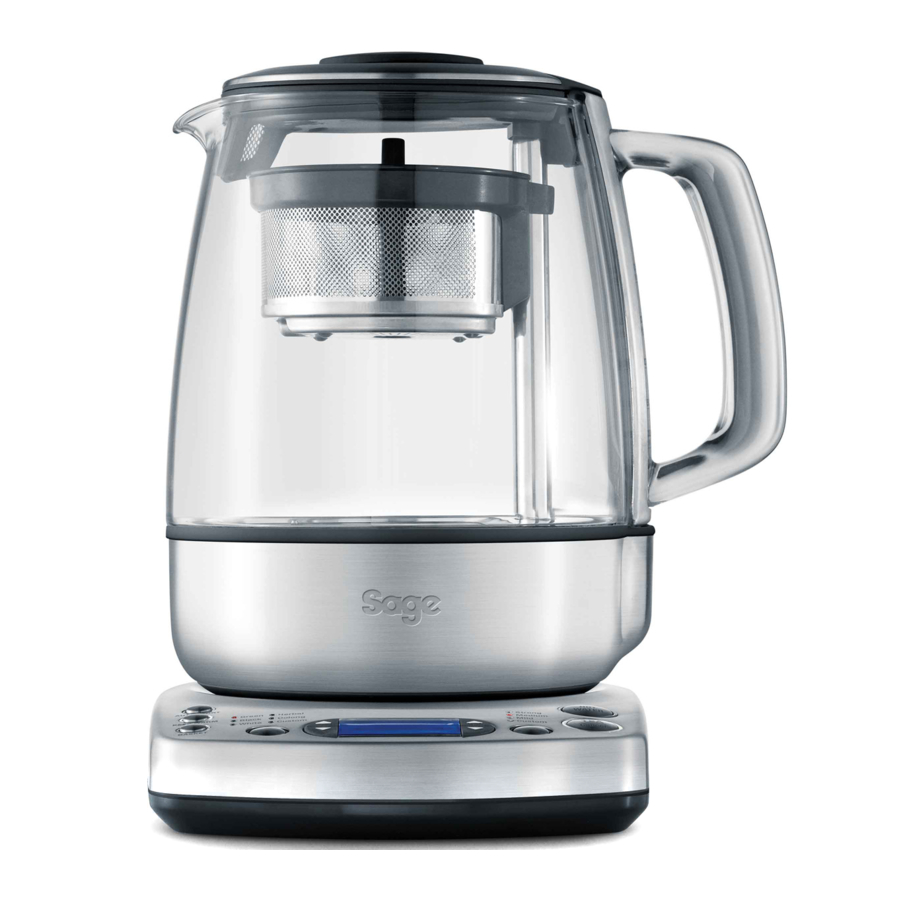
Components

- Jug lid
- Stainless steel scale filter
- Tea basket lid
- Stainless steel tea basket
- Jug post
- Glass jug
- Immersed temperature sensor
- Tea scoop
- Power base
- Cord storage

- AUTO START button
- KEEP WARM button
- BASKET button
- TEA TYPE button
- Variable temperature control
- Backlit LCD
- Variable time control
- TEA STRENGTH button
- HOT WATER / CANCEL button
- TEA / CANCEL button
Functions
BEFORE FIRST USE
In order to remove any dust or protective residues from the manufacturing process, it is recommended to run a boiling cycle then discard the water.
- Unwind the power cord completely and insert the power plug into a grounded wall outlet.
- Press the left
![]() ARROW UP button until the LCD screen displays 100°C.
ARROW UP button until the LCD screen displays 100°C.

- Press the HOT WATER / Cancel button to start the cycle.
- Discard the water. The Tea Maker ™ is now ready to use.

USE THE TEA MAKER™ FOR BREWING TEA
- Fill with desired amount of water. Ensure you do not fill past the tea maximum mark (1200mL TEA MAX).
- Place the basket on a flat, dry surface. Remove basket lid by lifting from the sides.
![]()
- Use the provided tea scoop to fill the basket with tea leaves. As a general guide, use 1 scoop of tea leaves per cup/250ml of water.


Selecting the tea type
Press the TEA TYPE button and toggle through until the desired tea.
Selecting the tea strength
The desired tea strength determines the brew time.
- Press the TEA STRENGTH button and toggle through until the desired tea strength.
- Press the TEA / Cancel button to start the tea brewing cycle.
- Once the selected brew temperature is reached the assembled basket will automatically lower into the heated water.
- Once the basket reaches the bottom of the glass jug, the LCD screen will indicate the brewing progress.
- At the end of the tea brewing cycle, the basket will automatically rise to the top of the glass jug.

The tea basket is hot to touch after tea is brewed. Ensure the tea basket handle has cooled before handling.
| TEA TYPE | GREEN TEA | WHITE TEA | OOLONG TEA | HERBAL TEA | BLACK TEA |
| PRESET BREW TEMP | 80˚C | 85˚C | 90˚C | 100˚C | 100˚C |
| PRESET BREW TIME | 3:00 | 3:00 | 3:00 | 4:00 | 4:00 |
Selecting the 'Keep Warm' Feature
This feature allows the brewed tea or heated water to remain warm for up to 60 minutes.
- Press the KEEP WARM button before, during or after completion of the tea brewing or water heating cycle.
- If the glass jug is removed from the Power Base, the 'Keep Warm' feature will automatically switch off. You can re-select the 'Keep Warm' feature by pressing the KEEP WARM button.
Selecting the 'Basket Cycle' Feature
This feature continuously auto lifts and lowers the basket during the tea brewing cycle.
To activate the 'Basket Cycle' feature, press the BASKET button once.
USE AS A VARIABLE TEMPERATURE KETTLE
- Fill the glass jug with the desired amount of water.
- To boil and heat water:
- To boil water (100°C): Press the left
![]() ARROW UP button to increase the temperature to 100°C.
ARROW UP button to increase the temperature to 100°C. - To heat water to a customised temperature: Press the left
![]() ARROW UP button to increase the temperature, or the left
ARROW UP button to increase the temperature, or the left ![]() ARROW DOWN button to decrease the temperature.
ARROW DOWN button to decrease the temperature.

- To boil water (100°C): Press the left
- Press the HOT WATER / Cancel button to start the cycle.
- Once the selected temperature is reached, the tea alert will sound three times. The LCD screen will automatically display the 'Time Since Brew' function. This function counts up to a maximum of 60 minutes, allowing you to monitor when the water heating cycle was complete. It does not activate the heating elements.

CUSTOMISING BREW TEMPERATURE
Press the left ![]() ARROW UP button to increase the temperature, or the left
ARROW UP button to increase the temperature, or the left ![]() ARROW DOWN button to decrease the temperature.
ARROW DOWN button to decrease the temperature.
![]()
NOTE
This product is not calibrated for commercial or scientific use. Temperatures may vary ± 3˚C, which is within range for optimal brewing for each tea variety.
CUSTOMISING BREW TIME
Brew time less than 10 minutes
Press the right ![]() ARROW UP button to increase the time, or the right
ARROW UP button to increase the time, or the right ![]() ARROW DOWN button to decrease the time.
ARROW DOWN button to decrease the time.
Manual mode-brew times over 10 minutes
- Press the right ARROW UP button to increase the time up to the maximum 10 minutes.
- Continue to press the right ARROW UP button. The LCD screen will display 'MANUAL LIFT' and '- -: - -' on the right side of the LCD.
- Once the Tea Maker ™ is activated and the correct water temperature is reached, the basket will automatically lower.
- Once the desired brew time has elapsed, press and hold the BASKET button for 2 seconds. The basket will rise.
AUTO START FEATURE
- Press and hold the AUTO START button for 2 seconds.
- To set the CURRENT TIME, press the left
![]() ARROW UP button to increase the time, or the left
ARROW UP button to increase the time, or the left ![]() ARROW DOWN button to decrease the time in 1 minute increments.
ARROW DOWN button to decrease the time in 1 minute increments. - To set the START TIME, press the right
![]() ARROW UP button to increase the time, or the right
ARROW UP button to increase the time, or the right ![]() ARROW DOWN button to decrease the time.
ARROW DOWN button to decrease the time. - Once current time and start time are programmed, press either the flashing HOT WATER / Cancel or TEA / Cancel button to select which feature you would like to start at the programmed time.
- Ensure that the Tea Maker™ is prepared with:
- Sufficient water in the glass jug and tea leaves in the basket for the tea brewing cycle or,
- Sufficient water in the glass jug for the water heating cycle.
![]()
NOTE
Insufficient water may discolour your Tea Maker™ base!
![]()
NOTE
The 'Auto Start' feature can be cancelled anytime by pressing the AUTO START button.
Care & Cleaning
CLEANING THE GLASS JUG
- After each use, empty the glass jug. Do not allow brewed tea to stand overnight.
- Wipe the interior of the glass jug with a soft damp sponge or rinse with warm water. Tea deposits will enhance the flavour of the brewed tea, so if only using as a Tea Maker ™ do not wash with soapy water.
- Wipe the exterior of the glass jug with a soft damp cloth to clean.
![]()
- To remove the build-up of tannin, the astringent chemical constituent of tea, fill the glass jug with water up to the water maximum mark (1500mL WATER MAX) and bring water to boil and allow water to cool for one minute. Add contents of tea cleaner packet and allow to stand for 5 minutes. Empty Tea Maker, ™ refill with fresh water and boil. Repeat this step again. Empty Tea Maker ™ and rinse thoroughly.
- Dry thoroughly with a soft lint-free cloth before using.

![]()
NOTE
Allow all parts of the Tea Maker™ to cool completely before disassembling and cleaning.
![]()
NOTE
Only the jug lid, tea basket, tea basket lid and tea scoop are dishwasher safe.
CLEANING THE JUG LID AND INTEGRATED SCALE FILTER
- Wash the jug lid in warm soapy water with a soft sponge, rinse and dry thoroughly. The integrated scale filter can be cleaned by placing under running hot water and rubbing with a cleaning cloth or brush.
- Alternatively, the jug lid is dishwasher safe. Position the jug lid vertically so the scale filter is facing upwards. This will allow water to drain properly.
- Let all surfaces dry thoroughly prior to using.
CLEANING THE TEA BASKET LID, TEA BASKET AND TEA SCOOP
- Wash the tea basket lid, tea basket and tea scoop in warm soapy water with a soft sponge, rinse and dry thoroughly. A non-abrasive liquid cleanser or mild spray solution may be used to avoid build-up of stains. Apply the cleanser to the sponge, not the accessory surfaces, before cleaning.
- Alternatively, these accessories are dishwasher safe.
- Let all surfaces dry thoroughly prior to using.
CLEANING THE POWER BASE
- Wipe the power base with a soft damp sponge.
- Let all surfaces dry thoroughly prior to inserting the power plug into a wall outlet.
DESCALING
Use Sage® "The Descaler" to remove scale build up. To order visit www.sageappliances.com
Causes skin irritation. Wash hands thoroughly after handling. Wear protective gloves/protective clothing/eye protection/face protection.
- Empty one sachet (25g) into 1 litre of warm water, stir to dissolve. Pour into the tea maker.

- Leave stand for 5 minutes.
- After 5 minutes, discard the solution.
- Rinse the tea maker twice with fresh clean water.

STORAGE
- Ensure the Tea Maker ™ is switched off, cleaned and dried before storing.
- Ensure that the assembled tea basket is securely attached to the magnetic post within the glass jug.
- Ensure that jug lid is securely in place.
- Wrap the power cord around the power cord storage under the power base.
- Stand the Tea Maker ™ upright on the power base. Do not store anything on top.
Troubleshooting
| PROBLEM | POSSIBLE CAUSE |
| Tea Maker ™ will not switch 'ON' |
|
| The Tea Maker ™ will not work |
|
| The LCD light has gone out? |
|
| I cannot select a certain function |
|
| The LCD screen displays 'RESET' |
|
| The LCD screen displays 'ERROR' |
|
| I would like to have the Tea Maker ™ 's default settings back |
|
| The 'BASKET CYCLE' feature / BASKET button does not work |
|
| After boiling water, bubbles appear around the temperature sensor |
|
| My tea tastes too weak or too strong |
|
| There is a rattling noise inside the glass jug |
|

Documents / Resources
References
Download manual
Here you can download full pdf version of manual, it may contain additional safety instructions, warranty information, FCC rules, etc.
Download Sage the Tea Maker BTM800 / STM800 - Electric Teapot 1.5L Manual
Advertisement


Need help?
Do you have a question about the the Tea Maker BTM800 and is the answer not in the manual?
Questions and answers