Sage the Risotto Plus SRC600 - Multi Cooker 760W Manual
- Instructions manual (12 pages)
Advertisement
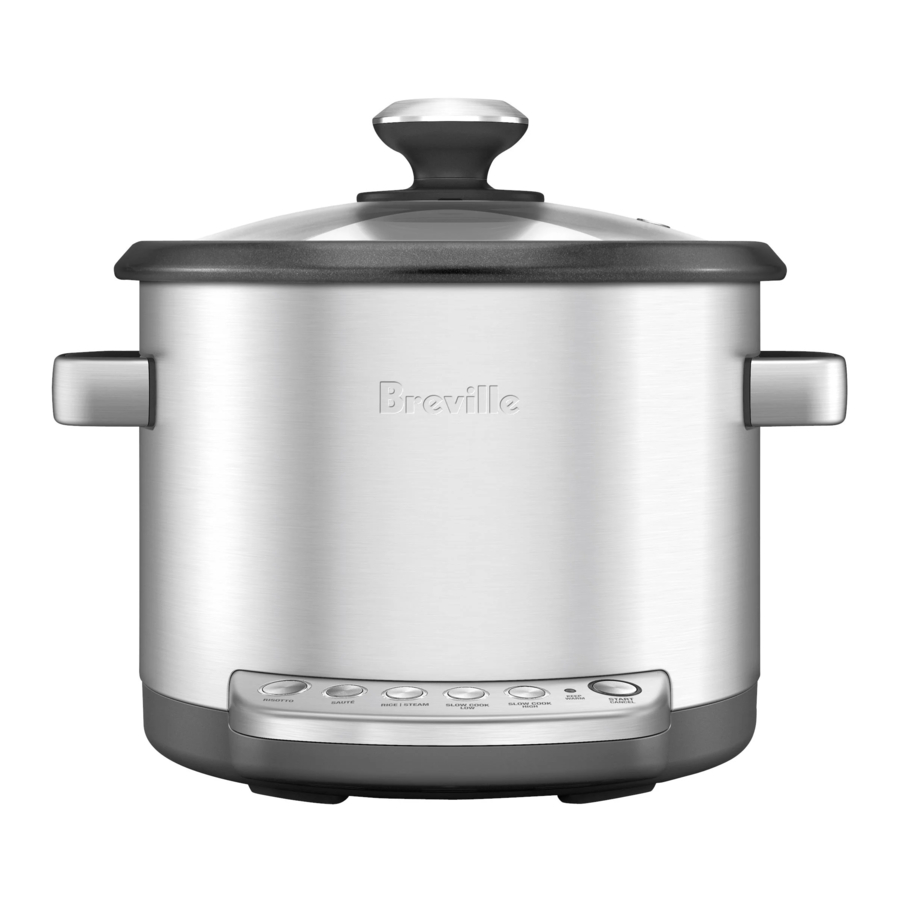
GETTING TO KNOW YOUR NEW APPLIANCE

- Tempered domed glass lid
- Removable non-stick cooking bowl
- Cool-touch handles
- Removable power cord (not shown)
- RISOTTO setting
- SAUTÉ / SEAR setting
- RICE / STEAM setting
- LOW SLOW COOK setting
- HIGH SLOW COOK setting
- KEEP WARM
- START / CANCEL button
- Stainless steel steaming tray
- Rice scoop and serving spoon
Rating Information
220–240V ~ 50–60Hz 640–760W
OPERATING YOUR NEW APPLIANCE
BEFORE FIRST USE
Before first use, remove all packaging material and promotional labels and wash the non-stick removable cooking bowl, stainless steel steaming tray and glass lid in hot soapy water, rinse and dry thoroughly.
HOW TO MAKE RISOTTO
SAUTÉ / SEAR setting
- Ensure exterior of the removable cooking bowl is clean before placing it in the housing (this will ensure proper contact with the inner cooking surface).
- Plug power cord into a 220–240V power outlet. The START / CANCEL button and RISOTTO button surround will illuminate in white.
- Press the SAUTÉ / SEAR button, the button surround will illuminate in white. Press the START / CANCEL button to activate the setting, the button surround will illuminate red.
- Cover with lid and allow to pre-heat for approximately 2–3 minutes (do not pre-heat for longer than 5 minutes).
- Add oil / butter and allow to heat / melt for approximately 1 minute.
- If using chicken or seafood in the recipe, sear in small batches, cover with lid and stir occasionally until food is cooked. Remove from cooking bowl.
- Add extra oil / butter to cooking bowl if necessary or if recipe states.
Allow to heat for approximately 1 minute. - Add ingredients such as onions and garlic. Sauté, cover with lid if necessary and stir occasionally for about 4 to 5 minutes or until cooked to desired brownness.
- Stir in Arborio or Carnaroli rice and mix well. Sauté for approximately 2–3 minutes, stirring occasionally.
- Pour in wine (if using) and cook uncovered until rice has absorbed all liquid and alcohol has evaporated, stirring frequently.
- Press the START / CANCEL button to stop the SAUTÉ / SEAR setting.
- Refer to step 1 in the RISOTTO setting section below.
RISOTTO Setting
- Follow steps 1–11 in the SAUTÉ / SEAR setting section above.
- Add stock or water and stir well. Cover with lid and press the RISOTTO button, then press the START / CANCEL button to activate the setting. The START / CANCEL button surround will illuminate red and cooking will commence.
- Allow to cook until the ready beeps sound and the Risotto Plus™ automatically switches to the KEEP WARM setting. This will take approximately 20–30 minutes depending on the recipe.
- Remove lid and stir well using the serving spoon provided.
- The Risotto Plus™ will remain on the KEEP WARM setting for 30 minutes before switching OFF. However, risotto is best served as soon as possible after completion of cooking.
NOTE
There may be occasions when the Risotto Plus™ switches to the KEEP WARM setting or switches off before cooking is complete. If this occurs, simply press the desired cooking button, then press the START/CANCEL button. The START/CANCEL button surround will illuminate red and the selected setting will be activated. This is a safety mechanism to prevent overheating due to certain cooking conditions.
TIPS
- Allow the risotto to rest in the KEEP WARM setting for 5 or 10 minutes to finish cooking.
- For optimum risotto results, we recommend you stir once after 15–20 minutes in the RISOTTO setting.
HOW TO MAKE RICE
RICE / STEAM setting
- Use the Risotto Plus™ rice scoop provided to measure the required quantity of rice. Always measure level scoops, not heaped.
- Place measured rice into a separate bowl and wash with cold water to remove any excess starch. The rice is ready for cooking when water runs clear from the rice. Drain well.
- Ensure the exterior of the removable cooking bowl is clean before placing it in the housing (this will ensure proper contact with the inner cooking surface)
![]()
- Before starting to cook, clean the bottom of the inner pot and the surface of the heating plate.
![]()
- To ensure the pot is sitting flat on the heating plate, turn the pot clockwise and anti clockwise inside the rice cooker.
![]()
- The pot must be properly positioned inside the rice cooker or the unit will not work and may become damaged.
![]()
- Before starting to cook, clean the bottom of the inner pot and the surface of the heating plate.
- Add the washed rice to the removable cooking bowl, ensuring rice is spread evenly across the bottom of the bowl and not heaped to one side.
- Add water using the following ratios:
White Rice =1 scoop rice: 1 scoop water.
Brown Rice = 1 scoop rice: 1½ scoops water. - Place the glass lid into position.
- Plug power cord into 220–240V power outlet. The START / CANCEL button and RISOTTO button surround will illuminate in white.
- Press the RICE / STEAM button, then press the START / CANCEL button to activate the setting. The START / CANCEL button surround will illuminate red and cooking will commence.
- When cooking is complete, the ready beeps will sound and the Risotto Plus™ will automatically switch to the KEEP WARM setting for up to 5 hours.
- Open the lid and turn the rice over with the serving spoon provided. Replace the lid and allow the rice to stand for 10–15 minutes before serving. This allows any excess moisture to be absorbed, resulting in a fluffier rice texture.


NOTE
- After using the RICE setting the appliance will automatically switch to the KEEP WARM setting for up to 5 hours.
- Do not remove the glass lid until ready to serve (except for when turning over rice after cooking is complete or as suggested in the recipes).
- To stop the KEEP WARM setting, unplug the power cord.

Do not interfere with the automatic selector control during operation.
- Always place liquid into the removable cooking bowl before pressing the START/CANCEL button.
- To prevent scratching the non-stick surface of the removable cooking bowl, always use wooden or plastic utensils.
- Ensure the removable cooking bowl is correctly positioned in the appliance base before you commence cooking.

- Before removing the non-stick cooking bowl from housing, always ensure the power cord is unplugged. Always ensure appliance is switched off at the power outlet and power cord is unplugged.
- Always use heat protective gloves or oven mitts when removing the lid and the non-stick cooking bowl from the appliance.
- Always position steam vent on lid away from yourself to avoid scalding from escaping steam.
- Always lift and remove the lid carefully, angling it away from yourself to avoid scalding from escaping steam.
- To ensure continued protection against risk of electric shock, connect to properly grounded outlets only.
- Cook only in removable non-stick cooking bowl.
- Do not use a damaged or dented removable cooking bowl. If damaged or dented, replace bowl before using.
NOTE
The Risotto Plus™ rice scoop is not a standard metric measuring cup.
1 Risotto Plus™ rice scoop is equal to 150g of uncooked rice and 180ml of water. If your Risotto Plus™ rice scoop is lost or misplaced, use another cup but maintain the same cooking ratios and ensure you do not exceed the 10 scoop maximum line in the removable cooking bowl:
Using the Risotto Plus™ rice scoop
- White Rice = 1 scoop rice + 1 scoop water
- Brown Rice = 1 scoop rice + 1½ scoops water
SLOW COOKING
HOW TO SLOW COOK
SEAR Setting
Searing in the Risotto Plus™ may take a little extra time and whilst not strictly necessary, the rewards are evident in the end result.
The cooking bowl keeps the heat stable and uniform allowing the meat to brown and form an even crust. Plus searing seals in the moisture, intensifies the flavour and provides more tender results.
- Ensure exterior of the removable cooking bowl is clean before placing it in the housing (this will ensure proper contact with the inner cooking surface).
- Plug power cord into a 230V power outlet. The START/CANCEL button and RISOTTO button surround will illuminate in white.
- Press the SAUTÉ/SEAR button, the button surround will illuminate white. Press the START/CANCEL button to activate the setting, the button surround will illuminate red.
- Cover with lid and allow to pre-heat for approximately 2–3 minutes (do not preheat for longer than 5 minutes).
- Add oil/butter and allow to heat/ melt for approximately 1 minute with the lid on.
- Always sear meat and poultry in small batches. Cover with lid and cook, stirring occasionally until food is evenly browned. Remove from cooking bowl. When finished searing, proceed to the Slow Cook Settings section below.
Slow Cook Settings
The Risotto Plus™ has two slow cook settings: Low and High. Use the recommended guidelines below to determine cooking time and heat settings and use recipes in this instruction book.
Dishes can be prepared well in advance and cooking time regulated so that food is ready to serve at a convenient time. A general rule of thumb for most slow cooked meat and vegetable recipes is:
Setting Cooking Time
- LOW: 6–7 hours
- HIGH: 3–4 hour
Your favourite traditional recipes can also be easily adapted to this slow cooker. Simply halve the amount of liquid and increase the cooking time.
NOTE
These cooking times are approximates only and times can vary depending on ingredients, quantities in recipes and whether the cooking bowl and its ingredients are hot from searing.
As a guide meats such as chicken or small pieces of meat will have best results when cooked on high for 3–4 hours. Larger pieces of meat such as lamb shanks will have best results when cooked on low for 6–7 hours.
Cooking Times (with Searing)
When the SAUTÉ/SEAR setting is used prior to slow cooking, cooking times will be shortened slightly. Check for doneness intermittently during cooking.
Low or High Slow Cook Settings
When the SAUTÉ/SEAR setting is used prior to slow cooking, cooking times will be shortened slightly. Check for doneness intermittently during cooking.
- Add all ingredients into the cooking bowl, ensuring denser foods are spread evenly across the bottom of the bowl and not heaped to one side and the
- liquid level is between MIN and MAX markings on the bowl.
- Place the glass lid into position.
- Press the LOW SLOW COOK OR HIGH SLOW COOK button, then press the START/CANCEL button to activate the setting. The START/CANCEL button surround will illuminate red and cooking will commence.
- Allow to cook until the ready beeps sound.
The unit then automatically switches to KEEP WARM setting. - The Risotto Plus™ will remain on the KEEP WARM setting for 5 hours before switching OFF.
The Sage Risotto Plus™ is designed specifically for flavour layering. A technique professional chefs use to enhance and deepen the taste of meals by using the same pan for browning onions, searing meats and creating casseroles, curries, soups and bolognese.
For this reason, Sage® have now developed a SLOW COOK with a SAUTÉ/SEAR setting to caramelise vegetables and sear meats before commencing the slow cooker function.
Following is a guide to help simplify the process of slow cooking, allowing you to obtain optimum results from your Risotto Plus™. We have also included helpful hints for successful slow cooking.
PREPARING MEAT AND POULTRY
Select the freshest cuts when purchasing meat.
Trim the meat or poultry of any visible excess fat. If possible, purchase chicken portions without the skin. Otherwise, the slow cooking process will result in extra liquid being formed from the fat as it melts. For casserole type recipes, cut the meat into cubes, approximately 4cm to 5cm.
Slow cooking allows less tender cuts of meat to be used. The bones can be left in meat or poultry. This imparts a good flavour and helps to keep the meat tender during cooking.
SUITABLE MEAT CUTS FOR SLOW COOKING
Beef chuck, skirt, round steak, boneless shin (gravy) beef, bone-in-shin (osso bucco), tri tip.
Lamb shanks, drumsticks (frenched shanks), neck chops, boned out forequarter or shoulder.
Veal diced leg, shoulder/forequarter chops and steaks, neck chops, knuckle (osso bucco).
Pork leg steaks, diced belly, diced shoulder, boneless loin chops.
Chicken pieces bone in (thigh cutlets / drumsticks). Chicken thigh fillets.
PREPARING VEGETABLES
Vegetables should be cut into even-sized pieces to ensure more even cooking. Frozen vegetables must be thawed before adding to other foods cooking in the Risotto Plus™.
RICE COOKING TABLES
The rice scoop provided with your Risotto Plus™ is used in the following tables.
NOTE
The Risotto Plus™ rice scoop is not a standard metric measuring cup.
1 Risotto Plus™ rice scoop is equal to 150g of uncooked rice and 180ml of water. If your Risotto Plus™ rice scoop is lost or misplaced, use another cup but maintain the same cooking ratios and ensure you do not exceed the 10 scoop maximum line in the removable cooking bowl:
Using the Risotto Plus™ rice scoop
- White Rice = 1 scoop rice + 1 scoop water
- Brown Rice = 1 scoop rice + 1½ scoops water
White Rice
| UNCOOKED WHITE RICE (RISOTTO PLUS RICE SCOOPS) | COLD TAP WATER (RISOTTO PLUS RICE SCOOPS) | COOKED RICE – APPROX. (RISOTTO PLUS RICE SCOOPS) | COOKING TIME –APPROX. (MINUTES) |
| 2 | 2 | 5 | 10–12 |
| 4 | 4 | 9 | 12–15 |
| 6 | 6 | 15 | 15–20 |
| 8 | 8 | 16 | 20–25 |
| 10 | 10 | 27 | 25–30 |
Brown Rice
| UNCOOKED WHITE RICE (RISOTTO PLUS RICE SCOOPS) | COLD TAP WATER (RISOTTO PLUS RICE SCOOPS) | COOKED RICE – APPROX. (RISOTTO PLUS RICE SCOOPS) | COOKING TIME – APPROX. (MINUTES) | |
| 2 | 3 | 5 | 25–30 | |
| 4 | 6 | 10 | 30–40 | |
| 6 | 9 | 15 | 40–45 | |
NOTE
Due to the additional water needed to cook brown rice, some starchy water bubbles may rise to the lid while cooking.
RICE VARIATIONS
- SAVOURY RICE
Prepare rice in the Risotto Plus™ as specified, substituting all the water with the same quantity of chicken, beef, fish, or vegetable stock. - SWEET RICE
Prepare rice in the Risotto Plus™ as specified substituting half the water with apple juice, orange juice or pineapple juice. Cooking rice with milk or cream is not recommended as it will burn onto the bottom of removable cooking bowl. - SAFFRON RICE
Add ¼ teaspoon of saffron powder or 2 saffron threads to every 2 cups of water. Use the white rice cooking tables. Mix well. - ARBORIO RICE
Arborio rice is short round-grained pearly rice often used for Italian risotto cooking. Use the brown rice cooking tables. - JASMINE RICE
Jasmine rice is fragrant long grain rice. Use the white rice cooking tables. - BASMATI RICE
Basmati rice is an aromatic long grain rice. Use the white rice cooking tables. - WILD RICE
It is not recommended to cook wild rice alone in the Risotto Plus™ as it requires a substantial amount of water. It is possible to cook wild rice as a blend with white or brown rice. - QUINOA
Quinoa is an ancient South American grain that is high in protein with fluffy, creamy and slightly crunchy texture. Use the brown rice cooking tables. - SUSHI
Sushi rice is short grained rice used in Japanese cooking. Use the brown rice cooking tables.
TIP
- Add a little extra water for fluffier rice and a little less water for firmer rice.
- Some rice varieties may require more water for cooking, such as wild rice blends, Arborio rice or short grain rice. Follow the directions on the packet or use the brown rice cooking table.
STEAMING
Steamed foods retain most of their nutritional value when cooked in the Risotto Plus™. Foods may be steamed by placing food in the stainless steel steaming tray over stock or water and covering with the glass lid. Keep the glass lid on while steaming food unless the recipe or chart specifically states to remove the lid. By removing the lid unnecessarily steam is lost and the cooking time will be extended.
- Measure 3 rice scoops or more of water or stock and pour into the removable cooking bowl. Use up to a maximum of 6 rice scoop cups of water.
- Place food to be steamed directly into the stainless steel steaming tray and insert into the removable cooking bowl.
- Place removable cooking bowl with the steaming tray into housing and cover with the glass lid.
- Plug power cord into a 230V power outlet. The START/CANCEL button and RISOTTO button surround will illuminate in white.
- Press the RICE/STEAM setting then press the START/CANCEL button to activate the setting. The START/CANCEL button surround will illuminate red and cooking will commence.
- When steaming is complete, the ready beeps will sound and the Risotto Plus™ will automatically switch to the KEEP WARM setting.
- If no further steaming is required, press the START/CANCEL button to cease operation and turn the Risotto Plus™ off at the power outlet and then unplug power cord.
Allow to cool before cleaning.
NOTE
- Keep the glass lid on while steaming food unless the recipe or chart specifically states to remove the lid. (By removing the lid unnecessarily, steam is lost and the cooking time will be extended.)
- Do not let the removable cooking bowl boil dry during steaming.
- Hot liquid can be added during the steaming process.
HINTS AND TIPS FOR STEAMING VEGETABLES
- Smaller pieces will steam faster than larger pieces.
- Try to keep vegetables to a standard size to ensure even cooking.
- Fresh or frozen vegetables may be steamed.
- If steaming frozen vegetables, do not thaw.
- The size and shape of vegetables, as well as personal taste, may call for adjustments to the cooking time. If softer vegetables are required, allow extra cooking time.
- Do not allow water or stock to reach the stainless steel tray. The steaming will not be effective.
Always lift and remove the lid carefully, angling it away from yourself to avoid scalding from escaping steam.
| VEGETABLES | PREPARATION & TIPS | QUANTITY | COOKING TIME |
| Artichoke | remove hard outer leaves & stalk | 2 medium | 30–35 |
| Asparagus | trim, leave as spears | 2 bunches | 12–14 |
| Beans | top and tail, leave whole | 250g | 13–15 |
| Beets | trim, do not break skin | 300g | 12–13 |
| Peppers | cut into strips | 3 medium | 14–16 |
| Broccoli | cut into florets | 250g | 8–10 |
| Brussel Sprouts | cut a cross in the base | 375g | 17–19 |
| Cabbage | large pieces | 500g | 10–12 |
| Carrots | cut into strips | 3 medium | 14–16 |
| Celery | slice into strips | 3 stalks | 5–6 |
| Chickpeas | soak for 12 hours | 1 cup dried | 40–45 |
| Corn | whole corn cobs | 2 small cobs | 20–22 |
| Courgette | sliced | 350g | 6 |
| Mushrooms | whole, unwashed | 300g | 8–10 |
| Onions | peeled, leave whole | 6 medium | 20–25 |
| Mangetout | topped and tailed | 250g | 4–5 |
| Peas | fresh, peeled frozen | 250g 250g | 8–10 4–5 |
| Potatoes | all purpose, whole | 4 (150–180g each) | 35–40 |
| Potatoes | new, whole | 6 (125g each) | 25–30 |
| Sweet Potato | cut into pieces | 300g | 20–25 |
| Spinach | leaves and stems cleaned | ½ bunch | 5 |
| Squash (baby) | topped and tailed | 350g | 8 |
| Turnips | peeled, sliced & cut to 50g pieces | 350g | 15–17 |
HINTS AND TIPS FOR STEAMING FISH AND SEAFOOD
- Season fish with fresh herbs, onions, lemon with a fork and is opaque in colour. etc. before cooking.
- Ensure fish fillets are in a single layer and do not overlap.
- Fish is cooked when it flakes easily
| TYPE | SUGGESTIONS AND TIPS | COOKING TIME (MINUTES) |
| Fish – fillets –whole –cutlets | Steam until opaque and easy to flake. A cutlet is cooked when the centre bone is able to be easily removed | 8–10 15–20 12–14 |
| Lobster – tails | Remove underside of shell | 18–20 |
| Mussels – in shell | Steam until just opened | 12–14 |
| Clams | Steam until just opened | 8–10 |
| Prawns - in shell | Steam until pink | 8–10 |
| Scallops | Steam until opaque | 4–6 |
HINTS AND TIPS FOR STEAMING POULTRY
- Select similar sized pieces of poultry for even cooking.
- For even cooking results arrange poultry in a single layer.
- Remove visible fat and skin.
- To obtain a browned appearance, sear the chicken before steaming.
- Check poultry is cooked by piercing the thickest part. The poultry is cooked when the juices run clear.
| TYPE | SUGGESTIONS AND TIPS | COOKING TIME (MINUTES) |
| Breast fillet | Place skin side up | 20–25 |
| Drumstick | Place thickest part to outside of the steaming tray | 30–35 |
| Thigh fillet | Place thickest part to outside of the steaming tray | 18–20 |
HINTS AND TIPS FOR STEAMING DUMPLINGS
- Fresh or frozen dumplings and savoury buns can be steamed.
- Place small pieces of baking paper, or cabbage or lettuce leaves, under the dumplings to avoid sticking to the steaming tray.
| TYPE | SUGGESTIONS AND TIPS | COOKING TIME (MINUTES) |
| BBQ pork or chicken buns | Cook from frozen | 10–12 |
| Dumplings – frozen | Separate before cooking | 8–10 |
| Dumplings – fresh | 5–6 |
KEEP WARM SETTING
The Risotto Plus™ will automatically switch to the KEEP WARM setting once the RICE, RISOTTO and SLOW COOK settings have finished cooking. It will keep KEEP WARM for up to 5 hours on the RICE and SLOW COOK settings and up to 30 minutes on the RISOTTO setting.
CARE & CLEANING
Unplug the power cord from the power outlet.
Allow all parts to cool before removing the removable cooking bowl. Wash the removable cooking bowl, stainless steel steaming tray and glass lid in hot, soapy water, rinse and dry thoroughly.
We do not recommend that any parts of your Risotto Plus™ are washed in a dishwasher as harsh detergents and hot water temperatures may stain or distort the removable cooking bowl and accessories.
Do not use abrasive cleaners, steel wool, or metal scouring pads as these can damage the non-stick surface.
The housing can be wiped over with a damp cloth and then dried thoroughly.
To prevent damage to appliance do not use alkaline cleaning agents when cleaning, use a soft cloth and a mild detergent.
NOTE
If rice has cooked onto the bottom of the removable cooking bowl, fill the bowl with hot, soapy water and leave to stand for approximately 10 minutes before cleaning.
The appliance connector must be removed before the Risotto Plus™ is cleaned and that the appliance inlet must be dried before the Risotto Plus™ is used again.
To prevent damage to the Risotto Plus™ do not use alkaline cleaning agents when cleaning, use a soft cloth and mild detergent.
Do not use chemicals, steel wool, metal scouring pad or abrasive cleaners to clean the outside of the Risotto Plus™ housing or cooking bowl as these can damaged the housing or the coating of the cooking bowl.
Do not immerse housing or power cord in water or any other liquid as this may cause electrocution.
TROUBLESHOOTING
| PROBLEM | WHAT TO DO |
| The Risotto Plus™ suddenly switches off. |
|
| The Risotto Plus™ has switched to KEEP WARM setting before cooking is complete. |
|

Documents / ResourcesDownload manual
Here you can download full pdf version of manual, it may contain additional safety instructions, warranty information, FCC rules, etc.
Download Sage the Risotto Plus SRC600 - Multi Cooker 760W Manual
Advertisement


Need help?
Do you have a question about the the Risotto Plus SRC600 and is the answer not in the manual?
Questions and answers