Advertisement
Advertisement
Table of Contents

Related Manuals for Sage Fast Slow GO BPR680

Summary of Contents for Sage Fast Slow GO BPR680
- Page 1 Fast Slow GO ™ BPR680/SPR680 QUICK GUIDE...
-
Page 2: Table Of Contents
IMPORTANT Contents SAFEGUARDS READ ALL INSTRUCTIONS Sage Recommends BEFORE USE AND SAVE Safety First FOR FUTURE REFERENCE Components • A downloadable version 10 Control Panel of this document 11 Food Presets is also available at 12 Cooking Presets sageappliances.com 13 Functions 23 Care &... - Page 3 result from inappropriate to more than half of its use of the pressure capacity. cooker. Make sure that the • The heating source cooker is properly closed necessary for cooking is before applying heat. included in the appliance. See “Pressure Cook” •...
- Page 4 • Always insert the In particular, use a body connector end of the and a lid from Sage ® power cord into the indicated as being appliance inlet before compatible.
- Page 5 • Do not place the • Do not operate the appliance near the appliance on a sink edge of a bench or table drain board. during operation. Ensure • Do not place the cooker that the surface is dry, on a stone bench top level, clean and free when it’s cooking.
- Page 6 • Do not use a damaged IMPORTANT SAFEGUARDS removable cooking bowl. FOR ALL ELECTRICAL APPLIANCES Replace before using. • Do not use this appliance • Do not place food or if it is worn, has been liquid directly into the dropped or is damaged stainless-steel base.
- Page 7 Sage sensory or mental Customer Service or go capabilities, or lack to sageappliances.com of experience and knowledge, if they have • The use of attachments been given supervision not sold or recommended or instruction concerning by Sage may cause fire, ®...
- Page 8 SPECIFICATION current not exceeding 30mA be installed in the electrical circuit Model SPR680 Rated Volume 6 Litres supplying the appliance. Usable Volume 4 Litres See your electrician for Working Pressure 80kPa professional advice. Heating Source Electric Heating Element These specifications may change without prior To protect against notice.
-
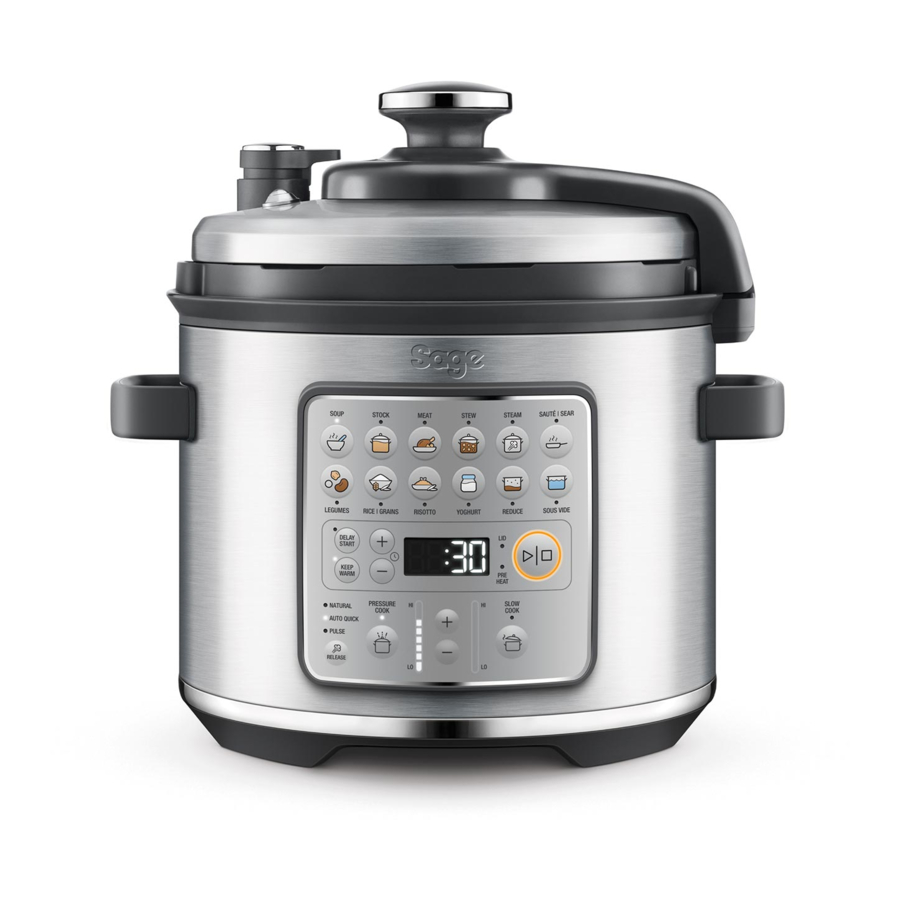
Page 9: Components
Components A. Pressure Release Valve F. Sealing Nut Automatically controls the rate at which G. 6L Removable Cooking Bowl steam is released from the cooker H. Lid Arm B. Pressure Safety Valve I. Easy Clean Moat C. Dishwasher Safe Removable Lid Catches condensation drips for D. -
Page 10: Control Panel
CONTROL PANEL SOUP STOCK MEAT STEW STEAM SAUTÉ | SEAR LEGUMES RICE | GRAINS RISOTTO YOGURT REDUCE SOUS VIDE DELAY START KEEP WARM PRESSURE SLOW NATURAL COOK COOK AUTO QUICK PULSE RELEASE A. Food Presets with light indicators J. Pressure release button with modes selection indicator B. -
Page 11: Food Presets
FOOD PRESETS SETTING: PRESSURE COOK FOOD MENU DEFAULT PRESET RANGE Soup 50 kPa - approx. 110°C 10 kPA – 80 kPa 30 MINS Up to 2:00 HRS AUTO QUICK Stock 80 kPa - approx. 116°C 10 kPA – 80 kPa 1 HOUR Up to 2:00 HRS AUTO QUICK... -
Page 12: Cooking Presets
YOGHURT Stage 1 Stage 2 Stage 3 Time: 8 – 16 HRS Scalding Cooling* Incubating Temp: n/a 10 MIN Up to 3 hours 8 hours Keep warm: n/a Temp: 83°C Temp: from 83°C to 43°C Temp: 43°C KEEP WARM OFF KEEP WARM OFF KEEP WARM OFF *Cool down time if the lid is open (for 2 litres of milk):... -
Page 13: Functions
Functions Pressure Release Valve Cover towards rear of cooker BEFORE FIRST USE 1. Remove and safely discard any packaging material, promotional labels and tape from the cooker. 2. Open the lid by turning the lid knob counter clockwise and lifting lid up and off the appliance until it is in the hinged open position. - Page 14 10. We recommend running a 15-minute FOOD MENU PRESSURE SLOW cooking cycle with water to get rid of any COOK COOK protective substances in the cooking Soup ✔ ✔ bowl and on the heating element. Stock ✔ ✔ Meat ✔ ✔...
- Page 15 • Refer to ‘Food Presets’ and ‘Cooking 6. Close the lid and turn the lid knob Presets’ section for preset settings clockwise to lock into place. The cooker recommendations. alert will sound when the lid has been locked. • If there is no visible light on any of the food preset indicators, then the product is in 7.
- Page 16 HANDS- FREE VARIABLE STEAM the pressure release valve. The steam release setting can be changed during RELEASE the steam release cycle by pressing The Fast Slow GO™ features 3 steam the STEAM RELEASE button. release methods: 14. At the end of the steam release cycle, Auto Quick the cooker alert will sound, the display will flash, and if ‘KEEP WARM’...
- Page 17 8. Press the START button to commence changes to the steam release mode may cooking. The START/CANCEL button lead to food spillage. will illuminate orange. CAUTION 9. The timer will be displayed and automatically begin to count down. The Always keep hands and face clear of the time can be adjusted during the slow cook pressure release valve when pressure cycle by pressing the TIME (+/-) button.
- Page 18 or SEAR setting and allow the water to come Stew to a simmer before pressure cooking. • The PRESSURE & SLOW COOK STEW setting is ideal for cooking ground meat, • Do not overfill the cooking bowl. The total meat sauces and hearty stews. volume of soup should not exceed the ‘MAX’...
- Page 19 The SEAR setting is designed to enhance and to the cooking table for rice/grains and deepen the taste of meals by using the same legumes on the Sage webpage for more cooking bowl for caramelizing and browning information. foods before pressure or slow cooking.
- Page 20 SOUS VIDE SOUS VIDE steps: 1. Fill cooking bowl with cool water until The SOUS VIDE setting is ideal for cooking it has reached the MAX line. food to a very precise temperature in To reduce preheat time, start with water a water bath.
- Page 21 and turn the pressure release valve to the and refrigerate until cold. Once the yoghurt open position. is completely cold, transfer to an airtight container and refrigerate for up to 2 weeks. TIPS • Using homogenised milk will produce a smoother yoghurt. If your result is slightly lumpy and separated, whisk the cooled yoghurt gently to combine.
- Page 22 LED will not be illuminated during DELAY Exact altitude can be found at START. www.elevationmap.net or by contacting Sage Customer Service Centre. SETTING THE UNIT MEASURE The unit measure default is in Celsius (C). To change between metric and imperial units,...
-
Page 23: Care & Cleaning
• Replace silicone rubber gasket every • Do not immerse metal base or power cord 1–2 years (see your nearest Sage Service in water or any other liquid as they may Centre). cause electrocution. - Page 24 WARNING If the silicone rubber gasket is not fitted correctly into the holder, the lid will not seal properly. This may cause the appliance to malfunction and leak steam or hot liquid which can cause burns or scalding. A mixture of ½ cup (125ml) lemon juice, 1 tablespoon lemon rind plus 500ml hot water cooked at HIGH pressure for 5 minutes can help eliminate food odours.
-
Page 25: Troubleshooting
• The screen will display “Err” when there is a non-resettable issue with the appliance. Should this occur, immediately remove the power cord from the power outlet and contact Sage Consumer Support. Factory Reset • Press and hold 'soup' and 'sous vide' buttons for three seconds to... -
Page 26: Guarantee
During this guarantee period Sage Appliances will repair, replace, or refund any defective product (at the sole discretion of Sage Appliances). All legal warranty rights under applicable national legislation will be respected and will not be impaired by our guarantee. - Page 27 Notes...
- Page 28 Netherlands Sweden Österreich: 0800 80 2551 0800 020 1741 0200 123 797 Luxembourg Denmark Sage Appliances France SAS 0800 880 72 080 820 827 Siège social: 66 avenue des Champs Elysées – 75008 Paris 879 449 866 RCS Paris Switzerland...
Need help?
Do you have a question about the Fast Slow GO BPR680 and is the answer not in the manual?
Questions and answers