Table of Contents
Advertisement
Quick Links
EC2-DIO Series
EtherCAT Slave
Modules User Manual
English Ver. 1.0, Mar. 2023
WARRANTY
All products manufactured by ICP DAS are warranted against
defective materials for a period of one year from the date of
delivery to the original purchaser.
WARNING
ICP DAS assumes no liability for damages consequent to the
use of this product. ICP DAS reserves the right to change this
manual at any time without notice. The information furnished
by ICP DAS is believed to be accurate and reliable. However, no
responsibility is assumed by ICP DAS for its use, nor for any
infringements of patents or other rights of third parties
resulting from its use.
COPYRIGHT
Copyright © 2023 by ICP DAS. All rights are reserved.
TRADEMARK
Names are used for identification only and may be registered
trademarks of their respective companies.
CONTACT US
If you have any questions, please feel free to contact us via
email at:
service@icpdas.com, service.icpdas@gmail.com
I/O
S
UPPORT
EC2-P16C16
EC2-P32
EC2-C32
Advertisement
Table of Contents

Related Manuals for ICP DAS USA EC2-DIO Series


Summary of Contents for ICP DAS USA EC2-DIO Series
- Page 1 EC2-DIO Series EtherCAT Slave Modules User Manual English Ver. 1.0, Mar. 2023 WARRANTY All products manufactured by ICP DAS are warranted against defective materials for a period of one year from the date of delivery to the original purchaser. WARNING ICP DAS assumes no liability for damages consequent to the use of this product.
-
Page 2: Table Of Contents
EC2-DIO series EtherCAT Slave I/O module TABLE OF CONTENTS INTRODUCTION ..............................4 ................................ 5 ACKAGE ............................6 RODUCT NFORMATION ..............................6 ELECTION UIDE HARDWARE INFORMATION ..........................7 ................................. 7 PPEARANCE ..............................10 PECIFICATION 2.2.1 System Specification ............................ 10 2.2.2 I/O Specification ............................11 .............................. - Page 3 EC2-DIO series EtherCAT Slave I/O module [EC2-P32]Index 1A00 DI Outputs Process Data Mapping ..................27 [ALL]Index 1C00 Sync Manager Type ......................... 28 [EC2-P16C16]Index 1C12 SyncManager 2 Assignment ....................28 [EC2-P16C16]Index 1C13 SyncManager 3 Assignment ....................28 6000-0 7FFF) ......................29...
-
Page 4: Introduction
The isolated input and output design protects the EC2-DIO series against the harmful interference and environment. The EC2-DIO series has passed and verified by the conformance test tool, therefore eligible EtherCAT Master or configurator can manipulate it simply and implement your various applications easily. -
Page 5: Package List
EC2-DIO series EtherCAT Slave I/O module 1.1 Package List The shipping package includes the following items: Quick Start EC2-DIO Series If any of these items is missing or damaged, please contact your local distributor for more information. Keep the shipping materials and overall package in case you want to NOTE ship the module back in the future. -
Page 6: Product Information
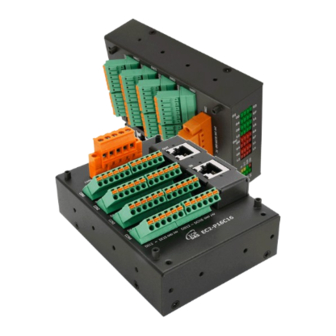
EC2-DIO series EtherCAT Slave I/O module 1.2 Product Information The EC2-DIO series of EtherCAT slave modules support a range of I/O formats, such as photo-isolated digital input, relay contact ,and open-collector output, etc. The table below provides a description of each model. -
Page 7: Hardware Information
Interface DC Power Input Connector The “24V” and “GND” pins are used for the power supply applies to all types of EC2-DIO series module. The valid power voltage range is from +10 to +30 V The definition of “F.G.” (Frame Ground): Electronic circuits are constantly vulnerable to Electrostatic Discharge (ESD), which becomes worse in a continental climate area. - Page 8 Device configuration in saving mode Green Device configuration in protected mode PWR LED Indicator Once power is supplied to the EC2-DIO series module, the system LED indicator will illuminate. Copyright © 2023 ICP DAS CO., Ltd. All Rights Reserved. - 8 -...
- Page 9 EC2-DIO series EtherCAT Slave I/O module I/O Indicator The exact design and functionality depends on the module type which indicates the I/O status. Notation Color States Description Input voltage is below the lower switching threshold voltage Green Input voltage is higher than the upper switching threshold voltage Digital output status is “Off”...
-
Page 10: Specification
EC2-DIO series EtherCAT Slave I/O module 2.2 Specification 2.2.1 System Specification Item Specification Communication Ethernet Port 2 x RJ-45, 100 BASE-TX Protocol EtherCAT Distance between Station Max. 100 m (100 BASE-TX) Data Transfer Medium Ethernet/EtherCAT Cable (Min. CAT 5), Shielded... -
Page 11: I/O Specification
EC2-DIO series EtherCAT Slave I/O module 2.2.2 I/O Specification Model EC2-P32 EC2-P16C16 EC2-C32 Digital Input Channels Dry/Wet Contact Dry: Sink Sink/Source Wet: Sink/Source (NPN/PNP) Dry: Close to GND On Voltage Level Wet: +10 V ~ +40 V Dry: Open Off Voltage Level Wet: +4 V Max. -
Page 12: Pin Assignments
EC2-DIO series EtherCAT Slave I/O module 2.3 Pin Assignments EC2-P16C16 Copyright © 2023 ICP DAS CO., Ltd. All Rights Reserved. - 12 -... -
Page 13: Ec2-P32
EC2-DIO series EtherCAT Slave I/O module EC2-P32 Copyright © 2023 ICP DAS CO., Ltd. All Rights Reserved. - 13 -... -
Page 14: Ec2-C32
EC2-DIO series EtherCAT Slave I/O module EC2-C32 Copyright © 2023 ICP DAS CO., Ltd. All Rights Reserved. - 14 -... -
Page 15: Wiring Connections
EC2-DIO series EtherCAT Slave I/O module 2.4 Wiring Connections Input Wiring Digital Model Readback as 1 Readback as 0 Input/Counter Close to GND Open DI.GND DI.GND +S5 V +S5 V Dry Contact To other To other channel channels +10 ~ +50 VDC OPEN or <4 VDC... -
Page 16: Wiring To The Connector
EC2-DIO series EtherCAT Slave I/O module 2.5 Wiring to the Connector A tip for connection the wire to the connector Use the blade of a flat-head screwdriver to push the wire clamp, then hold until step 2 complete. ... -
Page 17: Dimensions
EC2-DIO series EtherCAT Slave I/O module 2.6 Dimensions The following diagrams provide the dimensions of the EC2-DIO series module and can be used as a reference when defining the specifications for any custom enclosures. All dimensions are in millimeters. EC2-P16C16/P32/C32... -
Page 18: Getting Started
EC2-DIO series EtherCAT Slave I/O module 3. Getting Started This chapter provides a basic overview of how to configure and operate your EC2-DIO series module. 3.1 Connecting the Power and the Host PC Step 1 Connect both the IN port of EC2-DIO module and RJ-45 Ethernet port of Host PC. - Page 19 EC2-DIO series EtherCAT Slave I/O module Step 3 Verify the “PWR”LED indicator on the EC2-DIO module is Yellow, “IN”LED indicator is Green. █ █ Yellow, OK Green, OK Copyright © 2023 ICP DAS CO., Ltd. All Rights Reserved. - 19 -...
-
Page 20: Configuration And Operation
EC2-DIO series EtherCAT Slave I/O module 3.2 Configuration and Operation Beckhoff TwinCAT 2.X is most commonly used EtherCAT Master software to operate ECAT-2000 module. Inserting into the EtherCAT network Installation of the latest XML device description(ESI) NOTE Please ensure that you have installed the latest XML device description in TwinCAT. - Page 21 EC2-DIO series EtherCAT Slave I/O module Step 2 Configuration via TwinCAT In the left-hand of the TwinCAT System Manager, click on the branch of the EtherCAT Box you wish to configure (ECx-P16C16 in this example). Click DIx or DOx to get and configure state.
-
Page 22: Object Description And Parameterization
EC2-DIO series EtherCAT Slave I/O module 4. Object Description and Parameterization 4.1 Standard Object(0x1000-0x1FFF) [ALL]Index 1000 Device Type Index Name Meaning Data type Flags Default 1000:00 Device type Device type of the EtherCAT slave: the UINT32 0x00030191 Lo-Word contains the CoE profile used (5001). -
Page 23: [All]Index 1009 Hardware Version
EC2-DIO series EtherCAT Slave I/O module [ALL]Index 1009 Hardware Version Index Name Meaning Data type Flags Default String 1.0.0 1009:00 Hardware version Hardware version of the EtherCAT slave [ALL]Index 100A Software Version Index Name Meaning Data type Flags Default Firmware version for EtherCAT slave String 1.0.0... -
Page 24: [Ec2-P16C16]Index 1600 Do Outputs Process Data Mapping
EC2-DIO series EtherCAT Slave I/O module [EC2-P16C16]Index 1600 DO Outputs Process Data Mapping Data Index Name Meaning Flags Default type DO Output process 1600:00 PDO Mapping RxPDO 1 UINT8 0x11(17dec) data mapping 1600:01 SubIndex 001 PDO Mapping entry (object 0x7000,entry 0x01) -
Page 25: [Ec2-C32]Index 1600 Do Outputs Process Data Mapping
EC2-DIO series EtherCAT Slave I/O module [EC2-C32]Index 1600 DO Outputs Process Data Mapping Data Index Name Meaning Flags Default type DO Output process 1600:00 PDO Mapping RxPDO 1 UINT8 0x21(33dec) data mapping 1600:01 SubIndex 001 PDO Mapping entry (object 0x7000,entry 0x01) -
Page 26: [Ec2-P16C16]Index 1A00 Di Outputs Process Data Mapping
EC2-DIO series EtherCAT Slave I/O module [EC2-P16C16]Index 1A00 DI Outputs Process Data Mapping Index Name Meaning Data type Flags Default DI Output process 1A00:00 PDO Mapping TxPDO 1 UINT8 0x11(17dec) data mapping 1A00:01 SubIndex 001 PDO Mapping entry (object 0x6000,entry 0x01) -
Page 27: [Ec2-P32]Index 1A00 Di Outputs Process Data Mapping
EC2-DIO series EtherCAT Slave I/O module [EC2-P32]Index 1A00 DI Outputs Process Data Mapping Data Index Name Meaning Flags Default type DI Output process 1A00:00 PDO Mapping TxPDO 1 UINT8 0x21(33dec) data mapping 1A00:01 SubIndex 001 PDO Mapping entry (object 0x6000,entry 0x01) -
Page 28: [All]Index 1C00 Sync Manager Type
EC2-DIO series EtherCAT Slave I/O module [ALL]Index 1C00 Sync Manager Type Index Name Meaning Data type Flags Default 1C00:00 Sync manager type Using the sync managers UINT8 0x04(4dec) 1C00:01 SubIndex 001 Sync-Manager Channel 1:Mailbox write UINT8 0x01(1dec) 1C00:02 SubIndex 002... -
Page 29: Profile Specific Objects (0 6000-0 7Fff)
EC2-DIO series EtherCAT Slave I/O module 4.2 Profile Specific Objects(0x6000-0x7FFF) [EC2-P16C16]Index 6000 Digital Inputs Index Name Meaning Flags Default Data type 6000:00 Digital Inputs UINT8 0x11(17dec) 6000:01 BOOLEAN 0x00(0dec) 6000:02 BOOLEAN 0x00(0dec) 6000:03 BOOLEAN 0x00(0dec) 6000:04 BOOLEAN 0x00(0dec) 6000:05 BOOLEAN... -
Page 30: [Ec2-P32]Index 6000 Digital Inputs
EC2-DIO series EtherCAT Slave I/O module [EC2-P32]Index 6000 Digital Inputs Index Name Meaning Data type Flags Default 6000:00 Digital Inputs UINT8 0x21(33dec) 6000:01 BOOLEAN 0x00(0dec) 6000:02 BOOLEAN 0x00(0dec) 6000:03 BOOLEAN 0x00(0dec) 6000:04 BOOLEAN 0x00(0dec) 6000:05 BOOLEAN 0x00(0dec) 6000:06 BOOLEAN 0x00(0dec) -
Page 31: [Ecat-P16C16]Index 7000 Digital Outputs
EC2-DIO series EtherCAT Slave I/O module [ECAT-P16C16]Index 7000 Digital Outputs Index Name Meaning Data type Flags Default 7000:00 Digital Outputs UINT8 0x11(17dec) 7000:01 BOOLEAN 0x00(0dec) 7000:02 BOOLEAN 0x00(0dec) 7000:03 BOOLEAN 0x00(0dec) 7000:04 BOOLEAN 0x00(0dec) 7000:05 BOOLEAN 0x00(0dec) 7000:06 BOOLEAN 0x00(0dec) -
Page 32: [Ec2-C32]Index 7000 Digital Outputs
EC2-DIO series EtherCAT Slave I/O module [EC2-C32]Index 7000 Digital Outputs Index Name Meaning Data type Flags Default 7000:00 Digital Outputs UINT8 0x21(33dec) 7000:01 BOOLEAN 0x00(0dec) 7000:02 BOOLEAN 0x00(0dec) 7000:03 BOOLEAN 0x00(0dec) 7000:04 BOOLEAN 0x00(0dec) 7000:05 BOOLEAN 0x00(0dec) 7000:06 BOOLEAN 0x00(0dec) -
Page 33: Profile Specific Objects (0 8000-0 8Fff)
EC2-DIO series EtherCAT Slave I/O module 4.3 Profile Specific Objects(0x8000-0x8FFF) [EC2-P16C16/P32/C32]Index 8000 DIO Settings Index Name Meaning Data type Flags Default 8000:00 UINT8 0xC(12dec) 0: Disable The default value (80n0:13) is 8000:01 Digital output keep value BOOLEAN 0x00(0dec) active. 1: Enable... -
Page 34: Firmware Upgrade Througe Ethercat Foe
EC2-DIO series EtherCAT Slave I/O module 5. Firmware upgrade through EtherCAT FoE This section describes the device update for ICP DAS EtherCAT slaves from the EC1, EC2 and EC8 series. Demonstrate how to update firmware using Beckhoff TwinCAT 3 EtherCAT master. - Page 35 EC2-DIO series EtherCAT Slave I/O module Step 2 Select the firmware file(*.efw). Step 3 Click ok button to start upgrade firmware. Copyright © 2023 ICP DAS CO., Ltd. All Rights Reserved. - 35 -...
- Page 36 EC2-DIO series EtherCAT Slave I/O module Step 4 Check out the progress bar and wait for it finish. Step 5 TwinCAT master will notice user the function successes, just click “OK”. NOTE: Due to the ECx-DIO will restart the system after firmware upgrading so that TwinCAT will indicate the slave not in the expected state.
-
Page 37: Explicit Device Id
EC2-DIO series EtherCAT Slave I/O module 6. Explicit Device ID Explicit Device ID is used for met identification function of TwinCAT master. User can specify an ID at EtherCAT slave side and setup identification at TwinCAT master side. TwinCAT master will check if the ID of the slave matched with the expected identification value during startup the slave. - Page 38 EC2-DIO series EtherCAT Slave I/O module Step 2 Go to “General -> Behavior” and turn on the “Check Identification”. Copyright © 2023 ICP DAS CO., Ltd. All Rights Reserved. - 38 -...
- Page 39 EC2-DIO series EtherCAT Slave I/O module Step 3 Confirm current identification ADO (Address Offset) is “(ADO 0x0134)”. Don’t forget to assign the value in decimal. The value “100” is just an example here. Step 4 User should also setup the same value on moduel like following: The digit format “Rotary Switch”...
- Page 40 EC2-DIO series EtherCAT Slave I/O module Step 6 Re-activate the TwinCAT master. Step 7 If user see the below screen, that means that TwinCAT master already enter running mode successfully and the slave also passed the identification checking so that it can enter OP state.
- Page 41 EC2-DIO series EtherCAT Slave I/O module Step 8 The slave will also accept frames from TwinCAT master with 2 kinds of address (1001 or 100) at the same time.But it needs to turn on second address function in ESC register. However, we arrange command for observe this behavior first.
- Page 42 EC2-DIO series EtherCAT Slave I/O module Step 9 Double-click “Cmd 1” and setup “Slave Address” and “Address Offset”. I setup slave address = 0x64 and address offset = 0x12 in this example. Step 10 Re-activate the TwinCAT master again. Copyright © 2023 ICP DAS CO., Ltd. All Rights Reserved.
- Page 43 EC2-DIO series EtherCAT Slave I/O module Step 11 Go to “ESC Access -> Memory” in “Advanced Settings” and check out the address 0x0012. The firmware will write the user specified Switch ID value into ESC register 0x0012 (the register named Configured Station Alias).
- Page 44 EC2-DIO series EtherCAT Slave I/O module Step 134 Click “Device N (EtherCAT) -> Cmd 1 -> DATA”, you will see the command get the value of ESC register 0x0012 back successfully. It is correct, the “0x0064” in UINT data type.
-
Page 45: Appendix: Revision History
EC2-DIO series EtherCAT Slave I/O module Appendix: Revision History This chapter provides revision history information to this document. The table below shows the revision history. Revision Date Description 2023.Mar Initial issue Copyright © 2023 ICP DAS CO., Ltd. All Rights Reserved.
Need help?
Do you have a question about the EC2-DIO Series and is the answer not in the manual?
Questions and answers