Table of Contents
Advertisement
Quick Links
Advertisement
Table of Contents

Related Manuals for Lectron EVC27


Summary of Contents for Lectron EVC27
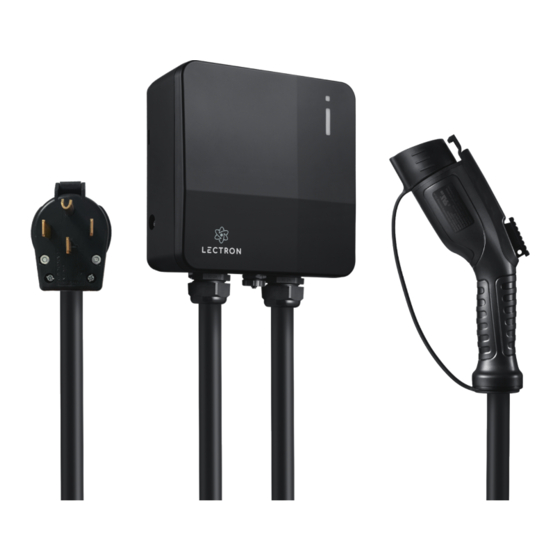
- Page 1 48A AC Charging Station (4G) USER MANUAL...
- Page 2 In the box 2 x M5 anti-theft AC charging station Wall-mounted round head screws bracket 4 x M6 hexagonal Allen wrench Corrugated expansion screws mounting template EV cable Set screws + organizer holster anchors (holster) Page 1...
- Page 3 Warnings • To avoid fire, injury, or death, carefully read and follow the instructions during installation, operation, and maintenance. - DO NOT put your fingers into the electric vehicle connector. - DO NOT use this product if the flexible power cord or EV cable is frayed, has broken insulation, or displays any other signs of damage.
-
Page 4: Installation Requirements
Installation requirements • Disconnect electrical power prior to installing the charging station. • Be sure to preview the user manual and ensure local building and electrical codes are reviewed before installing the AC charger. • The AC charger should be installed by a qualified technician according to the user manual and local safety regulations. - Page 5 Introduction to parts CAUTION: Avoid placing the charger near hot objects and at high-temperature locations and away from dangerous substances such as flammable gases and corrosive materials. Basic Interface Signal check Rear notch indicator LED light Charging cable indication LAN cable AC power inlet cable...
- Page 6 Plan the mounting WARNING: In areas with frequent thunderstorms, add surge protection at the service panel for all circuits. Ensure all power and ground connections, especially those at the breaker and bus bar, are clean and tight. CAUTION: Not recommended to be installed in coastal environments with high humidity or high dust 1.
- Page 7 2. Select the appropriate mounting location with electrical capacity: 1. Ensure the owner has chosen a mounting location allowing the charging cable to reach the car’s charging port while providing slack. 2. The device must be anchored into mounting such as 2 x 6 in stud or a solid wall.
- Page 8 Mount the charging station 4. Fix the cable organizer holster to the wall, approximately 8 inches from the far right end of the punched hole. 5. Use 1 set (4 pcs in total) of hexagonal expansion screws to secure the wall-mounted bracket on the wall.
- Page 9 6. Attach the AC charging station to the mounting plate. 7. Insert the short screws at the sides of the AC charging station. Page 8...
- Page 10 Wiring the circuits WARNING: This device must be grounded. Disconnect electrical power before installing the charging station. Improper connection of the equipment-grounding conductor would result in a risk of electric shock. Check with a qualified electrician or serviceman if you are not sure whether the product is properly grounded. Do not modify the plug provided with the product –...
-
Page 11: Operating Your Device
Operating your device WARNING: This device should be supervised when used around children. CAUTION: Please use the charger properly. Do not hit or press hard on the enclosure. If the case is damaged, please contact a professional technician. Do not put heavy objects on the charger to avoid accidents. 1. - Page 12 3. Smart APP Guide: Download the ‘Lectron’ APP. Scan the QR code below, follow the tutorial in the link to connect your device, and operate the charger. Page 11...
- Page 13 4. Charging: The green light (CHARGE) flashes automatically when charging is in progress. If the red light (FAULT) is on, plug the vehicle connector again. If the red light stays on, please refer to "Error and Warning Messages". 5. Charging completed: The green light (CHARGE) remains on when the battery level reached 100%.
- Page 14 6. Put away: After unplugging the charging gun, neatly wrap up your charging cable and hang it on the cable organizer holster. Place the handle in the holster at the top. Light codes Signal indicator Not connected Connecting Connected Connection fail Solid blue Green blinking Solid green...
- Page 15 Status indicator Waiting to charge, Standby, waiting Charging in progress communicating to plug in with vehicle Solid blue Solid green Green blinking Charging Fault completed Solid green Solid red Page 14...
- Page 16 Error and warning messages Fault status Remark 1 flash followed by Voltmeter fault Auto recover 3 sec pauses Auto recover (pull out the 2 flash followed by Control pilot fault charging connector) 3 sec pauses 3 flash followed by Input UVP Auto recover 3 sec pauses 4 flash followed by...
-
Page 17: Warranty And Maintenance
(including the implied warranties of merchantability, particular and applicable reasonableness and adaptability, etc.) whether in the contract, civil negligence, or other aspects, Lectron shall not be responsible for any special, incidental or consequential damages. Page 16... -
Page 18: Speci Cations
Speci cations Model number: EVC27 Rated input voltage: 200-240 V ±10% AC 16/32/40/48 A (48 A requires Rated output current: hardwired installation) AC power frequency: 50 / 60 Hz Input protection: UVP, OVP, RCD (CCID20), SPD, ground fault protection Plug:... - Page 19 Get more support Scan the QR code below or email us at contact@ev-lectron.com. Made in China...
Need help?
Do you have a question about the EVC27 and is the answer not in the manual?
Questions and answers