Table of Contents
Advertisement
Quick Links
Advertisement
Table of Contents

Subscribe to Our Youtube Channel
Related Manuals for Philco PHD 614 C


Summary of Contents for Philco PHD 614 C
- Page 1 GLASS CERAMIC INDUCTION COOKTOP USER'S MANUAL PHD 614 C...
- Page 2 Dear customer, Thank you for buying a PHILCO brand product. So that your appliance serves you well, please read all the instructions in this user's manual.
-
Page 3: Table Of Contents
CONTENTS PART 1: IMPORTANT SAFETY INSTRUCTIONS ....................2 PART 2: DESCRIPTION OF THE CONTROL PANEL ................... 7 PART 3: OPERATING THE APPLIANCE ......................8 Before fi rst use ....................................8 Touch controls ....................................8 Turning the appliance on and off .............................8 ... -
Page 4: Part 1: Important Safety Instructions
PART 1: IMPORTANT SAFETY INSTRUCTIONS Recommendation: Carefully read these instructions before installing and operating this appliance. Write down the serial number found on the rating label of the appliance in the space below. It is essential that you store this user's manual in a safe place so that you can use it in the future. - Page 5 Only connect the appliance to a properly grounded circuit that conforms to valid electrical safety codes. If you are not sure whether the used electrical circuit is properly grounded, please contact a qualifi ed electrician. Do not subject the power cord to excessive pressure during the installation and placement of the device, or to extreme temperatures.
- Page 6 Safety instructions for use Do not place any metal items or fl ammable materials such as knives, forks, spoons, wiping cloths or pot lids, etc. near the cooking surfaces as they may heat up or catch on fi re. ...
- Page 7 The appliance is not intended to be operated by means of external timer or separate remote control system. WARNING: Danger of fi re: do not store items on the cooking surface. NEVER try to extinguish a fi re with water, but switch off the appliance and then cover fl ame e.g.
- Page 8 Avoid the following The base of the used cookware A course base can scratch the cooktop. Do not turn on the cooktop with empty cookware. This could cause damage. Hot cookware Never move hot pots or pans on to the control panel or the frame of the cooktop. Salt, sugar and sand Salt, sugar and sand can scratch the cooktop.
-
Page 9: Part 2: Description Of The Control Panel
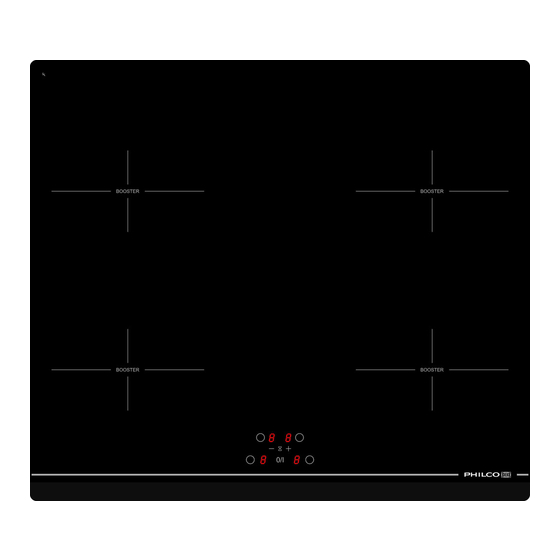
PART 2: DESCRIPTION OF THE CONTROL PANEL Description of the control panel Timer display + button – button Timer indicator light Hotplate selection button Power on display On / off button NOTE: Due to continuous development, the presented picture may diff er from the actual model. Shown on the display Display Meaning... -
Page 10: Part 3: Operating The Appliance
PART 3: OPERATING THE APPLIANCE Before fi rst use Before fi rst use, wipe the cooktop with a clean wiping cloth and wipe dry using a dry wiping cloth. Do not use any cleaning agents, there is a risk of a fi ne blueish coat forming on the cooktop, which is very diffi cult to remove. -
Page 11: Booster Function
Booster function This function shortens the cooking time by setting the maximum power level for 5 minutes. After this time has elapsed, the hotplate power level will switch to 9. This function is suitable for speeding up the heating of large amounts of liquids or sauces. -
Page 12: Control Panel Lock
Control panel lock The appliance is equipped with a control panel lock function, which prevents accidental or undesirable changes from being made on the hotplate control panel or the timer. To activate the lock, turn on the appliance using the 0/I button. "0" or "H" will appear on the display. Simultaneously press the"-"... -
Page 13: Saving Energy
Energy savings Place the cookware on the hotplate before turning it on. If you turn on the hotplate before placing the cookware on it, the hotplate will not turn on and the display will be shown. To reduce the cooking time use a lid. ... -
Page 14: Part 4: Cleaning And Maintenance
PART 4: CLEANING AND MAINTENANCE Before cleaning, check that the appliance is turned off , the power cord is disconnected from the power socket, or if appropriate the circuit breaker to which the appliance is connected is disengaged. Clean the cooktop before every use. This will prevent food remains from baking on. For cleaning use special cleaning agents for glass ceramic cooktops, which can be used even if the cooktop is still warm. -
Page 15: Part 5: Installing The Appliance
PART 5: INSTALLING THE APPLIANCE Safety precautions The appliance MUST be installed in the correct manner from the technical point of view and in accordance with this installation manual and according to valid local legal codes. The person performing the installation is responsible for any damages caused by an inadequate installation. -
Page 16: Positioning The Cooktop On The Workbench
Requirements for the workbench The workbench must be straight and located horizontally. Perform the cut-outs into the built-in furniture prior to installing the appliance. Remove all splinters and wood shavings otherwise a malfunction of the electrical components could occur. At the same time ensure that after performing the cut-out works, the stability of the furniture is not compromised. -
Page 17: Electrical Connection
Electrical connection Before connecting the electrical wiring check that: The voltage indicated on the rating label of the appliance (in the rear part) is the same as the voltage in your power socket. The circuit into which the appliance will be connected must cover the load of the given appliance (see rating label). -
Page 18: Part 6: Troubleshooting
PART 6: TROUBLESHOOTING The cooktop or a hotplate did not turn on. The cooktop is incorrectly connected to the power grid. The protective fuse is disengaged. The lock function is activated. The touch buttons are coated with a layer of grease or water. There is a foreign object on the buttons. -
Page 19: Part 7: Technical Specifications
PART 7: TECHNICAL SPECIFICATIONS MODEL PHD 614 C Size: 180 mm Nominal power: 1,400 W All hotplates Booster: 1,850 W Timer Pot detection Booster Total power input 7,400 W Residual heat indicator Child safety lock Automatic shut off Shut off after overfl ow... - Page 20 INSTRUCTIONS AND INFORMATION REGARDING THE DISPOSAL OF USED PACKAGING MATERIALS Dispose of packaging material at a public waste disposal site. DISPOSAL OF USED ELECTRICAL AND ELECTRONIC APPLIANCES The meaning of the symbol on the product, its accessory or packaging indicates that this product shall not be treated as household waste.
Need help?
Do you have a question about the PHD 614 C and is the answer not in the manual?
Questions and answers