Table of Contents
Advertisement
Advertisement
Table of Contents

Subscribe to Our Youtube Channel
Related Manuals for Philco PHD 64 P


Summary of Contents for Philco PHD 64 P
-
Page 1: Glass Ceramic
GLASS CERAMIC INDUCTION COOKTOP USER'S MANUAL PHD 64 P... - Page 2 Dear customer, Thank you for buying a PHILCO brand product. So that your appliance serves you well, please read all the instructions in this user's manual.
-
Page 3: Table Of Contents
CONTENTS PART 1: IMPORTANT SAFETY INSTRUCTIONS ....................2 PART 2: DESCRIPTION OF THE APPLIANCE ....................5 Description of the appliance ..............................5 Description of the control panel ...............................6 PART 3: OPERATING THE APPLIANCE ......................7 Turning the appliance on and off .............................7 ... -
Page 4: Part 1: Important Safety Instructions
PART 1: IMPORTANT SAFETY INSTRUCTIONS Recommendation: Carefully read these instructions before installing and operating this appliance. Write down the serial number found on the rating label of the appliance in the space below. It is essential that you store this user's manual in a safe place so that you can use it in the future. - Page 5 Safety instructions for use Do not place any metal items or fl ammable materials such as knives, forks, spoons, wiping cloths or pot lids, etc. near the cooking surfaces as they may heat up or catch on fi re. ...
-
Page 6: Copyright © 2013, Fast Čr, A. S
Avoid the following The base of the used cookware A course base can scratch the cooktop. Do not turn on the cooktop with empty cookware. This could cause damage. Hot cookware Never move hot pots or pans on to the control panel or the frame of the cooktop. Salt, sugar and sand Salt, sugar and sand can scratch the cooktop. -
Page 7: Part 2: Description Of The Appliance
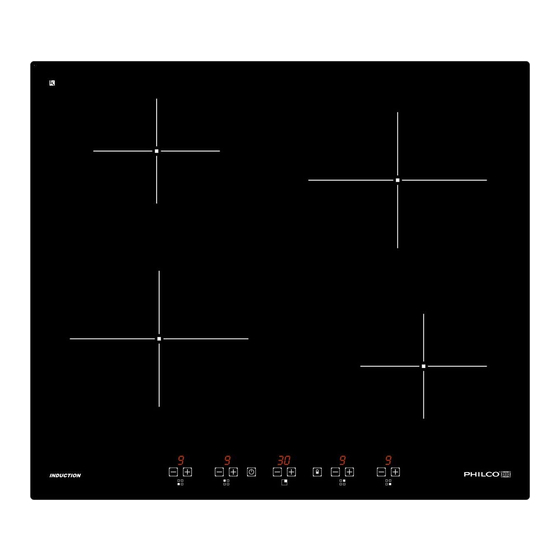
PART 2: DESCRIPTION OF THE APPLIANCE Description of the appliance Simple hotplate Control panel EN - 5 Copyright © 2013, Fast ČR, a. s. 04/2013... -
Page 8: Description Of The Control Panel
Description of the control panel A. Main power button – turn the cooktop on / off B. Lock button – activate / deactivate the lock C. Increase hotplate power button D. Decrease hotplate power button Hotplate display Timer display G. Timer button / plus – increase the time value H. -
Page 9: Part 3: Operating The Appliance
PART 3: OPERATING THE APPLIANCE The appliance is controlled by touching (pressing) buttons and the respective functions are shown on a display and are accompanied by sounds. Turning the appliance on and off Press and hold the main power button and the displays of all the hotplates will be lit. -
Page 10: Timer Function (Available Depending On The Model)
Timer function (available depending on the model) The timer makes it possible to set the time after which the hotplate will automatically turn off in the range from 1 to 99 minutes. Simultaneously press the G and H buttons to enter the timer mode. Press the G and H buttons again to select a hotplate on which you wish to activate a timer. -
Page 11: Suitable Cookware
Suitable cookware Do not use cookware that has a coarse base because this base could scratch the glass ceramic surface. Suitable cookware should have a thick fl at base. Before using and placing the cookware on the cooktop, check that the base is clean and dry. -
Page 12: Part 4: Cleaning And Maintenance
PART 4: CLEANING AND MAINTENANCE Before cleaning, check that the appliance is turned off , the power cord is disconnected from the power socket, or if appropriate the circuit breaker to which the appliance is connected is disengaged. Clean the cooktop before every use. This will prevent food remains from baking on. For cleaning use special cleaning agents for glass ceramic cooktops, which can be used even if the cooktop is still warm. -
Page 13: Part 5: Installing The Appliance
PART 5: INSTALLING THE APPLIANCE Safety precautions The appliance MUST be installed in the correct manner from the technical point of view and in accordance with this installation manual and according to valid local legal codes. The person performing the installation is responsible for any damages caused by an inadequate installation. -
Page 14: Positioning The Cooktop On The Workbench
Requirements for the workbench The workbench must be straight and located horizontally. Perform the cut-outs into the built-in furniture prior to installing the appliance. Remove all splinters and wood shavings otherwise a malfunction of the electrical components could occur. At the same time ensure that after performing the cut-out works, the stability of the furniture is not compromised. - Page 15 Apply single sided tape around the bottom edge of the cooktop - see picture below. Do not stretch too much. Attach 4 mounting brackets into the side parts of the appliance. Insert the cooktop into the cut-out hole in the workbench. To ensure cooling, before inserting the oven, it is necessary to remove the rear kitchen panel in the location where the oven is opened.
-
Page 16: Electrical Connection
Electrical connection Before connecting the electrical wiring check that: The voltage indicated on the rating label of the appliance (in the rear part) is the same as the voltage in your power socket. The circuit into which the appliance will be connected must cover the load of the given appliance (see rating label). -
Page 17: Part 6: Technical Specifications
PART 6: TECHNICAL SPECIFICATIONS MODEL PHD 64 P Front left hotplate 1 500 (2 000) W Back left hotplate 1 200 (1 600) W Front right hotplate 1 200 (1 600) W Back right hotplate 1 500 (2 000) W... -
Page 18: Packaging Materials
INSTRUCTIONS AND INFORMATION REGARDING THE DISPOSAL OF USED PACKAGING MATERIALS Dispose of packaging material at a public waste disposal site. DISPOSAL OF USED ELECTRICAL AND ELECTRONIC APPLIANCES The meaning of the symbol on the product, its accessory or packaging indicates that this product shall not be treated as household waste.
Need help?
Do you have a question about the PHD 64 P and is the answer not in the manual?
Questions and answers