
Related Manuals for HTP Invertig 301


Summary of Contents for HTP Invertig 301
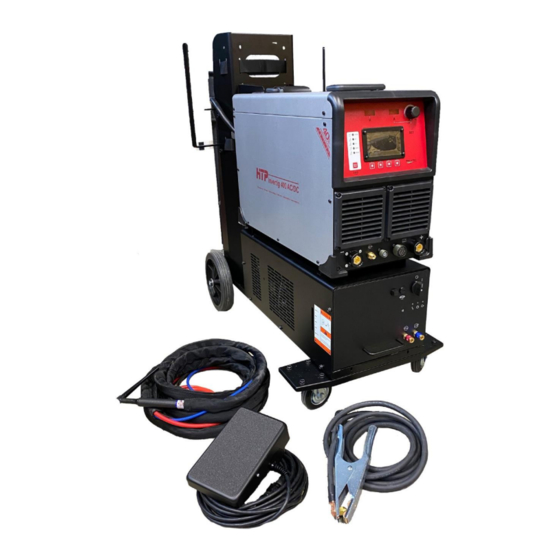
- Page 1 Invertig™ 301/400 180 Joey Drive Elk Grove Village, IL 60007-1304 Scan QR Code Ph.: (847) 357-0700 Fax: (847) 357-0744 for Video Email: customerservice@htpweld.com Playlist Web: www.usaweld.com...
- Page 3 3) SAFETY SUGGESTIONS 4) SPECIFICATIONS 5) ELECTRICAL CONNECTION 6) FRONT PANEL CONNECTIONS 7) REAR PANEL CONNECTIONS 8) EXPLANATIONS 12-20 a) Invertig 301 vs. Invertig 400 b) Torches c) Wave Forms 12-13 d) Nominal vs. Average Amps e) AC Balance f) AC Frequency...
-
Page 4: Warranty
In the AC TIG mode, the following wave forms are available: square wave, soft square wave, and triangular wave. The Invertig 301 is a single-phase only machine, it runs on 208 to 240V. The Invertig 400 offers the ability to run on single- phase power, from 208 to 240V, or on 3-phase power, from 200 to 575V. -
Page 5: Safety Suggestions
3) SAFETY SUGGESTIONS It is forbidden for people with PACEMAKERS to use or come near the machine. When welding near sensitive electronics, for example in hospitals or assisted living homes or around computers or computer control modules in vehicles, we STRONGLY recommend turning off HF (high-frequency arc start). Even an AC arc on a modern inverter can be ignited in lift-arc mode! HF travels long distances, 10 to 20 feet are very common in some instances, and HF can interfere with electronics in neighboring buildings if they are on the same transformer! Unlike regular welding currents, that travel the path of least resistance, HF is unpredictable. - Page 6 Noise can damage your hearing. Protect yourself suitably to avoid hearing damage. The welding arc can cause burns. Keep the tip of the welding gun/torch far from your body and from other persons. For more information, refer to the following standards and comply as applicable. ) ANSI Standard Z49.1 SAFETY IN WELDING AND CUTTING, obtainable from the American National Standards Institute, 1430 Broadway, New York, NY 10018.
- Page 7 Fig. 1...
-
Page 8: Specifications
4) SPECIFICATIONS Invertig 301 AC/DC Invertig 400 AC/DC Single-Phase: 230V (208 to 240V) 230V (208 to 240V) Single Phase Input Voltage 3-Phase: 200 to 575V Welding Current Single-Phase 4 to 300 Amps 4 to 350 Amps Welding Current 3-Phase 4 to 400 Amps... -
Page 9: Electrical Connection
350 amps (the max output of the Invertig 400 on single-phase). We ship your Invertig 301 with a NEMA 6-50P single phase plug. We ship your Invertig 400 without a plug since we don’t know if you will run your machine on single or 3-phase power or what your electrical outlet looks like. -
Page 10: Front Panel Connections
6) FRONT PANEL CONNECTIONS Fig. 2 Z—Negative Output Receptacle When TIG welding, connect the TIG torch to the negative output receptacle to weld Electrode Negative (EN; with the torch negative and the work positive). When using your Invertig to TIG weld, all work will be done in EN. When Stick welding in Direct Current Electrode Negative (DCEN), plug the optional electrode holder into the negative output receptacle. -
Page 11: Rear Panel Connections
Contains the serial number of your Invertig 301/400. The serial number consists of two letters and six numbers. S—On/Off Switch The switch turns your Invertig 301/400 on and off. Set the switch to position 0 for off, and set the switch to position 1 for on. - Page 12 Invertig 301 vs. Invertig 400 The Invertig 301 is a 300 amp AC/DC TIG welder with single-phase capacity only. The Invertig 301 runs on 208 to 240 volt input power, and features the same functions as the Invertig 400 but has less maximum output and a slightly lower duty-cycle.
- Page 13 Soft Square Wave: The soft square wave provides a more sinus like wave form, which allows for a softer arc and a more fluid weld puddle, and it does so while creating significantly less noise. The SOFT symbol on the right-hand side of the LCD above the 3-phase symbol (Fig.
- Page 14 AC Balance Balance refers to the time the arc spends above or, in the case of HTP machines, below the zero line. What does that mean? Imagine you weld AC and you set your frequency not to 100Hz but to 1Hz (1Hz used for the purpose of easy demonstration;...
- Page 15 In place of high-speed pulse, we recommend the use of the triangular wave form instead, which achieves similar results. With the Invertig 301/400, you can adjust the pulse frequency from 0.4 to 20.0 PPS, the background amps from 10 to 90%, and the peak time (pulse-on time or duty) from 10 to 90%.
- Page 16 j) Pulse in Stick (Square Wave Only) Advantages of Pulse Welding Pulse welding includes ALL of the following advantages, but not all at the same time. At a later point in the manual, we cover, in more detail, suggested settings regarding how, when, and where certain situations apply. ...
- Page 17 Now Let’s Talk Pulse How does pulse work? How do I set up the Invertig 301/400 to pulse weld in Stick mode? For manufacturing or critical code repairs, welding procedures are typically specified. These welding procedures spell out everything including, but not limited to, pre-heat of the part, alloy of the filler rod, amperage setting, travel speed, bead size, multi-pass weld number of passes (if applicable), inter-pass temperature, post-heat, and so on.
- Page 18 Unlike regular welding currents that travel the path of least resistance, HF is unpredictable. Lift start, not to be mistaken for scratch-start, can be used to ignite a DC or an AC welding arc with the Invertig 301/400. If you use a foot pedal, turn HF off in the menu, and then touch the clean and cold tungsten electrode to the clean material you plan to weld on.
- Page 19 without HF and by depressing the foot pedal before the tungsten touches the base metal. At this point, whatever you set the machine to (however much the foot pedal is depressed) the arc will strike at that amperage. This is, by far, the least preferable arc starting method with the Invertig.
-
Page 20: Front Panel Controls
q) Smart Water-Cooler Operation and Control The smart water-cooler is controlled by the welder, but the smart water-cooler also controls the welder. The pump and the fan in the cooler are on-demand, meaning they only run if and when necessary. The fan is also variable speed. If the fluid level in the cooler is low, the cooler communicates with the welding machine, turns the welding output off, and displays an error message. - Page 21 10) HOW TO WELD—STEP BY STEP The first adjustment you can make after activating AC mode is balance. Fig. 14 shows 70% EN (Electrode a) STICK Negative). Using encoder F (Fig. 11), you can change the balance value from 10 to 90%. Once you select the Use the Select Mode button (Fig.
- Page 22 When in the menu shown in Fig. 17, press button C (Fig. amps in this case) for a burst of 162 amps, that lasts less 11; SELECT in this instance) a few times to move the than a second, to ignite the arc. black arrow next to Asymmetric set: Ep - En.
- Page 23 C (Fig. 11; the green arrow in this instance) to revert back to the main Stick welding screen (Fig. 24). All other HTP stick welding machines (the Inverarc™ 200 TLP and the Invertig™ 221 AC/DC) have the background amps and the peak time factory fixed at 50% each.
- Page 24 Fig. 27 Fig. 30 You can now adjust your asymmetric arc. You can limit When in the AC ACTIVATION screen (Fig. 27), simply the EP (Electrode Positive) amperage here. In Fig. 30, the press button D (Fig. 11) to activate AC mode. asymmetric arc value is set to 100%, so EP is not limited in this instance;...
- Page 25 Fig. 33 Fig. 36 Here, you can select your pre-gas flow in seconds. by turning encoder F (Fig. 11) until you reach your desired pre-gas flow duration. In Fig. 36, we set a pre-gas flow duration of 0.4 seconds. In order to adjust the next value of the sequencer, in this case t1 (slope up), press button C (Fig.
- Page 26 Fig. 40 The Invertig 301/400 allows you to adjust TIG hot- start in both AC and DC. Most other TIG welding machines, and all other high-end, brand name welding machines, feature a hot-start function that delivers a factory pre-set amount of hot-start, for a Fig.
- Page 27 The following example shows a setting that could be used for 3/8” thick material. Fig. 44 Now, press button D (Fig. 11) to turn pulse-on and proceed to the PULSE - MAIN SETTINGS menu (Fig. 45). Fig. 42 Since we set the hot-start value lower than the starting current value (as seen in Fig.
- Page 28 Here, you can adjust your pulse speed/frequency from If you purchased an Invertig 301 with the Arctic Chill 0.4 to 20.0 PPS in AC and 0.4 to 999.9 PPS in DC by water-cooler option, where the cooler plugs directly into turning encoder F (Fig.
- Page 29 When you let go of the momentary switch button, the c) TIG 4T machine goes into t1 (slope up), which we set to 1.5 seconds (Fig. 54). TIG 4T is a very popular process in Europe where people typically use a momentary (arc on/off) switch instead of a foot pedal.
- Page 30 Once you let go of the momentary switch button, the arc extinguishes and the post-gas flow timer engages (Fig. 57; 12.0 seconds in this instance). Fig. 60 Here, you can set the pre-gas flow duration in seconds (Fig. 58), the spot weld time in seconds (Fig. 59; spot weld time refers to the arc on time that will create the Fig.
- Page 31 In TIG 2T, when you press the momentary switch button the machine welds and when you let go, the machine stops. In TIG RESET, the process works different. Let’s take a look at the sequencer. Fig. 64 If you want to weld at a lower amperage, a swift flick of the momentary switch button allows you to weld at your lower set amperage (Fig.
- Page 32 Once you let go of the momentary switch button, the arc clears. Wait an additional six (6) seconds, and the extinguishes and the post-gas flow timer engages (Fig. Invertig will be back in the regular welding mode. 67; 12.0 seconds in this instance). How to Load Stored JOBs 1) Press the JOB button D to pull up the JOB LIST page.
- Page 33 However, these numbers change with the selected welding amperage and the ambient temperature. In reality, very few can keep track of welding time like this, so we equipped the Invertig 301/400 AC/DC with a highly sophisticated over-heat protection. The machine monitors the temperature of several vital internal components. Just before temperatures venture outside of the safe operating range, the machine displays a message to the operator, the cooling fan continues to run, and the welding output is shut down for four (4) minutes.
- Page 34 13) EXPLODED VIEW INVERTIG 301 AC/DC...
- Page 35 PARTS LIST—INVERTIG 301 AC/DC Pos. Part# Description Pos. Part# Description 620809 LCD Protection Frame 620893 Plate 661385 Front Panel Frame 647610 Input Power Cable 660466 LCD Protection Panel 614542 Flyback Power Supply PCB 661043 Front Fan Cover 617030 Solenoid Valve...
- Page 36 EXPLODED VIEW—INVERTIG 400 AC/DC...
- Page 37 PARTS LIST—INVERTIG 400 AC/DC Pos. Part# Description Pos. Part# Description 620809 LCD Protection Frame 613308 Shield Logic PCB 661385 Front Panel Frame 613603 Primary Rectifiers Boost PCB 660466 LCD Protection Panel 613606 Driver Boost PCB 661043 Front Fan Cover 613605 Power Boost PCB 631970 Gas Connector...
- Page 38 +Vout LEM HO200S +Vout NTCAC1 J1 J3 NTCAC2 J2 J4 NTC4 10K GDLH GDRH SDLH SDRH PCB AC CONVERTER COD.61400400 GDLL GDRL PCS 65099200 SDLL SDRL PCB CLAMP AC COD.61410700 PCS 65102200 PCB OUT FILTER COD.611415V0 -Vout -Vout +Vout -Vout PCS 65037700 UFB280-FA40 PCB INVERTER GROUP COD.61446 300...
- Page 39 WIRING DIAGRAM—Invertig 400 AC/DC...
- Page 40 15) Glossary Arc-Force Related to amps and volts when welding. When stick welding, the Pro Pulse 300 power source produc- es a CC, or constant current, output; in other words, the machine holds a constant amperage level, while the voltage varies according to the arc length, or the distance between the rod and the work surface—longer arc lengths increase voltage and shorter arc lengths decrease voltage.
- Page 41 Notes...
Need help?
Do you have a question about the Invertig 301 and is the answer not in the manual?
Questions and answers