Table of Contents
Advertisement
Quick Links
BUILT-IN COMPACT OVEN
USER MANUAL
315545
Warning notices: Before using this product, please read this manual carefully and keep it for future reference.
The design and specifications are subject to change without prior notice for product improvement.
Consult with your dealer or manufacturer for details.
The diagram above is just for reference. Please take the appearance of the actual product as the standard.
Advertisement
Table of Contents

Related Manuals for Midea 315545


Summary of Contents for Midea 315545
- Page 1 BUILT-IN COMPACT OVEN USER MANUAL 315545 Warning notices: Before using this product, please read this manual carefully and keep it for future reference. The design and specifications are subject to change without prior notice for product improvement. Consult with your dealer or manufacturer for details.
-
Page 2: Table Of Contents
THANK YOU LETTER THANK YOU LETTER Thank you for choosing Midea! Before using your new Midea product, please read this manual thoroughly to ensure that you know how to operate the features and functions that your new appliance o ers in a safe way. -
Page 3: Safety Instructions
SAFETY INSTRUCTIONS SAFETY INSTRUCTIONS Intended Use The following safety guidelines are intended to prevent unforeseen risks or damage from unsafe or incorrect operation of the appliance. Please check the packaging and appliance on arrival to make sure everything is intact to ensure safe operation. If you find any damage, please contact the retailer or dealer. - Page 4 IMPORTANT SAFETY INSTRUCTIONS IMPORTANT SAFETY INSTRUCTIONS WARNING To reduce the risk of fire, electric shock, persons when injury to using your appliance, follow basic precautions, including the following: • This appliance can be used by children aged from 8 years and above and persons with reduced physical, sensory or mental capabilities or lack of experience and knowledge if they have been given supervision or instruction concerning use of the appliance in...
- Page 5 • This appliance is intended to be used in household and similar applications such as: - Sta kitchen areas in shops, o ces and other working environments; - By clients in hotels, motels and other residential type environments; - Farm houses; - Bed and breakfast type environments.
- Page 6 • Do not use the paper cups and plastic containers with temperature resistance below 120 degrees. The glass, ceramic, stainless steel utensils can be used. READ CAREFULLY AND KEEP FOR FUTURE REFERENCE CAUSES OF DAMAGE CAUTION • Creation of sparks: Metal e.g. a spoon in a glass must be kept at least 2 cm from the oven walls and the inside of the door.
- Page 7 • Using the appliance door for standing on or placing objects on: Do not stand or place anything on the open appliance door. Do not place ovenware or accessories on the appliance door. • Transporting the appliance: Do not carry or hold the appliance by the door handle.
-
Page 8: Specification
SPECIFICATION MODEL 315545 RATED VOLTAGE 220-240V~ 50 Hz 1700 W RATED INPUT POWER(CONVECTION) 1000 W RATED INPUT GRILL POWER(BOTTOM) 2200 W RATED INPUT GRILL POWER(DOUBLE TOP) RATED INPUT POWER(MAX) 3000 W... -
Page 9: Product Overview
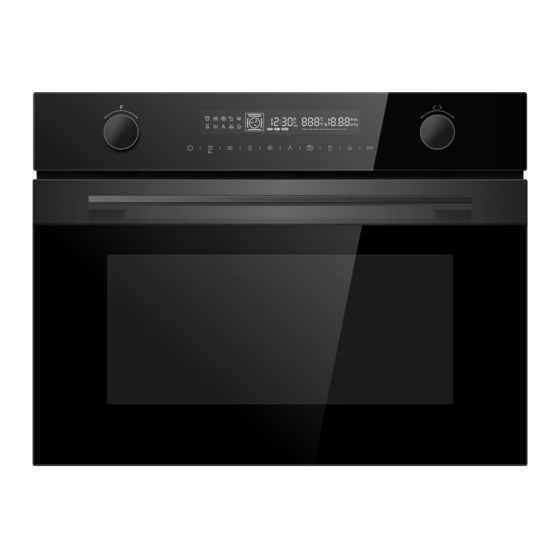
PRODUCT OVERVIEW Use this section to familiarise yourself with your new appliance. The control panel and the individual operating controls are explained. You will find information on the cooking compartment and the accessories. Control Panel Touch Keys And Display The touch keys are used to set the various additional functions. On the display, you can read the values that you have set. - Page 10 Function And Displayscreen Use the function knob( the left knob ) to set the type of heating. Function The top and bottom elements work together to provide conventional cooking. The oven needs to be pre-eated to the Conventional required temperature: ideal for slow cooking dishes such as casseroles and stews.
- Page 11 Parameter Adjustment Use the parameter knob(the right knob) to set the parameters. Parameter Function Select the temperature of cooking(°C). : 100-235 : 100-250 Temperature : 50-250 : 100-235 : 150-200 : 50-250 : 50-235 : 50-235 : 100-235 : 30-45 Time Set the time of cooking.
-
Page 12: Product Installation
PRODUCT INSTALLATION Fitted Units • This appliance is only intended to be fully fitted in a kitchen. • This appliance is not designed to be used as a tabletop appliance or inside a cupboard. • The fitted cabinet must not have a back wall behind the appliance. •... - Page 13 Building In • Do not hold or carry the appliance by the door handle. The door handle cannot hold the weight of the appliance and may break o . 1. Carefully push the oven into the box, making sure that it is in the centre. 2.
- Page 14 Connect The Wires Of The Mains Power Cord In Accordance With The Following Colour Coding: Green and yellow Earth wire < (E) Neutral Blue wire (N) Brown Live (L) Great Britain And Australia: Do not connect the appliance using a 13 A plug or protect it with a 13 A fuse. The appliance must be protected using a fuse that is rated 16 A or higher.
- Page 15 Grill rack • For grilling, e.g. steaks, sausages and for toasting bread. • Type and quantity of accessories is subject to actual demand. • In order to ensure the best cooking e ect, the baking rack should be placed in the second of the side hanger, as shown in the figures below, the baking tray should be pushed along the second guide rails of the side hanger in place.
- Page 16 Removing the appliance door 1. Open the appliance door fully. 2. Fold open the two locking levers on the left and right 3. Close the appliance door as far as the limit stop. 4. With both hands, grip the door on the left- and right-hand side, and pull it out upwards.
- Page 17 Removing the door cover The plastic inlay in the door cover may become discolored. To carry out thorough cleaning, you can remove the cover. Remove the appliance door like instructed above. 1. Press on the right and left side of the cover. 2.
- Page 18 Take out the glass, clean the inside and outside door glass as well as internal dirt. Tips: 1. After cleaning, please restore the inner glass in the direction of taking out and make sure that the inner glass A is facing down. 2.
-
Page 19: Operation Instructions
OPERATION INSTRUCTIONS Before Using The Appliance For The First Time Here you will find everything you need to do before using your oven to prepare food for the first time. First read the section on Safety information . Setting The Clock 1. - Page 20 Setting The Type Of Heating And Temperature Example: Radiant Grilling at 200 °C for 25 minutes. 1. In waiting state, turn the function knob repeatedly till light. And the default temperature of radiant grilling will display. 2. Turn the parameter knob to set the temperature to 200° C. 3.
- Page 21 Pausing preheating During setting the rapid preheating function, touch the key can pause the function. NOTE 1. The preheating function only works if you have already chosen one of the modes above and the temperature of setting must over 100°C. 2.
- Page 22 Setting The Timer You can use the timer as a kitchen timer. It runs independently of the oven. The timer has its own audible signal. In this way, you can tell whether it is the timer or a cooking time which has elapsed.
-
Page 23: Cleaning And Maintenance
CLEANING AND MAINTENANCE With careful care and cleaning your compact oven will retain its looks and remain good order. We will explain here how you should care for and clean your appliance correctly. Risk of electric shock! Penetrating moisture may cause an electric shock. Do not use any high-pressure cleaners or steam cleaners. - Page 24 Area Cleaning agents Hot soapy water: Appliance front Clean with a dish cloth and dry with a soft cloth. Do not use glass cleaners or metal or glass scrapers for cleaning. Hot soapy water: Clean with a dish cloth and dry with a soft cloth. Remove flecks of limescale, grease, starch and albumin (e.g.
-
Page 25: Trouble Shooting
TROUBLE SHOOTING Malfunctions often have simple explanations. Please refer to the malfunction table before calling the after-sales service. If a meal does not turn out exactly as you wanted, refer to the Expert Cooking Guide section, where you will find plenty of cooking tips and tricks. Risk of electric shock! Incorrect repairs are dangerous. - Page 26 Which foods are a ected? Acrylamide is mainly produced in grain and potato products that are heated to high temperatures, such as potato crisps, chips, toast, bread rolls, bread, fine baked goods (biscuits, gingerbread, cookies). Tips for keeping acrylamide to a minimum when preparing food •...
-
Page 27: Trademarks, Copyrights And Legal Statement
Midea may constitute trademark infringement or unfair competition in violation of relevant laws. This manual is created by Midea and Midea reserves all copyrights thereof. No entity or individual may use, duplicate, modify, distribute in whole or in part this manual, or bundle or sell with other products without the prior written consent of Midea. -
Page 28: Data Protection Notice
Further information are provided on request. You can contact our Data Protection O cer via MideaDPO@midea.com. To exercise your rights such as right to object your personal date being processed for direct marketing purposes, please contact us via MideaDPO@midea.com. To find further information, please follow the QR Code. - Page 29 DATA PROTECTION NOTICE...
- Page 32 PN:1617000A17788...
Need help?
Do you have a question about the 315545 and is the answer not in the manual?
Questions and answers