Table of Contents
Advertisement
Quick Links
MIDEA
BUILT-IN OVEN 82L
Warning notices: Before using this product,
please read this manual carefully and keep
it for future reference. The design and
specifications are subject to change without
prior notice for product improvement.
Consult with your dealer or manufacturer
for details.
INSTALLATION
INSTRUCTIONS
USER GUIDE
310717
Advertisement
Table of Contents

Related Manuals for Midea 310717


Summary of Contents for Midea 310717
- Page 1 Warning notices: Before using this product, please read this manual carefully and keep it for future reference. The design and specifications are subject to change without prior notice for product improvement. Consult with your dealer or manufacturer 310717 for details.
-
Page 3: Table Of Contents
CONTENTS SAFETY INFORMATION CURE YOUR APPLIANCE WHEN NEEDED Intended Use CUSTOMER SERVICE Warning TIPS AND TRICKS Causes of Damage TYPICAL RECIPES INSTALLATION Cakes GETTING TO KNOW YOUR Bread & Pizza APPLIANCE Meat Controls and display AUTOMATIC RECIPES Types of heating TEST FOOD ACCORDING TO EN BEFORE USING THE APPLIANCE 60350-1... -
Page 4: Safety Information
SAFETY INFORMATION Intended Use Thank you for buying Midea Built-in Oven. Before unpacking it, please read these instruc- tions carefully. Only then will you be able to operate your appliance safely and correctly. Warmly recommend retain the instruction manual and installation instructions for future use or for subsequent owners. - Page 5 Risk of burns! The appliance becomes very hot. Never touch the interior surfaces of the appliance or the heating elements. Always allow the appliance to cool down. Keep children at a safe distance. Accessories and ovenware become very hot. Always use oven gloves to remove acces sories or ovenware from the cavity.
-
Page 6: Causes Of Damage
Causes of Damage Accessories, foil, greaseproof paper or ovenware on the cavity floor: do not place accessories on the cavity floor. Do not cover the cavity floor with any sort of foil or greaseproof paper. Do not place ovenware on the cavity floor if a temperature of over 50 ºC has been set. -
Page 7: Installation
INSTALLATION min.35 min. min. min. min. min.585 min. min. max.595 min.35 min.35 To operate this appliance safe , please be sure that it has been installed to a professional standard respecting the installation instructions . Damages occur because of incorrect installation are not within the warranty. -
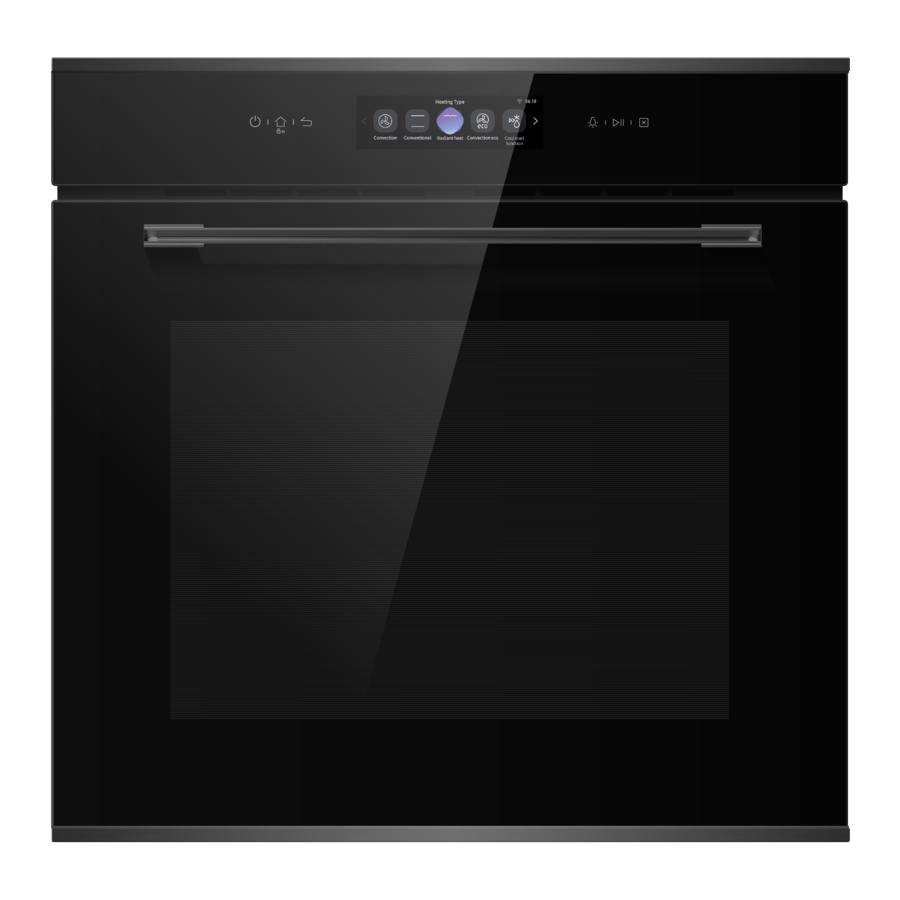
Page 8: Getting To Know Your Appliance
GETTING TO KNOW YOUR APPLIANCE Controls and display ON / OFF Switch on and o oven. Back to the home page/use childproof lock with 3s Home/lock press Back button Return to the previous page. An input and output device, you can swipe left and Display right to access more categories . - Page 9 Types of Heating Temperature For baking and roasting on one or more Conventional + Fan 50~250℃ levels. The fan distributes the heat from the heating elements evenly around the cavity. For grilling small amounts of food and for browning food. Please put the food in the Radiant Heat 150~250℃...
- Page 10 Caution If you open the appliance door during an on-going operation, the operation will not be paused. Please be especially careful with the risk of burns. Note To defrost big portions of food, it is possible to remove the side-racks and place the container on the cavity floor.
-
Page 11: Before Using The Appliance
BEFORE USING THE APPLIANCE Before using the appliance to prepare food for the first time, you must clean the cavity and accessories. After connecting the appliance to the power or following a power cut, the settings for initial use are shown in the display. Setting the language English is the preset language. -
Page 12: Operating The Appliance
Settings Heating Mode Temperature 250°C Time After the appliance has cooled down: Clean the smooth surfaces and the door with soapy water and a dish cloth. Dry all surfaces Install the side-racks OPERATING THE APPLIANCE In this chapter, you will learn about how to operate your appliance. We will explain how to switch the oven on and o , and how to select the heating mode. -
Page 13: Quick Preheat And Cooking Time
Setting the temperature: You can touch “+&-“ to change temperature. It also can be adjusted within a large range by touch “temperature” in bottom. Conventional Press the Start/Pause button to start. Conventional Quick preheat and cooking time You can use quick preheat function and cooking time setting in the temperature page. Touch “preheating”... -
Page 14: Change During The Cooking Process
Caution Do not cover the ventilation slots. Otherwise, the appliance may overheat. To make the appliance cools down more quickly after the operation, the cooling fan may continue to run for a period afterwards. Change during the cooking process When the oven is working, you can change or cancel it by the follow ways. When your appliance is working, the set type of heating and temperature are shown on the display. -
Page 15: Childproof Lock
CHILDPROOF LOCK Your appliance has a childproof lock so that children cannot switch it on accidentally or change any settings. When you give a long press on HOME/LOCK button for 3 seconds, childproof lock is activated. Now there is a lock mark shown in the screen, long press HOME/LOCK or the mark on the screen, then the oven is unlocked. -
Page 16: Sabbath Mode
SABBATH MODE With the Sabbath mode, you can set the cooking process up to 72 hours, you can keep the food warm without switch on and o the oven. Starting Sabbath mode You can choose Sabbath mode in this way: Press ON/OFF button, touch heating type. -
Page 17: Accessories
ACCESSORIES Your appliance is accompanied by a range of accessories. Here, you can find an overview of the accessories included and information on how to use them correctly. Accessories included Your appliance is equipped with the following accessories: Wire Rack Baking Tray For ovenware, cake tins and For tray bakes and small... - Page 18 Notes Ensure that you always insert the accessories into the cavity the right way round. Always insert the accessories fully into the cavity so that they do not touch the appliance door. Locking function The accessories can be pulled out approximately halfway until they lock in place. The locking function prevents the accessories from tilting when they are pulled out.
- Page 19 Optional accessories You can buy optional accessories from the after-sales service, from specialist retailers or online. Accessories below are available to be purchased , and you are also welcome to see your sales brochures for more details. Meat probe Rotary system Barbecue stick For roasting meat like chicken, For making some barbecue...
-
Page 20: Energy Efficient Use
ENERGY EFFICIENT USE Remove all accessories, which are not necessary during the cooking & baking process Do not open the door during the cooking & baking process If you open the door during cooking & baking, switch the mode to “Lamp” (Without change the temperature setting) Decrease the temperature setting in not fan assisted modes to 50°C at 5min to 10min before end of cooking &... -
Page 21: Environment
ENVIRONMENT The packaging is made for protect your new appliance against damages during transport. The materials used are selected carefully and should be recycled. Recycling reduces the use of raw materials and waste. Electrical and electronic appliances often contain valu- able materials. - Page 22 To ensure that the di erent surfaces are not damaged by using the wrong cleaning agent, observe the information in the table. Depending on the appliance model, not all of the areas listed may be on/in your appliance. Caution! Risk of surface damage Do not use: Harsh or abrasive cleaning agents.
- Page 23 Area Appliance exterior Cleaning Hot soapy water: Clean with a dish cloth and then dry with a soft cloth. Door panels Do not use a glass scraper or a stainless steel scouring pad. Hot soapy water: Clean with a dish cloth and then dry with a soft cloth. Door handle If descaler comes into contact with the door handle, wipe it o immediately.
-
Page 24: Appliance Door
Shadows on the door panels, which look like streaks, are caused by reflections made by the interior lighting. Enamel is baked on at very high temperatures. This can cause some slight color variation. This is normal and does not a ect operation. The edges of thin trays cannot be completely enameled. - Page 25 Warning – Risk of injury! If the hinges are not locked, they can snap shut with great force. Ensure that the locking levers are always fully closed or, when detaching the appliance door, fully open. The hinges on the appliance door move when opening and closing the door, and you may be trapped.
- Page 26 Open the appliance door fully. While opening the appliance door , you can make another check if the hinges areonto the right position . If you make the fitting wrong , you will not be able to make the appliance door fully opened. Fold both locking levers closed again.
-
Page 27: Rails
Caution! While the appliance door is well installed, the door cover can also be taken o , by this time. Removing the door cover means to set the inner glass of the appliance door free, the glass can be easily moved and cause damage or injury. As removing the door cover and inner glass means to reduce the overall weight of the appliance door. - Page 28 Change the power cord Position A show the terminal box position on the back of the back outer case and it’s closed. Steps: a. cut o the power, use small flat screwdriver to open two snap 1,2. b. use Phillips crewdriver to take o screws 3,4 ,5and6.
- Page 29 Fix the telescopic runners ( take the left side for example same for right side) Put the point A and B of the telescopic runners horizontally on the outer wire. Rotate the telescopic runners anti-clockwise(clockwise for right side) by 90 degrees. 3.
- Page 30 Remove the telescopic runners ( take the left side for example same for right side) Lift up one end of the telescopic runners hard. Lift up the whole telescopic runners and remove backward.
-
Page 31: Cure Your Appliance When Needed
CURE YOUR APPLIANCE WHEN NEEDED If a fault occurs, before calling the after-sales service, please ensure that is not because of incorrect operations and refer to the fault table, attempt to correct the fault yourself. You can often easily rectify technical faults on the appliance yourself. If a dish does not turn out exactly as you wanted, you can find many tips and instruc- tions for preparation at the end of the operating manual. - Page 32 The temperature setting is too high, or the shelf level could be optimized. Double check the recipe and settings. The surface finish and or color and or material of the Uneven browning baking ware were not the best choice for the select- ed oven function.
- Page 33 Insert the new lamp, making sure that the pins are in the correct position. Push the lamp in firmly. Glass cover If the glass cover of the halogen lamp is damaged, it must be replaced. You can obtain a new glass cover from the after-sales service. Please specify the E number and FD number of your appliance.
-
Page 34: Customer Service
Rely on the professionalism of the manufacturer. You can therefore be sure that the repair is carried out by trained service technicians who carry original spare parts for your appliances. Above, thank you again for buying Midea Built-in Oven, and we wish that our appliance will bring you delicious food and happy life. -
Page 35: Tips And Tricks
TIPS AND TRICKS You want to cook your Try to use settings of similar recipes first and optimize own recipe the cooking process due to the result. Put a wooden stick inside the cake about 10 minutes before the given baking time is reached. If there is no raw Is the cake baked ready? dough at the stick after pulling out, the cake is ready. - Page 36 Every heat resistant baking ware can be used. It is Which kind of baking recommended not to use aluminum in direct contact with ware can be used? food, especially when it is sour. Please ensure a good fitting between container and lid. Preheat the oven for 5 minutes and place the food in the level given by this manual.
-
Page 37: Typical Recipes
TYPICAL RECIPES Duration CAKE Form Level Mode Temp.in °C in minutes Sponge Cake (simple) Conventional in a Box shape with Fan Sponge Cake (simple) Conventional in a Box shape Sponge Cake with Round form Conventional Fruits in a round Form with Fan Sponge Cake with Tray... - Page 38 Duration CAKE Form Level Mode Temp.in °C in minutes Tray Convention Small Cakes p.h.t:10:00 Tray Convention Small Cakes b.t.:34:00 p.h.t.: 8:00 Butter Yeast Cake Tray Conventional b.t.: 30:00 p.h.t.: 8:00 Shortbread Tray Conventional b.t.: 13:00 Shortbread 2 Trays Tray Conventional p.h.t:8:20 with Fan b.t.: 12:00...
-
Page 39: Meat
Duration MEAT Form Level Mode Temp.in °C in minutes Beef Tender Loin Tray Double Grill 1,6 KG with fan Meatloaf 1 kg Meat Tray Conventional Chicken 1 kg Tray L2:Rack Double Grill L1:Tray with fan Fish (2,5 kg ) Tray Conventional Ribs Tomahawk Tray... -
Page 40: Test Food According To En 60350-1
TEST FOOD ACCORDING TO EN 60350-1 ℃ RECIPESA Accessories Level Time(min) Pre-heat Sponge cake Springform Φ26cm 30-35 Sponge cake Springform Φ26cm 30-35 Small cake 1 tray 30-40 Small cake 1 tray 40-50 Small cake 2 trays L2&L4 30-35 Cheese cake Springform Φ26cm 70-80 Apple pie... -
Page 41: Energy Efficiency According
ENERGY EFFICIENCY ACCORDING TO EN 60350-1 Please note the following information: The measurement is carried out in the “ECO” mode to determine the data regarding the forced air mode and the label-class The measurement is carried out in the “Top & Bottom Heating” mode to determine the data regarding the conventional mode During the measurement only the necessary accessory is in the cavity.All other parts have to be removed... -
Page 42: Cooking By Eco Mode
Potato Gratin Rack and round plate Lasangne Rack and glass plate Cheese Cake Springform Φ20cm DATASHEET (EU 65/2014 & EU 66/2014) 310717 No of Cavities Heat Source Electric Usable Volume 82L(Gross) Energy E ciency Class (A+++ to D) Note All oven modes described on Page 8 and 9 are main functions of the oven.
Need help?
Do you have a question about the 310717 and is the answer not in the manual?
Questions and answers