Table of Contents
Advertisement
Quick Links
Advertisement
Table of Contents

Related Manuals for Kärcher K 3.86 M


Summary of Contents for Kärcher K 3.86 M
- Page 1 K 3.86 M English Español Français 5.961-396.0 10/04...
-
Page 2: Table Of Contents
HIGH PRESSURE WASHER OPERATOR MANUAL Overview Safety Alert Symbols Important Safety Instructions DANGER Assembly Instructions indifies ’’an imminently hazardous situa- Operating Instructions tion which, if not avoided, will result in GFCI instructions death or serious injury.’’ Using the Accessories Working with Detergents Shut Down WARNING Taking a Break... -
Page 3: Overview
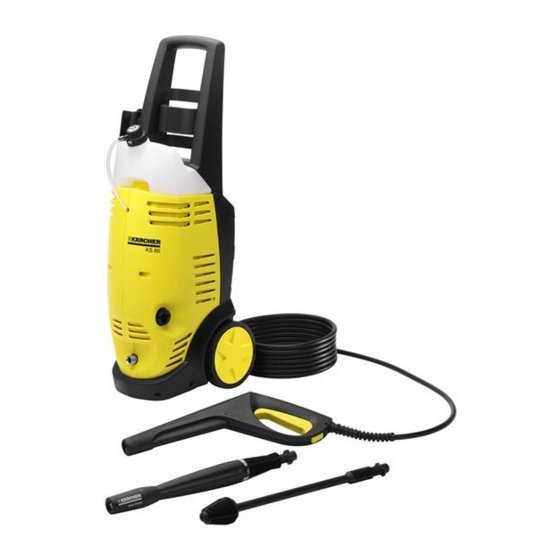
MODEL OVERVIEW Item Description: 10 Trigger gun 1 Power cord with Ground Fault Circuit 11 Trigger gun safety lock Interrupter (GFCI) 12 Vario Spray wand 2 High pressure outlet 13 Rotating spray wand 3 On/OFF switch 4 Water inlet with garden hose con- CAUTION nector (not shown) Follow the maintenance instructions... -
Page 4: Important Safety Instructions
IMPORTANT SAFETY INSTRUCTIONS WARNING! Do not use acids and solvents in this product. These products can cause physical injuries to the operator and When using this product basic precauti- irreversible damage to the machine. ons should always be followed, inclu- To reduce the risk of electrocution, ding the following: keep all connections dry and off the... - Page 5 connecting the product from the ex- Ground Fault Circuit Interrupter tension cord. (GFCI) Protection If you are using an extension cord, it This product is supplied with a Ground should always be completely un- Fault Circuit Interrupter (GFCI) built into wound from the cable drum.
-
Page 6: Assembly Instructions
ASSEMBLY INSTRUCTIONS " " STEP 1: Mount cover to backside STEP 4: Attach the high pressure hose to the trigger gun. Pull out the locking slide from the right side of the trigger gun handle (A), and insert the small end of the high pressure hose into place (B). -
Page 7: Operating Instructions
OPERATING INSTRUCTIONS " " STEP 1: Connect the high pressure STEP 4: Connect garden hose to the hose to the unit’s high pressure out- cold water source and turn water on let. completely. Plug the power cord into the power outlet. "... -
Page 8: Gfci Instructions
GFCI INSTRUCTIONS " STEP 1: Plug the Ground Fault Cir- cuit Interrupter (GFCI) into a working outlet. " STEP 2: Press ’’TEST’’, then press ’’RESET’’ to assure proper connec- tion to power. Note: The actual appearance of the GFCI may be different from this illu- stration. -
Page 9: Working With Detergents
WORKING WITH DETERGENTS Detergents can only be applied at For best results see Cleaning Tips on low pressure (Min). pages 11 & 12 for specific informati- " STEP 1: Install the vario power on on how to clean different sur- nozzle. -
Page 10: Shut Down
SHUTTING DOWN STEP 1: Turn the switch to OFF (0) po- sition and unplug cord from outlet. STEP 5: Disconnect the high pressure hose from the high pressure outlet. STEP 2: Turn off the water source. STEP 3: Press trigger to release water pressure. -
Page 11: Winterizing And Long-Term Storage11
WINTERIZING AND LONG-TERM STORAGE " 1: Disconnect all water connections. freezing temperatures. DO NOT " store near furnace or other sources 2: Turn on the machine for a few se- of heat as it may dry out the pump conds, until the water which had seals. - Page 12 sweeping motion keeping the spray (with or without detergent). Pre-rinse nozzle approximately 6 inches from the cleaning surface with fresh water. If cleaning surface. using Kärcher Pressure Wash or De- greaser, apply detergent at low pressu- Cement Patios, Brick and Stone re.
-
Page 13: Optional Cleaning Accessories
OPTIONAL CLEANING ACCESSORIES Optional cleaning accessories are available Flexible Spray Wand to further enhance your cleaning capabili- Having trouble reaching areas at odd ties: See accessories order form for product descriptions and ordering instructions. angles? The Karcher Flexible Spray Wand swivels 360° to easily clean diffi- Pump Guard cult-to-reach areas. - Page 14 dirt on cars, boats, patio furniture and T-Racer Wide Area Surface Cleaner other surfaces. Great for applying deter- For cleaning surfaces such as patios, gent. Fits most Karcher pressure was- terraces and driveways without splash- hers up to 2300 PSI. (bayonet) back, there is no better solution than Part No.
-
Page 15: Troubleshooting
TROUBLESHOOTING Disconnect the machine from the power CAUTION source before making any repair. Symptom Cause Solution Motor will not start On/Off switch is in the “OFF” (O) Turn switch to the “ON” (I) position position. Power cord is not plugged in. Plug in power cord. - Page 16 Symptom Cause Solution No detergent. Detergent suction tube not properly Check connection. connected to the machine. Detergent is too thick. Dilute detergent, for best results use Kärcher detergent. Filter on detergent suction tube is Run warm water through filter to re- clogged.
Need help?
Do you have a question about the K 3.86 M and is the answer not in the manual?
Questions and answers