Table of Contents
Advertisement
Quick Links
Advertisement
Table of Contents

Subscribe to Our Youtube Channel
Related Manuals for CAS CL-3000 Series


Summary of Contents for CAS CL-3000 Series
-
Page 2: Table Of Contents
CONTENTS 1. GENERAL ........................... 8 1.1. Precautions ...................... 8 1.2. Introductions ....................10 1.3. Specifications ....................11 1.4. Name and Functions ..................13 1.5. Symbols ......................16 1.6. Key Functions ....................17 1.7. Installation of the Label Roll ............... 20 2. - Page 3 ............51 2.2.5.2. Delete Origin (Menu code 1253) ..............52 2.2.6. Barcode (Menu code 1260) ..........52 2.2.6.1. New/Edit Barcode (Menu code 1261) ............54 2.2.6.2. Delete Barcode (Menu code 1263) ................55 2.2.7. Tare (Menu code 1270) ............55 2.2.7.1.
- Page 4 ..............86 2.7.4. Currency (Menu code 1440) ..........87 2.7.4.1. New/Edit Currency (Menu Code 1441) ............. 89 2.7.4.2. Delete Currency (Menu code 1443) ..........89 2.7.5. Job Batch Schedule (Menu code 1450) 2.7.5.1. New/Edit Job Batch Schedule (Menu code 1451) ........2.7.5.2.
- Page 5 ..........122 2.10.5.2. Change Password (Menu code 1852) ............123 2.10.5.3. Delete User (Menu code 1854) ..........123 2.10.5.4. Config Permission (Menu code 1855) ............125 2.10.5.5. Clerk Key (Menu code 1856) ................. 125 2.10.6. Test (Menu code 1860) ............126 2.10.6.1.
- Page 6 ................... 158 3.4.2 Using Speed Key 3.5. Override (FOR key) ................... 159 ..................159 3.5.1 By-Weight PLU ..................160 3.5.2 By-Count PLU ..................161 3.5.3 By-PCS PLU 3.6. Sales Operation ..................162 ................. 162 3.6.1 Weighed Item Operation ..................163 3.6.2 By Count Item ..................
-
Page 7: General
1. Label Format ....................188 2. ASCII Code Table ..................195 3. Window Character Set Information ............. 196 4. Error Message ....................197 1.GENERAL 1.1 PRECAUTIONS... - Page 8 • CE Mark Warning...
- Page 9 This is a Class A product. In a domestic environment this product may cause radio interference in which case the user may be required to take adequate measures.
-
Page 10: Introductions
We have designed this equipment with many advanced features, high quality construction, and user-friendly menu driven programming. We are confident that you will find the CAS CL3000 series scale will meet all of your most demanding needs. Remember, for proper installation and maintenance please have your Authorized CAS Dealer do the primary installation, programming, and demonstration. -
Page 11: Specifications
1.3 SPECIFICATIONS Max. Capacity 3/6 kg 6/15 kg 15/30 kg 6/15 lb 15/30 lb 30/60 lb 0.002 lb/ 0.005 lb/ 0.01 lb/ Interval 1/2 g 2/5 g 5/10 g 0.005 lb 0.01 lb 0.02 lb Max. Tare -2.999 kg -5.998 kg -9.995 kg -5.998 lb -9.995 lb... - Page 12 Number Range (Price Look Up, 10000 1~999999 Item Index Number) Ingredient 510 character 1000 1~1000 User Defined Barcode Format 1~20 Department 1~99 Tax Type Group 1~99 Clerk 1~95 Discount 1~99 Origin 1~500 Programmable Data Fixed Label Format Free Format Bitmap Image 1~99 Customer 1~89...
-
Page 13: Name And Functions
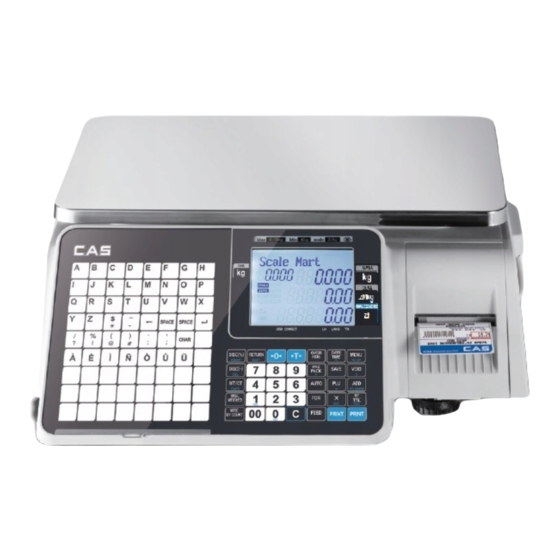
1.4 NAME AND FUNCTIONS OVERALL VIEW... - Page 14 DISPLAY CL3000-B ■ CL3000-P ■...
- Page 15 KEYBOARD CL3000-P ■ CL3000-B ■...
-
Page 16: Symbols
1.5 SYMBOLS SYMBOLS DESCRIPTION Stable weight indicator Zero weight indicator Net weight indicator Speed key shift status indicator Discount status indicator Auto clearing status and Print mode indicator Print Mode indicator Auto clearing status indicator Battery status(level) check USB memory connection check CONNECT Network server connection check LAN Connection Status... -
Page 17: Key Functions
1.6 KEY FUNCTIONS Function key DESCRIPTION Numeric keys. Used to enter pricing, qty, count, tare, etc. Double zero key. Clear key. Used to clear erroneous entries and error conditions. Re-Zero key. Use to remove small variations in the scale’s zero. Tare key. - Page 18 DESCRIPTION ADD-Up key. This key when used in conjunction with ST/TTL key allows you print a customer-total label as well as individual transaction labels. Page down key: Used to go to next page in program mode. Multi-Label key. Use this key to print multiple sales of the same transaction.
- Page 19 Program mode key DESCRIPTION Alpha keys. Used to type text data. Used to type $ Backspace key. Used to backspace and delete text data. Space bar. Used to go to next line to enter text Special symbol keys. Used to type special symbol. (See ASCII code table) Note: X key is only used in sale mode and ESC key is only used in program mode.
-
Page 20: Installation Of The Label Roll
1.7 Installation of the Label Roll • Label Specifications Outer diameter of roll : 100mm Inner diameter of roll : 40mm Width of receipt roll : 40, 50, 60mm Width of label roll : 60mm(MAX) • Print Area Width of label : 60mm(MAX) Printable width : 56mm(MAX) Length of label : 80mm(MAX) - Page 22 To install the label roll at ANY time you must follow the directions in this section: ⑦ Press the FEED key. Scale prints twice for auto Label adjustment...
-
Page 23: Programming
2. PROGRAMMING Program Mode Menu Tree (Menu code : 1000) CODE Menu CODE Sub Menu CODE Sub Menu PRICE 1110 (Change unit price) EDIT 1120 (New/Edit) EDIT 1131 (New/Edit Discount) DEL.PLU 1137 (Delete (11331) DISC by PLU(DC)) 1130 (Discount) DEL.DPT 1133 (Delete 1138... - Page 24 1230 (Tax Rate) SMSG 1240 (Sales Message) ORIGIN 1250 (Origin) 1260 (Barcode) TARE 1270 (Tare) SYMBOL 1280 (Unit Symbol) EDIT 1311 (New/Edit Ingredient) TABLE2 1310 (Ingredient) 1300 (PLU Data 1313 (Delete Ingredient) Table II) NUTRI 1320 (Nutrition Facts) EDIT 1411 STORE (New/Edit Store) 1410...
- Page 25 TAX.NO 1542 (Global Tax Number) CODE Menu CODE Sub Menu CODE Sub Menu SCALE 1611 (Scale) 1612 (PLU) MISC 1613 (Misc. PLU) X1-REP GROUP 1610 1614 (X1 Report) (Group) DEPT 1615 REPORT (Department) 1600 (Report) HOURLY 1616 (Hourly) CLERK 1617 (Clerk) Z1-REP 1620...
- Page 26 (Ticket) (Select Ticket Item) LIST 1762 (Select List Item) FONT 1763 (Select Ticket Font Size) SLMODE 1810 (Sale Mode) OPMODE 1820 (Operation Mode) SCALE 1830 (Department & Store ID) TIME 1840 (Date/Time) EDIT 1851 (New/Edit User) PASSWD 1852 CLERK (Change Password) (User/ 1850 Security...
- Page 27 CLERK 1874 (Clerk Logout) F-KEY F-KEY 1881 (Function Key Define) 1880 (Function CLERK Key Define) 1882 (Function Key Block) CODE Menu CODE Sub Menu CODE Sub Menu SERVIC 1911 (Service Type) DHCP 1912 (DHCP) 1913 (IP) 1910 (Network REMOTE Setting) 1914 (Remote IP) RS232C...
- Page 28 Selectable menu. If you want to select PLU, simply press 1...
-
Page 29: Plu Programming
2.1 PLU Programming You can set 39 items for a PLU as below table and if you do not want to use some items, you can prohibit those items in menu code:1144. DISPLAY Description DEPT Department No. PLU No. TYPE Select PLU type among By Weight, By Count or By-PCS NAME1 Enter name 1 of item. - Page 30 DISPLAY Description % Tare. (0~99.99) You can enter tare weight as percentage of item. *P.TARE If you set it to 20%, 20% of item is tare weight. Tare % Limit. (0~99.99) You can enter tare limit. *T.LIMIT %tare < = % limit -> Gross weight is printed %tare >...
-
Page 31: Create By-Weight Plu (Menu Code 1120)
2.1.1 Create By-Weight PLU (Menu code 1120) ( NEW/Edit PLU : MENU → 1. PLU → 2. New/Edit ) ◆ You can press the SAVE key at anytime to save the current PLU data and if you want to exit without saving, press the ESC key. - Page 32 3. Enter PLU Name 1 4. Select Group • You can use Group depending on the EX) “BEEF” Menu code 1220. • If there is no group for this PLU, enter 0. EX) 1. Meat 5. Select Origin 6. Enter Prefix •...
- Page 33 7. Item Code 8. Price • If you do not want to use item code, enter 0. EX) Item Code = 1941 EX) Price = $10.00 9. Tax No. 10. Tare • Maybe changed using Menu Code 1231. • You can use Tare Table, depending If the Global Tax Settings on the setting of Parameter 584 (Menu Code 1541) is not used.
- Page 34 11. Produced Date 12. Packed Date • Print Date minus the Input Value • Print Date plus Input Value in Days. in Days. See chart on next page. See chart on next page. EX) 0 : No print EX) 0 : Today 1 : Print Date –...
- Page 35 15. Sell By Time • Packed Time plus Input Value in Hours. See Chart on next page. 0 : Current Time 1 : Packed Time + 1 Hour EX) 10 Hour 16. Ingredient No. 17. Sales Message No. • You can use Ingredient depending •...
-
Page 36: Create By-Count Plu (Menu Code 1120)
18. Reference PLU Department 19. Reference PLU No. • If you do not want to use, enter 0 • If you do not want to use, enter 0 EX) Reference PLU Department = 0 EX) Reference PLU No. = 0 Usage is possible to register the reference key at 1881 in order to use the No. - Page 37 2. Select PLU Type 3. Enter PLU Name 1 - 1. By Weight / 2. By Count / 3. By PCS EX) BY-Count Item EX) PEAR 4. Qty Unit No. 5. Price EX) Qty Unit No. 6 EX) Price = $10.00...
-
Page 39: Create By-Pcs Plu (Menu Code 1120)
2.1.3 Create By-PCS PLU (Menu code 1120) ( MENU → 1. PLU → 2. New/Edit ) ※ Showing only the different parts of PLU field By-PCS PLU is used depending on the Parameter 593. ◆ You can press the SAVE key at anytime to save the current PLU data and if you want to exit without saving, press the ESC key. -
Page 40: Editing Plu (Menu Code 1120)
4. Pieces 5. Qty Unit No. • If you enter 0, it is regarded as 1. EX) 10 piece EX) Qty Unit No. 6 2.1.4 Editing PLU (Menu code 1120) ( MENU → 1. PLU → 2. New/Edit ) ◆ You can call up existing PLU information for edit. 2.1.5 Management(Menu code 1140) 2.1.5.1 Copying PLU (Menu code 1141) ( MENU →... - Page 41 2. Select Destination • Enter the Department number where the New PLU(s) will be located • Enter the PLU number that you wish to copy the Source PLU into EX) Destination Department # = 2 Destination PLU # = 1 Note : If PLU number exists in destination department you will be asked to confirm the move...
-
Page 42: Deleting Plu (Menu Code 1142)
2.1.5.2 Deleting PLU (Menu code 1142) ( MENU → 1. PLU→ 4. Management → 2. Delete) • There are three ways to delete PLU. Simply enter the number that you wish to delete. 1. Delete by PLU No 2. Delete by Dept. No 3. -
Page 43: Moving Plu (Menu Code 1143)
2.1.5.3 Moving PLU (Menu code 1143) ( MENU → 1. PLU→ 4. Management → 3. Move) • All the PLU information will move with commend (discount, Tax, barcode type, etc) 1. Select Source • Enter the Department No. and PLU No. which you wish to move EX) Source Department # = 1 Source PLU # = 1 Note : If PLU number exists in destination department you will be asked to confirm the copy. -
Page 44: Selecting Plu Field Items (Menu Code 1144)
2.1.5.4 Selecting PLU field Items (Menu code 1144) ( MENU → 1. PLU→ 4. Management → 4. Select PLU items • If you enter N, you cannot use that item when you create PLU. To enter Y, press Y key or 1 key. To enter N, press N key or 0 key. -
Page 45: Sample Printing (Menu Code 1170)
• To clear the selected PLU Sale Count, press the TEST key. To clear all PLU Sale Counts press the ZERO key. 2.1.6 Sample Printing (Menu code 1170) ( MENU → 1. PLU → 7. Sample Printing ) • Used to enable printing a sample PLU label EX) If set to Yes, when editing an existing PLU or creating a new one, depressing the SAVE key will result in a label being printed with that PLU's information on it. -
Page 46: Programming Plu Data Table I
2.2 Programming PLU Data Table I In the CL3000 series, PLU's are organized by Departments and sometimes Groups as shown in the figure below. It is important to understand this structure to take advantage of the CL3000 series sophisticated features regarding Label formats, X and Z reports, etc. -
Page 47: New/Edit Department (Menu Code 1211)
2.2.1.1 New/Edit Department (Menu code 1211) ( MENU → 2. PLU Data Table I → 1. Department → 1. New/Edit ) ◆ You can press the SAVE key at anytime to save the current data and if you want to exit without saving, press the ESC key. 1. - Page 48 Note: You can select from 5 different Speed Key sets. Refer to Section 2.6 Speed Key Set No.
-
Page 49: Delete Department (Menu Code 1213)
2.2.1.2 Delete Department (Menu code 1213) ( MENU → 2. PLU Data Table I → 1. Department → 3. Delete ) 1. Enter Department number EX) Delete department 2 Note: There is no confirmation request when deleting a Department. Pressing the PRINT key will cause the Department entered to be deleted. -
Page 51: Delete Group (Menu Code 1223)
2.2.2.2 Delete Group (Menu code 1223) ( MENU → 2. PLU Data Table I → 2. Group → 3. Delete ) 1. Enter group number EX) Delete group 1. Note: There is no confirmation request when deleting a Group. Pressing the PRINT key will cause the Group entered to be deleted. -
Page 52: Tax Rate (Menu Code 1230)
2.2.3 Tax Rate (Menu code 1230) ( MENU → 2. PLU Data Table I → 3. TAX Rate ) You can use tax number when you create PLU. Note: Tax Rate programming requires that a Level 3 Password be entered. See Section 2.14.6 User/Security Configuration. -
Page 53: Delete Tax Rate (Menu Code 1233)
3. Enter Tax Rate EX) Tax Rate = 5.00% 4. Exit Menu • If you want to exit, press ESC key. 2.2.3.2 Delete Tax Rate (Menu code 1233) ( MENU → 2. PLU Data Table I → 3. TAX Rate → 3. Delete ) 1. -
Page 55: Sales Message (Menu Code 1240)
2.2.4 Sales Message (Menu code 1240) ( MENU → 2. PLU Data Table I → 4. Sales Message ) Sales message can be printed on PLU labels so long as the format that you use contains a Sales Message field. This is a great tool for advertising and cross-marketing products. -
Page 56: Delete Sales Message (Menu Code 1243)
2.2.4.2 Delete Sales Message (Menu code 1243) ( MENU → 2. PLU Data Table I → 4. Sales Message → 3. Delete ) 1. Enter Message No. EX) Delete message 1. Note: There is no confirmation request when deleting a Sales Message. Pressing the PRINT key will cause the Sales Message entered to be deleted. -
Page 57: Delete Origin (Menu Code 1253)
3. Exit Menu • If you want to exit, press ESC key. 2.2.5.2 Delete Origin (Menu code 1253) ( MENU → 2. PLU Data Table I → 5. Origin → 3. Delete ) 1. Enter Origin No. EX) Delete Origin 10. Note: There is no confirmation request when deleting a Origin. -
Page 58: Barcode (Menu Code 1260)
2.2.6 Barcode (Menu code 1260) ( MENU → 2. PLU Data Table I → 6. Barcode ) Up to 20 different Barcode Formats can be programmed in the CL3000 series. Different Barcode Formats can be assigned to individual PLU's or one Barcode Format can be used for all PLU's by enabling the Global Barcode Format Setting (Menu 1520). - Page 59 ▶ type of Barcode Type Description EAN-13 13digit I20F5 2~24 digit UPCA 12 digit CODE128 2~30 digit 4. Enter Barcode Form • You can select from a list of Barcode types or you can create your own custom format • Refer to following table. EX) Barcode Form = 1.
-
Page 60: Delete Barcode (Menu Code 1263)
▶ The following defines the format characters for Barcode Formats: (Example) Symbol Description • item code • PLU number • price • price check digit (It is created automatically) • unit price • weight • quantity • department • group •... -
Page 61: Tare (Menu Code 1270)
Note: There is no confirmation request when deleting a Barcode. Pressing the PRINT key will cause the Barcode entered to be deleted. 2.2.7 Tare (Menu code 1270) ( MENU → 2. PLU Data Table I → 7. Tare ) The CL3000 series can be programmed to use a Tare No. instead of a numeric value.(System Parameter 584) If you are using Tare Numbers they should be programmed prior to programming any PLU's that use a Tare weight. -
Page 62: Delete Tare (Menu Code 1273)
• There are 2 types of Tare Weights that can be entered. EX) Tare Type = 1 Numeric Type Enter the numeric value using the number keys EX)Tare Type = 2 Weight Type Place the container on the platter and press ▶... -
Page 63: Tare Key (Menu Code 1274)
EX) Delete tare no. 1 Note: There is no confirmation request when deleting a Tare No. Pressing the PRINT key will cause the Tare No. entered to be deleted. 2.2.7.3 Tare Key (Menu code 1274) ( MENU → 2. PLU Data Table I → 7. Tare→ 4. Tare Key ) This menu allows you to assign the Tare No.'s (Menu 1271) to Tare Keys. -
Page 64: Unit Symbol (Menu Code 1280)
2.2.8 Unit Symbol (Menu code 1280) ( MENU → 2. PLU Data Table I → 8. Unit Symbol ) This menu allows you to program or change the Unit Symbol that will print on the label for Non Weight or By Count PLU’s. 2.2.8.1 New/Edit Unit Symbol (Menu code 1281) ( MENU →... -
Page 65: Programming Plu Data Table Ii
EX) Delete unit symbol 1. Note: There is no confirmation request when deleting a Unit Symbol No. Pressing the PRINT key will cause the Unit Symbol No. entered to be deleted. 2.3 Programming PLU Data Table II 2.3.1 Ingredient (Menu code 1310) ( MENU →... -
Page 66: Delete Ingredient (Menu Code 1313)
• Note: Pressing the PG UP or PG DOWN key will move the cursor to the beginning or end of the brackets respectively. 3. Exit menu • If you want to exit, press ESC key. 2.3.1.2 Delete Ingredient (Menu code 1313) ( MENU →... - Page 67 be inputted by using the [CHAR] CODE input key. Ingredient1 and Ingredient2 are printed onto separate fields in the label format. Field ID of Ingredient1 is 25, while that for ingredient2 is 26. 1.2 Inputting of Ingredient at the weighing scale (1) Input Ingredient1 at the ingredient input window (MENU 1311).
-
Page 68: Nutrition Facts (Menu Code 1320)
2.3.2 Nutrition Facts (Menu code 1320) ( MENU → 3. PLU Data Table II → 2. Nutrition Facts ) Using this menu you can program Nutrition Facts information that can be linked to individual PLU’s. Note: The printing size of the Nutrition Facts may vary depending on the label format selected. - Page 69 you can use the Arrow keys to go through each page. 1. Nutrition Fact No 2. Enter description • This value can be from 1 to 500. EX) Nutrition fact no = 1 EX) BEEF STEW 3. Enter Serving Size(Text) 4.
- Page 70 5. Calories 6. Calories from fat EX) Calories = 230 EX) Calories From Fat= 120 7. Total Fat(g) 8. Saturated fat(g) EX) Total fat = 14 g EX) Saturated fat = 7 g...
- Page 71 9. Trans Fat(g) 10. Cholesterol(mg) EX) Trans Fat = 1 g EX) Cholesterol = 40 mg 11. Sodium(mg) 12. Total Carbohydrate(g) EX) Sodium = 950 mg EX) Total Carbohydrate = 16 g...
- Page 72 13. Dietary Fibers(g) 14. Sugars(g) EX) Dietary Fiber = 2 g EX) Sugars = 3 g 15. Protein(g) 16. Vitamin A(%) EX) Protein = 11 g EX) Vitamin A = 20%...
- Page 73 17. Calcium(%) 18. Vitamin C(%) EX) Calcium = 2% EX) Vitamin C = 0 % 19. Iron(%) EX) Iron = 6 %...
-
Page 74: Delete Nutrition Facts (Menu Code 1323)
2.3.2.2 Delete Nutrition Facts (Menu code 1323) ( MENU → 3. PLU Data Table II → 2. Nutrition Facts → 3. Delete ) 1. Enter nutrition fact number to delete. EX) Delete nutrition facts no.1 Note: There is no confirmation request when deleting a Nutrition Fact No. Pressing the PRINT key will cause the Nutrition Fact No. -
Page 75: Discount Programming
2.4 Discount Programming 2.4.1 Discount (Menu code 1130) ( MENU → 1. PLU → 3. Discount ) The Discount Programming Menu is used to program promotional pricing for individual PLU's. Discount pricing can be accomplished using Menu code 1130 or by using the CL-Works Software. - Page 76 ▶ Discount Type Display Type Description - By Weight PLU: Set the discount amount on unit Unit Price price, depending on weight. UPRICE Discount - By Count/PCS PLU: Set the discount amount on unit price, depending on number of items. - By Weight PLU: set discount % of unit price, % Unit Price depending on weight.
- Page 77 3. Enter discount value • Refer to below table. ※ Target unit is different depending on the PLU type. This is By Weight PLU therefore this unit is weight. In case of By count PLU or By PCS PLU, unit is count. EX) 1st Target: 0.100 Kg 1st Value: 1.00 $ 2nd Target: 0.500 Kg...
- Page 78 TARGT2 Second Target Weight Set weight limit for 2nd stage of discount. Set the discount amount of unit price for the VALUE2 Second Value Price second weight limit. 4. Discount Condition 1: (Set the day of week ) 1 -> Discount 0 ->...
-
Page 79: Delete Discount (Menu Code 1133)
EX) Start Time: 8am End Time: 6:30pm 6. Exit menu • If you want to exit, press the ESC key. 2.4.1.2 Delete Discount (Menu code 1133) ( MENU → 1. PLU → 3. Discount → 3. Delete ) ◆ There are three ways to delete Discount. Simply enter the number that you wish to delete. - Page 80 1. Enter the department number and PLU number to delete EX) Department number = 2 PLU No. = 1 Note: There is no confirmation request when deleting a Discount of a PLU No. Pressing the PRINT key will cause the Discount of the PLU No. entered to be deleted. 2) Delete by Dept.
- Page 81 Number entered to be deleted.
- Page 82 3) Delete ALL (DC) (Menu code 1139) ( MENU → 1. PLU → 3. Discount → 3. Delete → 3. Delete ALL(DC) ) Press 1 key to select Delete all (DC) Note: There is no confirmation request when deleting all Discounts. Pressing the PRINT key will cause All Discounts in all Departments to be deleted.
-
Page 83: Global Discount (Menu Code 1530)
2.5 Global Discount Programming 2.5.1 Global Discount (Menu code 1530) ( MENU → 5. Global Setting → 3. Discount ) This menu is used to select what type of Discount is applied to a PLU. You can select to use a Global Discount for all PLU's, apply Discounts based on individual PLU's or use no Discount at all. -
Page 84: Weight/Count/Pcs Discount (Menu Code 1532/1533/1534)
2.5.1.2 Weight/Count/PCS Discount (Menu code 1532/1533/1534) ( MENU → 5. Global → 3. Discount → 1. Priority ) If you want to use the Global Discount method and apply the same discount regardless of PLU, you can set the Discount information in Menu code 1532, 1533 and 1534. -
Page 85: Speed Key Setting (Menu Code 1160)
2.6 Speed Key Setting (Menu code 1160) ( MENU → 1. PLU → 6. Speed Key ) This menu is used to program Speed keys. Speed keys are short-cut keys used to allow quick access to the most frequently used PLU's in a department. There is also a SHIFT function that allows you to set a second level of Speed keys that will double the number of Speed keys available in a department. - Page 86 3. PLU No. • Enter PLU no. to assign speed key • PLU should be belong to scale department. EX1) PLU 10 = BEEF...
-
Page 87: Programming Store Data
2.7.1.1 New/Edit Store (Menu code 1411) ( MENU → 4. Store Data Table → 1. Store → 1. New/Edit Store ) 1. Enter store number. 2. Press PRINT key and enter ppropriate text in NAME . EX) #1 EX) NAME = CAS STORE... -
Page 88: Delete Store (Menu Code 1413)
3. Press PRINT key, then user may enter other store information such as TELEPHONE NUMBER or any text information. EX) TEL.#=2019339002, TEXT=NJ CAS office 4. Press PRINT key and user may go back to STORE main menu by using ESC key. -
Page 89: Customer (Menu Code 1420)
Pressing the PRINT key will cause the Store No. entered to be deleted. 2.7.2 Customer (Menu code 1420) ( MENU → 4. Store Data Table → 2. Customer ) This Menu is used to program the Customer Information. Customer Information is used to manage a specific Customer's Accounts Receivable. - Page 90 3. Press “PRINT” key, then user may enter the Address 3, TEL. Number and customer s CREDIT LIMIT AMOUNT. EX) ADDNESS3=NJ 07073 EX) TEL=2019339002 EX) CREDIT LIMIT AMOUNT=200.00 4. Press “PRINT” key, to enter the information. User may go back to main CUSTOMER menu by pressing “X/ESC”...
-
Page 91: Delete Customer (Menu Code 1423)
2.7.2.2 Delete Customer (Menu code 1423) ( MENU → 4. Store Data Table → 2. Customer → 3. Delete ) This Menu allows you to Delete a Customer from the file. 1. Enter customer to delete EX) Delete customer N0.=1 2.7.3 Scroll Message (Menu code 1430) ( MENU →... - Page 92 This value can be from 1 to 6000 seconds. Ex.) 5 seconds...
-
Page 93: Edit Scroll Message (Menu Code 1432)
2.7.3.2 Edit Scroll Message (Menu Code 1432) ( MENU → 4. Store Data Table → 3. Scroll Message → 2. Edit Scroll Message ) This Menu allows you to program the actual information that will be in the Scrolling Message. You may input up to 9 messages and use two different scrolling effects. 1. - Page 94 4. Set scrolling message effect 5. Select use or unuse for scrolling • Effect =0 : No use. Message • Y : USE Effect =1 : Scroll message left to right Effect =2 : Scroll message right to left N : NO USE Effect =3 : Scroll message blink EX) Effect = 2 EX) 1 = Yes...
-
Page 95: Currency (Menu Code 1440)
• Enter Date EX) Start Date = 00-00-00 EX) End Date = 00:00:00 Note: If you enter 00-00-00 for a Start and End Date. This means that the message will be shown starting today and will be shown every day until December 31, 2099. •... -
Page 96: New/Edit Currency (Menu Code 1441)
another currency simply by this function. ☞ Please refer to Menu 1881 Function key definition. 2.7.4.1 New/Edit Currency (Menu Code 1441) ( MENU → 4. Store Data Table → 4. Currency → 1. New/Edit ) 1. Numbering Currency 2. Rate Decimal Point •... - Page 97 5. Last Symbol 6. Price Decimal Digit • Enter the last currency symbol to be • Enter the number of decimal digit changed. EX) No last symbol EX) Price Decimal point digit = 2 7. Price Output Format • Enter the number of format EX) Price Output Format = 2 ▶...
-
Page 98: Delete Currency (Menu Code 1443)
When total amount is less than 1, only $100.00c, 12c(Greek) Last currency symbol shows up. 2.7.4.2 Delete Currency (Menu code 1443) ( MENU → 4. Store Data Table → 4. Currency → 3. Delete ) 1. Currency number to delete EX) Delete Currency no. -
Page 99: Delete Job Batch Schedule (Menu Code 1453)
3. PLU No. 4. Label Print Quantity • Enter the number of PLU to call. • Enter the total number of label printing to print. You can enter 1-99. Note : This PLU must belong to count or PCS type 2.7.5.2 Delete Job Batch Schedule (Menu code 1453) ( MENU →... - Page 100 Note: There is no confirmation request when deleting a Job Batch Schedule No. Pressing the PRINT key will cause the Job Batch Schedule No. entered to be deleted.
-
Page 101: Scanner (Menu Code 1460)
2.7.6 Scanner (Menu code 1460) ( MENU → 4. Store Data Table → 6. Scanner ) This menu is used to make barcode scanning sale available or just to call up PLU. These are operable functions and setting methods when using by connecting the barcode scanner to CL3000 series. -
Page 102: Scanner Config (Menu Code 1464)
1. Enter the number of Conversion Table to be deleted EX) Delete Conversion Table no. 2 Note: There is no confirmation request when deleting a Table No. Pressing the PRINT key will cause the Conversion Table No. entered to be deleted. 2.7.6.3 Scanner Config (Menu code 1464) ( MENU →... -
Page 103: Label Format Key Table (Menu Code 1470)
- From 3 to 5 digits “XXXXX” calls PLU by comparing with Mapping Code. At this time, you must enter 5 digits as Mapping Code in menu1461. Example 3) Scan Form : [ XXXXXXXXXXXXX ] - The 13 digits bar code is calls PLU by comparing with Mapping Code. At this time, you must enter 13 digits as Mapping Code at menu1461. -
Page 104: Programming Global Setting
2.8 Programming Global Setting The Global Setting function is used to program functions of the CL3000 series like Label Format, Barcode Format, Discount and Tax settings that will be used on every PLU or transaction. These settings, when selected override any settings that are rogrammed in the PLU. - Page 105 2. Set PLU label No. 3. Set Miscellaneous label number • Set PLU label number • Set label format for miscellaneous item. EX) PLU Label No. = 10. IS6040- EX) Misc. Label No = 10. IS6040- 00010(60x40) 00010(60x40) 4. Set total label number 5.
- Page 106 6. Set printing direction of PLU and 7. Input Label #2 Misc. item EX) Reverse Item Label = Y EX) Label2 # : [11] If you do not wish to use the label #2, simply input ‘0’. It operates in the same manner as the Aux.Label of the PLU input items.
-
Page 107: Barcode Format (Menu Code 1520)
2.8.2 Barcode Format (Menu code 1520) ( MENU → 5. Global Setting → 2. Barcode ) Global Barcode Setting provides all-in-one barcode setting by selecting nine different barcode options so that user does not need to save data for individual PLUs one by one. All related barcode data are selected and saved from PLU barcode data table user may already register. - Page 108 4. Set barcode number for by-PCS 5. Set barcode number for fixed PLU EX) PLU PCS barcode No. = 2 EX) PLU fixed barcode No. = 2 6. Set barcode number for Misc. 7. Set barcode number for Misc. weight item count item EX) Misc.
- Page 109 8. Set barcode number for Misc. 9. Set barcode number for Add-Up PCS item Total EX) Misc. PCS barcode No. = 2 EX) Add Up TTL barcode No. = 2 10. Set barcode number for floating 11. Set barcode2 number Total EX) Floating TTL barcode No.
-
Page 110: Tax (Menu Code 1540)
It operates in the same manner as the Barcode2 No. of the PLU input items. If the Barcode2 No. of PLU has already been registered, then, it prints the corresponding barcode, and if there is no inputted number, then, barcode of the number inputted here will be outputted. -
Page 111: Printing Programming(Menu Code 1700)
2.9 Printing Programming(Menu code 1700) ( MENU → 7. Print ) This chapter explains how to set printing-related environments, such as print label item, markdown, Hardware, serial number format, and ticket. ▶ PRINT Submenu Submenu Description ITEM Select item(s) which is(are) not printed on label. Markdown. - Page 112 ▶ Print Label Item Item Description D.NAME Department Name DEPT.NO Department Number GR.NO Group Number PLU NO PLU Number NAME1 PLU Name 1 NAME2 PLU Name 2 NAME3 PLU Name 3 I.CODE Item Code U.WT Unit Weight TAX.RT Tax Rate TAX.PR Tax Price TARE...
-
Page 113: Markdown (Menu Code 1720)
PR.TARE Percent Tare PR.LIMT Percent Tare Limit SAVED Saved Price SERIAL Label Serial STORE Store Name CL.NO Clerk Number CL.NAME Clerk Name CU.NAME Customer Name CU.NO Customer Number SCL.NO Scale Number WEEK Day of Week CUR.RAT Currency Rate TOTAL2 Second Total Price UPRIC2 Second Unit Price TRACE... -
Page 114: Printer Hardware (Menu Code 1730)
Weight Markdown Select “Yes” to display both of original weight and the WEIGHT discounted weight if any. Otherwise, select No. Quantity Markdown Select “Yes” to display both of original quantity and the discounted quantity if any. Otherwise, select No. 1. Select Yes or No by using 1 or 0 key 2. -
Page 115: Print Mode (Menu Code 1731)
“End Margin(30)” size is set. If you use Continuous Label Paper in Label mode, “Gap length” value is applied to “End Margin”. * The values in ( ) are default. Enter the “Gap(128)” and “Peel(128)” values for printing sensor calibration. * The values in ( ) are default. - Page 116 EX) Width = 60mm EX) Height = 40mm EX) Gap Length = 2mm • If it is Ticket Mode, “TICKET SIZE” is displayed, and “TEST” key is not operated. And “Feed”, “End Margin” instead of “Height”, “Gap Length” shows up. EX) Width = 60mm EX) Feed = 20mm EX) End Margin = 30mm...
-
Page 117: Sensor Calibration (Menu Code 1733)
• If it is Continuous Label Mode, “CONT. LABEL SIZE” is displayed, and “TEST” key is not operated. And “End Margin” instead of “Gap Length” shows up. 2.9.3.3 Sensor Calibration (Menu code 1733) (MENU → 7. Print → 3. Printer Hardware → 3. Sensor Calibration ) Enter appropriate values for “Gap”, “Peel”, “Out of Paper”. -
Page 118: Print Intensity (Menu Code 1735)
• When “Ticket Mode” is in “Print Mode”, [Peel-off] and [Label Paper] do not work. 2.9.3.5 Print Intensity (Menu code 1735) ( MENU → 7. Print → 3. Printer Hardware → 5. Print Intensity ) Enter any value from “0” to “20”. Press “TEST”... - Page 119 ( MENU → 7. Print → 3. Printer Hardware → 6. Adjust Feed Length ) Enter any value of the feed alignment from “0” to “400”. Press “TEST” to test feed or “ENTER” to save current “FEED” Length value. • 1pixel = 0.125mm Ex) “280”...
-
Page 120: Label Preprint (Menu Code 1737)
2.9.3.7 Label Preprint (Menu code 1737) ( MENU → 7. Print → 3. Printer Hardware → 7. Label Preprint ) Enter “Y(Yes)” or “N(No)” to select Preprint mode and any value of the preprint length from “0 mm” to “10 mm”. Press “TEST”... -
Page 121: Serial Number Format (Menu Code 1740)
2.9.4 Serial Number Format (Menu code 1740) ( MENU → 7. Print → 4. Serial Number Format ) SERIAL NUMBER FORMAT programming is for numbering of label/ticket issued (printed) on label/ticket. User may identify daily total counts of label/ticket used up. Meaning •... -
Page 122: Add-Up Total (Menu Code 1750)
2.9.5 Add-Up Total (Menu code 1750) ( MENU → 7. Print → 5. Add-up Total ) This section shows how to set printing environments of total label and item label when you use ADD-UP sales. ① Press “5” to get into ADD-UP TOTAL menu in PRINT main menu. -
Page 123: Ticket (Menu Code 1760)
※ It is applied to Label mode. 2.9.6 Ticket (Menu code 1760) ( MENU → 7. Print → 6. Ticket ) This section shows how to select item(s) (Contents) printed on ticket. ① Press “6” to go to TICKET setting. 2.9.6.1 Select Ticket Item (Menu code 1761) ( MENU →... - Page 124 ▶ Ticket Format Setting Ticket Format Display Description Setting It outputs product list (Detailed item can be set in the following menu, 1762) ■ Printing the list of each sales item(s). LIST Print. List * In case of “Yes” selected user can go to “List Item”...
-
Page 125: Select Ticket Font Size (Menu Code 1763)
2.9.6.3 Select Ticket Font Size (Menu code 1763) ( MENU → 7. Print → 6. Ticket → 3. Select Ticket Font Size) It can designate the size of the letters of the item that is printed in the ticket. ▶ Ticket Font Size Setting Display Ticket Font Setting Description... -
Page 126: Programming Scale Configuration (Menu Code 1800)
2.10 Programming Scale Configuration (Menu code 1800) ( MENU → 8. Scale Config ) This chapter explains how to configure the scale. 2.10.1 Sale Mode (Menu code 1810) ( MENU → 8. Scale Config → 1. Scale Mode ) This section is to select sale mode, which have seven different modes in the following table. - Page 127 ▶ Selecting one of following sale modes, user may select an one-stop setting for Clerk, Operation, Print, and Prepack mode. Operation Print Prepack MODE Clerk Mode Mode Mode Mode 1. Ticket & Floating Floating Clerk Regist Ticket 2. Label No Clerk Regist Label 3.
-
Page 128: Operation Mode (Menu Code 1820)
2.10.2 Operation Mode (Menu code 1820) ( MENU → 8. Scale Config → 2. Operation Mode ) This section is to select a clerk and operation mode. There are three different operation modes, REGISTRATION, RE-PACK, MANAGER and three different clerk modes, NO CLERK, STANDARD CLERK, and FLOATING CLERK. -
Page 129: Department (Menu Code 1830)
2.10.3 Department (Menu code 1830) ( MENU → 8. Scale Config → 3. Department ) This section shows how to select current department where scale is being used. User can use (call up) PLUs only for current department selected in sales mode. For example, if current department selected is GROCERY user can call up items registered only in GROCERY department. - Page 130 EX) TIME= [10:30:00] EX) Month Format(1=12)= [1] 2. Set “YEAR FORMAT”, TIME FORMAT and separator for “DATE”. EX) Year Format (0=2001, 1=01) = [1] EX) Time Format(0~3) = [1] EX) Date Separator = [-]...
-
Page 131: User/ Security Configuration (Menu Code 1850)
3. Set separators for “TIME”, using ASCII code table on page EX) Time Separator = [:] ☞ Please refer to “ASCII Code Table” (chapter 4.4) to input special characters in Date or Time separator. 4. Press “PRINT” key to save it and go out to SCALE CONFIGURATION main menu. - Page 132 EX) NICKNAME =[CHRIS], EX) CLERK PASSWORD =[0117], EX) CLERK LEVEL =[3], EX) USE FOR TRAINING = [N] Note: If you use floating mode, you have to register all clerks. ▶ NEW/EDIT USER in USER’S Security Condition Display Description Clerk No. This value can be from 1 to 99. Clerk Name.
-
Page 133: Change Password (Menu Code 1852)
Therefore default password is 011. • You have to set a level 3 clerk. If there is no level 3 clerk, you can use default password(011) and if any, you cannot use it. Clerk level: This value can be from 0 to 3. This level is related to menu 1855(Config permission). -
Page 134: Delete User (Menu Code 1854)
2.10.5.3 Delete User (Menu code 1854) ( MENU → 8. SCALE CONFIG → 5. User/Security Con. → 4. Delete ) 1. Enter clerk number to delete EX) Delete clerk no. 2 2.10.5.4 Config Permission (Menu code 1855) ( MENU → 8. SCALE CONFIG → 5. User/Security Con. → 5. Config Permission ) Permission level is related to clerk level and if the clerk level is lower than permission level, this clerk cannot access that function. - Page 135 Add up Set a permission level for add-up sales Display Description Return Set a permission level to return item Ovride Set a permission level to override price Cashdw Set a permission level to open cash drawer Menu Set a permission level to go to program menu P.menu Set a permission level to edit PLU Price...
-
Page 136: Clerk Key (Menu Code 1856)
2.10.5.5 Clerk Key ( Menu code 1856 ) ( MENU → 8. SCALE CONFIG → 5. User/Security Con. → 6. Clerk Key ) You can assign Clerk key to clerk. There are 64 Clerk keys and you have to set these keys in menu 1881 (Key define). See chapter 2.14.8. 1. -
Page 137: Display Test (Menu Code 1861)
2.10.6.1 Display Test (Menu code 1861) ( MENU → 8. SCALE CONFIG → 6. Test → 1. Display ) To test the display, press “1” on Test menu screen. It automatically tests it. You can exit from testing, by pressing “X/ESC” key. 2.10.6.2 A/D Test (Menu code 1862) ( MENU →... -
Page 138: Chess Printer Test (Menu Code 1864)
2.10.6.4 Chess Printer Test (Menu code 1864) ( MENU → 8. SCALE CONFIG → 6. Test → 4. Chess Print ) Press “TEST” key to test printing a label. 2.10.6.5 Printer Sensor Test (Menu code 1865) ( MENU → 8. SCALE CONFIG → 6. Test → 5. Printer Sensor ) To test printer sensor, press “5”... -
Page 139: Firmware Version (Menu Code 1867)
▶ Printer Sensor Test Items Test Items Description Peel-off To test that peel-off sensor is properly work. Head-up To test that TPH is opened or not To show real time Gap sensor’s value. Peel To show real time peel off sensor’s value. To show TPH’s temperature value. -
Page 140: Communication (Menu Code 1868)
Menu Sub-menu Setting Value Description 2.10.6.7 Communication (Menu code 1868) ( MENU → 8. SCALE CONFIG → 6. Test → 8. Communication ) You can test communication. 2.10.7 Scale Parameter (Menu code 1870) ( MENU → 8. SCALE CONFIG → 7. Scale Parameter ) You can set scale’s environment as below. - Page 141 1. Display P.SCROL Setting whether scroll message is showed (Menu up or not when PLU is called. code:1871) LABEL Do not use rewind function when you use “X” key in label mode ORIGIN 0: Do not print 1: Print in Name 1 Print origin in commodity line.
-
Page 142: Backup To Usb Memory (Menu Code 1877)
2.10.7.1 Backup to USB Memory (Menu code 1877) ( MENU → 8. SCALE CONFIG → 7. Scale Parameter → 7. Backup to USB Memory ) After connecting to USB, Select Yes or No by using “1” or “0” key. If you press “1” key in “Backup to USB” menu, backup file(*.dat) going to be created in USB. -
Page 143: Function Key Define (Menu Code 1880)
2.10.8 Function Key Define (Menu code 1880) ( MENU → 8. Scale → 8. function Key Define ) Function Key Define 2.10.8.1 (Menu code 1881) ( MENU → 8. SCALE CONFIG → 8. function Key Define → 1. function Key Define ) You can define function keys to Speed keys. - Page 144 [TYPE CHANGE] WT/CT Key [CASHOPEN] Cash Drawer Open Key [GRAND TOTAL] Grand Total Key [ PLU REFERENCE] Reference PLU Key Function Key Define Description [IN WEIGHT] IN Weight Key [LABEL/TICKET] Toggle between the Label and Ticket [DISPLAY RESET] Display refresh [MISC WEIGHT] Misc.
- Page 145 83~90 [LABEL1~8] Label Change Key [EDIT TAX] Tax Change Key [EDIT TRACE] Traceability Change Key 93~124 [CLERK(V33~64)] Clerk key [SCAN CLERK] Select the scan clerk Function Key Define Description [BARCODE] Input barcode number Key [EDIT INGREDIENT] Edit ingredient Key [LARGE MSG CALL] Large Message Call Key [SALE SPECIAL] Change Special Unit Price Key...
- Page 146 0 or 9999 PLU Key...
-
Page 147: Function Key Block (Menu Code 1882)
2.10.8.2 Function Key Block (Menu code 1882) ( MENU → 8. SCALE CONFIG → 8. function Key Define → 2. Function Key Block ) You can block each function keys. (Chapter 1.6 KEY FUNTION) 1. Enter function key Select the function key which you don't want to use. -
Page 148: Report
2.11 Report 2.11.1 Introduction X mode is used to read (i.e. print and display) sales data. The X1 report allow you to print report at any time for either of the reporting period. The time period combination you chose is completely dependent upon how you use Z1 Remember that you can generate as many X reports as you would like because X mode does NOT clear any sales data. -
Page 149: X1 Scale Sales Report (Menu Code 1611/1613)
2.11.4 X1 Scale Sales Report (Menu code 1611) ( MENU → 6. Report → 1. X1 Report → 1. Scale ) If you press “1” key on X1 Report menu screen, scale sales report is shown on the display. To print this report, press “TEST” key. To exit this menu, press the “ESC”... - Page 150 ▶ Sample(Label) - Scale Report ▶ Sample(Ticket) - Scale Report...
-
Page 151: X1 Plu Report (Menu Code 1612/1632)
2.11.5 X1 PLU Report (Menu code 1612) ( MENU → 6. Report → 1. X1 Report → 2. PLU Report ) Press “2” key on X1 Report menu screen. EX) department 1 Enter PLU range to check. EX) PLU 1 ~ 10... - Page 152 PLU sales report is shown on the display by pressing “PRINT” key. To print report, press “TEST” key. To exit this menu, press the “ESC” key. Note: PLU with no sales is not printed.
- Page 153 ▶ Sample(Label) - PLU Report ▶ Sample(Ticket) - PLU Report...
-
Page 154: X1 Miscellaneous Plu Report (Menu Code 1613/1633)
2.11.6 X1 Miscellaneous PLU Report (Menu code 1613) ( MENU → 6. Report → 1. X1 Report → 3. MISC. PLU ) Press “3” key on X1 Report menu screen. Enter the number to check. 0 : Miscellaneous by-Weight 1 : Miscellaneous by-count 2 : Miscellaneous by-pcs Ex) Misc. - Page 155 To print report, press “TEST” key. To exit this menu, press the “ESC” key. Note: Misc. PLU with no sales is not printed. ▶ Sample(Label) - Miscellaneous Report ▶ Sample(Ticket) - Miscellaneous Report...
-
Page 156: X1 Group Report (Menu Code 1614/1644)
2.11.7 X1 Group Report (Menu code 1614) ( MENU → 6. Report → 1. X1 Report → 4. Group ) Press “4” key on X1 Report menu screen. Enter group range to check Ex) Group 0 ~ Group 23 You can see group sales data by pressing “PRINT”... - Page 157 To print report, press the “TEST” key. To exit this menu, press “ESC” key. Note: Misc. If the setting of MENU 1872, “ALL.REP” is “No”, the group with no sales is not printed. But if “Yes”, all group sales data within the range is printed. ▶...
-
Page 158: X1 Department Sales Report (Menu Code 1615/1635)
2.11.8 X1 Department Sales Report (Menu code 1615) ( MENU → 6. Report → 1. X1 Report → 5. Department ) Press “5” key on X1 Report menu screen. Enter department range to check. EX) dept 1 ~ dept 10 You can see department sales data by pressing “PRINT”... - Page 159 To print report, press the “TEST” key. To exit this menu, press “ESC” key. Note: If the setting of MENU 1872, “ALL.REP” is “No”, the department with no sales is not printed. But if ”Yes”, all department sales data within the range is printed. ▶...
-
Page 160: X1 Hourly Sales Report (Menu Code 1616/1636)
2.11.9 X1 Hourly Sales Report (Menu code 1616) ( MENU → 6. Report → 1. X1 Report → 6. Hourly ) Press “6” key on X1 Report menu screen. Enter time to check. EX) AM 9 hour ~ PM 2 hour You can see hourly sales data by pressing “PRINT”... - Page 161 To print report, press “TEST” key. To exit this menu, press “ESC” key Note: If the setting of MENU 1872, “ALL.REP” is No, the hour with no sales is not printed. But if “Yes”, all hour sales data within the range is printed. ▶...
-
Page 163: X1 Clerk Sales Report (Menu Code 1617/1637)
2.11.10 X1 Clerk Sales Report (Menu code 1617) ( MENU → 6. Report → 1. X1 Report → 7. Clerk ) Press “7” key on X1 Report menu screen. Enter clerk range to check. EX) clerk 0 ~ clerk 32 You can see clerk sales data by pressing “PRINT”... - Page 164 To print report, press “TEST” key. To exit this menu, press “ESC” key Note: If the setting of MENU 1872, “ALL.REP” is No, the clerk with no sales is not printed. But if “Yes”, all clerk sales data within the range is printed. ▶...
-
Page 165: Z1 Report (Menu Code 1620/1640)
2.11.11 Z1 Report (Menu code 1620) ( MENU → 6. Report → 2. Z1 Report ) If you select menu code 1620, you will see If you want to print and clear the data, press following screen. TEST key. The scale shows following screen. -
Page 166: Clear All Report (Menu Code 1650)
2.11.12 Clear All Report (Menu code 1650) If you select menu code 1650, you will see To clear all report, press 1 key. If you do not following screen. want to clear, press 0 or ESC key. ( MENU → 6. Report → 5. Clear All ) -
Page 167: Sales Operation
3. SALES OPERATION 3.1 Basic Operation This chapter explains basic operation of scale, such as how to set zero, tare, call up a PLU and override unit price in CL3000 series. ■ Turn ON the scale. The first screen will be seen as below for CL3000 series. 3.2 Zero You can use the ZERO key to correct for a deviation from zero as long as there are no PLUs or MISC PLUs called-up. -
Page 168: Tare
3.3 Tare You can enter tare weights as long as there are no PLUs or MISC PLUs called-up. If you need to temporarily override a PLU s tare weight, you must enter the tare weight first and then call-up that PLU. )There are two ways to enter a tare weight and both ways will only work if there is no PLU or MISC PLU called-up. -
Page 170: How To Clear Tare
3.3.3 How to Clear Tare ① Remove the item from the platter ② Press “TARE” key again. 3.3.4 Preset Tare ① Call up a PLU including tare (weight of container). EX) PLU #3 s tare =150 g ② Clear PLU#3, then tare is also automatically cleared. -
Page 171: Successive Tare
3.3.5 Successive Tare ① Enter tare (weight of container) using ② Enter the weight of container using numeric keys. numeric keys. EX) 150 g EX) 150 g ③ Press “TARE key after removing item and container from the platter. Note: Parameter 605 “Accumulation Tare” and parameter 606 “Subtraction Tare”... -
Page 172: Calling Up A Plu
3.4 Calling Up a PLU There are two ways to call up a PLU by using numeric key and preset key(speed key). 3.4.1 Using Numeric Key ① Enter PLU number by using numeric keys and press “PLU” key. EX) PLU No. 15 Note: Even though you do not press PLU key after entering a PLU number, PLU will be displayed depending on the setting time. -
Page 173: Override (For Key)
3.5 Override (FOR key) The OVERRIDE key is used to temporarily change the pricing of priced PLUs. If you set program menu 1873(“UPRICE”), changed priced is saved after printing a label. 3.5.1 By-Weight PLU - PLU# 1.MEAT (PLU Type : By weight, Unit Price : 1.99$). ①... -
Page 174: By-Count Plu
3.5.2 By-Count PLU ① Enter QUANTITY and press - PLU# 2.APPLE (PLU Type: By count, Unit Price: 1.00$). OVERRIDE key ③ Press PRINT key to print label. ② Enter new unit price. -
Page 175: By-Pcs Plu
3.5.3 By-PCS PLU - PLU# 3.Eggs (PLU Type: By PCS, Pieces: 3, Unit Price: 30.00$). ① Press OVERRIDE key and enter ② Press FOR key and enter QUANTITY new unit price ③ Press FOR key and enter PIECES ④ Press PRINT key to print label. -
Page 176: Sales Operation
Note: - If you set program menu 1873(“UPRICE”), changed priced is saved after printing a label. - Discount function is not available when you use OVERRIDE key. 3.6 Sales Operation 3.6.1 Weighed Item Operation EXAMPLE: - PLU No : 29, PLU Name: ONION, PLU type : by weight, Unit Price : 1.50$, - Sales Weight =1.0 kg ①... -
Page 177: By Count Item
④ Remove the item(s) from the platter. * Total Price= Sales weight X Unit price Note: - In “SAVE” & “Prepack” mode the PLU is not automatically cleared when you remove the item from the platter. - If you set CLRPLU” to “Y” in Menu 1873, PLU is cleared even though you do not remove the item from the platter. -
Page 178: By Pcs Item
User may call up a PLU by pressing speed key or numeric key. Please refer to chapter 3.4 for details. ③ Press “PRINT” key to print a label and complete current transaction. This transaction(s) is saved in the sales record. * Total Price= Piece(s) X Unit price Note: - In “SAVE”... - Page 179 Note: - In “SAVE” & “Prepack” mode the PLU is not automatically cleared when you remove the item from the platter.
-
Page 180: Discount
3.7 Discount Before using discount function, you have to set discount data in menu 1130 of program mode. Discount is different depending on PLU type. (For details, see chapter 2.4.1) 3.7.1 Unit Price Discount - By Weight PLU EXAMPLE: - PLU# 29=KIWI (By-Weight PLU), Unit price=20.00 ①... - Page 181 ⑤ Press the PRINT key. Note: - You can set four markdown information in menu 1720 of program mode.(See chapter 2.13.3) 3.7.2 % Unit Price Discount - By Weight PLU EXAMPLE: - PLU# 29=ORANGE (By-Weight PLU), Unit price=20.00 • 1st Target of Discount: “10 % off from unit price” for sales weight 0.500 kg. •...
- Page 183 ③ Place items on the platter. In this case, the weight of items(0.526 kg) is greater than 1st target(0.500 kg) therefore you can have 10% discount. (Total price is 9.47) ④ Place items on the platter. In this case, the weight of items(1.076 kg) is greater than 2nd target(1.000 kg) therefore you can have 20% discount.
-
Page 184: Unit Price Discount - By Pcs Plu
3.7.3 Unit Price Discount - By PCS PLU EXAMPLE 2: - PLU# 30=PREMIUM MANGO, 3 pieces FOR 6.00 • 1st Target of Discount: “Discount amount from unit price”=0.20 for sales 5 pieces. • 2nd Target of Discount: “Discount amount from unit price”=0.50 for sales 10 pieces. -
Page 185: Add-Up Transaction
3.8 Add-Up Transaction If you press the ADD key instead of the PRINT key, you will initiate the ADD-UP process. You can ADD-UP 399 items maximum. EXAMPLE 2: - PLU# 32=SIRLOIN, PLU Type = By-Weight, Unit Price=20.00, - PLU# 35=T-bone steak, PLU Type = By-PCS, Pieces=3, Unit Price=6.00 ①... - Page 186 ⑤ You can repeat the ADD-UP process ⑥ To complete the sale, press the PRINT key. up to 399 times or you can press the ST/TTL (To repeat the ADD-UP process, press the ESC key at anytime to see the grand-total. key.) Note: - You can press the VOID key to undo the transaction.
-
Page 187: Clerk Operation
3.9 Clerk Operation There are three clerk modes as below. ▶ Clerk Modes ☞ To register clerk, refer to menu code 1850 of program mode. (See chapter 2.14.5) Assumption - Clerk should be registered on menu 1850. (See chapter 2.14.5) - Clerk number should be set on menu 1856 to use “V1~ V64”... -
Page 188: Standard Clerk Operation
- When there is no PLU, you can print ticket again by pressing X key (It depends on the setting of parameter 599, Print last ticket) 3.9.1 Standard Clerk Operation Assumption - You have to set “S.MODE” to “2” (Standard Clerk) in menu 1820 of program mode. (See chapter 2.14.3) EXAMPLE 2: Clerk No: 2, Clerk Name: Christine, Clerk Key: V1... -
Page 190: Floating Clerk Operations
⑤ Press the PRINT key to complete transaction. If you are in ADD-UP mode, you can have label for grand total price. Note: - If you are in ADD-UP mode, you can have label for grand total price by pressing PRINT key. When you turn on the scale, this function is not active so you have to press ADD key. - Page 191 ③ Call up a PLU #2. ④ Place an item on the platter and press the V1 key. This transaction is saved to memory. ⑤ Press the PRINT key to complete transaction. Grand total price label is printed and sales data is cleared in memory.
-
Page 192: Void
3.10 Void You can press the VOID key to undo transaction in add-up process or floating clerk operation. ① Press the VOID key, you will see ② To void Kiwi, press the VOID key. following screen. Assumption) You sold several items ◆... - Page 193 * If price is not same, void list screen is shown on the display automatically.
-
Page 194: Payment & Chance
3.11 Payment & Change ▶Payment You can use PAY key in the add-up process or floating clerk operation. EX) Total price : 15.00 $ ① Press PAY key when there is subtotal ② Press Page down key and select payment price type(Coupon) If customer give coupon 6.00 $ and cash 9.00 $ to clerk... - Page 195 ③ Enter 6.00 ④ Press PRINT key then you can select payment type again. ⑤ Select Payment type (Cash) ⑥ Press PRINT key. The label is issued * Total price, receive and change is printed. Note: - You can set print item in menu 1760 of program mode. (See chapter 2.13.6) - If there is credit sales, a receipt is printed additionally.
-
Page 196: Return
3.12 Return The RETURN key is used to delete erroneous sale transactions. You can use the RETURN key to undo erroneous sales transactions like pressing the PRINT key inadvertently, selecting and printing the wrong PLU, an inadvertent Auto-Print in Pre-Pack mode, or perhaps adjusting the sales totals for a damaged or ruined package. -
Page 197: Prepack Key
3.13 Prepack Key Pre-Pack mode, it prints labels automatically. When it is in MANUAL mode, you must press the PRINT key (or ADD key) to get a label. In Pre-Pack mode, you can not select AUTO mode. Pre-Pack works like AUTO and SAVE mode except that the weight does not need to return to zero for every auto-print. - Page 198 ① Press PREPACK key and call up a PLU ② Place the item(s) on the platter. * User may call up a PLU by pressing speed key or numeric key. Please refer to Menu code 1160. ③ Label is issued automatically. ④...
-
Page 199: Key
3.14 X Key The X key is used to print multiple transactions for the same PLU. The X key operation is called the Multi-Label function. 3.14.1 By-Weight PLU Note: If you want to use X key for by-weight PLU, you must set Parameter 582, Use “X”... -
Page 201: Non-Weighed Plu
④ Remove the item(s) from the platter. Note: - If you set “LABEL” to “Y” in menu 1872 of program mode, the scale does not check peel-off, so you have to press FEED key after printing is done. (See chapter 2.14.21) - If parameter 551, “Use double print(auto)“... -
Page 202: How To Change Sell By Date/Time
① Call up a PLU ② Press EDIT SELL key to enter both of effective date and time. 3.15 How to Change Sell By Date/Time ③ Press PRINT key to complete saving. Note: - To use EDIT SELL key, you have to set this key in menu 1880 of program mode. -
Page 203: How To Change Origin
3.16 How to Change Origin ① Call up a PLU ② Press ORIGIN key to retrieve one of origin data saved. Note: - To use ORIGIN key, you have to set this key in menu 1880 of program mode. (See chapter 2.14.8) 3.17 How to Change PLU Type Note: If you set “TYPE”... -
Page 204: Direct Discount
3.18 Direct Discount If there is no discount information in PLU, you can use this function. ① Call up a PLU # 1 and press ② Press “Override Key” “Fixed Price” key. 3.18.1 Fixed Price Key ③ Type fixed price 2.00 than press PRINT key Note: - To use Fixed Price Key, you have to set this key in menu 1880 of program mode. -
Page 205: Discount Price Key
3.18.2 % Discount Price Key ② Press “%Discount” key and enter ① Call up a PLU(#1.APPLE). % amount to discount. Ex) 20% ③ Press PRINT key. ④ Place item on the platter and press PRINT key. Note: - To use % DISCOUNT key, you have to set this key in menu 1880 of program mode. -
Page 206: Plu Connection
3.19 PLU Connection 3.19.1 Referenced PLU Function If you press REFERENCE key(Functions key#:9) after calling up a PLU which has reference information, reference will be shown on the display. ◆ To use this function, you have to set reference department and reference PLU when you create PLU. -
Page 207: Appendix
- You have to set Parameter 597(Prepack report) to use this function. Also, Parameter 596 should be set to Y APPENDIX 1. Label Format There are fixed label format and user label format Fixed Label Format User Label Format 1~50 51~99 Quantity Method... - Page 208 1.1 Label Format Sample...
- Page 213 1.2 Label Format’s field Sample ▶ (1) Label sample 1 ▶ (2) Label sample 2...
-
Page 214: Ascii Code Table
2. ASCII Code Table ▶ Microsoft Window Codepage 1252 Note: To enter A , first you have to read 40 in a row and 01 in a column and type 41. -
Page 215: Window Character Set Information
3. Window Character Set Information... -
Page 216: Error Message
4. Error Message Critical Error Message Message Display Description Solution CODE 01, 02 : ADM communi c ati o n error ADM NOT IN 7-SEG CODE 03 : ADM i n i t i a l i zati o n error Inquire of A/S center CODE CODE 04 : ADM setting val u e error... - Page 217 Error Message Message Display Description Solution Try again after the setting i s changed in Menu 1913(IP) as follows When wireless network setting i s not properl y executed IP : [010.010.003.033] Set Err CHAR upon using new network card G/W : [010.010.000.001] SMASK [255.255.000.000]...
- Page 218 Can't Del 1 CHAR Menu 1213, Department No.1 cannot be deleted. Changed to label mode CHG to LABEL CHAR When changed to Label Mode using TICKET / LABEL key Changed to ticket mode CHG to TICKE CHAR When changed to TICKET Mode usi n g TICKET / LABEL key Check minimum Weight Check Min WT CHAR...
- Page 219 MAX TRNASACTION IS 50! MAX is 50! CHAR Message appearing when the maxi m um number of sold uni t s per Clerk exceeds 50ea Memory full CHAR Message appearing as no sales occur when the buffer i s fi l l e d up with data Negative ON CHAR When Negative sales are executed Negative PLU...
- Page 220 Override Err CHAR Override n Overri d e not allowed when two types of Override error., Weight Uni t are used When pri n ting i s attempted under the condi t i o n with printer Head being open -> Close Open TPH CHAR Head of the printer...
- Page 221 When USB memory i s not connected . BACKUP FAIL! CHAR Check USB memory connection status, When USB Memory i s not connected. UPDATE FAIL! CHAR When backup fi l e does not exist i n the USB memory . Check memory connection status or file status i n USB memory .
- Page 222 MEMO...
- Page 223 MEMO...
- Page 224 MEMO...
- Page 225 뒷표지...
Need help?
Do you have a question about the CL-3000 Series and is the answer not in the manual?
Questions and answers
На ленте при печати маркировки выходит черная полоса
A black stripe on the label when printing with the CAS CL-3000 Series may occur if the "Label Paper" setting is incorrect. If the label has a gap, "Label Paper" should be set to 1; if it does not have a gap, it should be set to 0. Incorrect settings can cause improper label detection, leading to printing issues like black stripes. Also, settings like print intensity and feed length may affect print quality.
This answer is automatically generated