
Related Manuals for Plextor PX-W4012TSe


Summary of Contents for Plextor PX-W4012TSe
- Page 1 Models: PX-W4012TS (Internal) PX-W4012TSe (External) INSTALLATION AND USERS MANUAL SCSI CD-R/CD-RW DRIVE APRIL 2003...
-
Page 2: Record Your Serial Number
Manual copyright ©2003 Plext Licenses and Trademarks Plextor and the Plextor logo are registered trademarks of Plextor Corp; and PlexWriter, PoweRec is a trademark of Plextor Corp. Other brands and products are trademarks of their respective holders. Record Your Serial Number For future reference, record the serial number and the TLA code (found on your drive’s label) in the space provided below. - Page 3 FCC NOTICE This equipment has been tested and found to comply with the limits for a Subpart B digital device, pursuant to Part 15 of the FCC Rules. These limits are designed to provide reasonable protection against harmful interference in a residential installation. This equipment generates, uses, and can radiate radio frequency energy, and, if not installed and used in accordance with the instructions, may cause harmful interference to radio communications.
- Page 4 VORSICHT: DIE TRENNUNG VOM NETZ ERFOLGT DURCH ZIEHEN DES NETZSTECKERS. Zur Einhaltung der Funk-Entstörung von nicht selbständig betreibbaren Hochfrequenzgeräten (periphere Anlagenkomponenten). Dieses Gerät entspricht als Einzelgerät den Funk-Entstöranforderungen der Postverfügung Nr. 243/1991. Wird das Gerät innerhalb einer Anlage zusammen mit anderen Geräten betrieben, so muss bei Inanspruchnahme der “Allgemeinen (Betriebs-) genehmigung”...
-
Page 5: Table Of Contents
Table of Contents 1. Getting Started ... 1 About this Manual... 1 Meet Your PlexWriter 40/12/40S ... 1 What the PlexWriter 40/12/40S Does ... 1 Features of the PlexWriter 40/12/40S ... 2 Minimum Configuration to Use the PlexWriter 40/12/40S ... 2 What You Can Do with the PlexWriter 40/12/40S ... - Page 6 Performing the Self-Test on an External Drive ... 38 After the Self-Test... 40 Appendix A: PlexWriter Specifications... 41 Appendix B: Technical Support... 47 How to Contact Plextor Technical Support... 47 Before You E-mail/Log On/FAX/Call ... 48 Returns ... 48 Contacting Plextor’s RMA Department ... 49 Packing Your Drive...
-
Page 7: Getting Started
Please read this manual carefully and keep it handy for easy reference. Use the manual for installation, operation and troubleshooting. See your dealer or call Plextor’s Technical Support Department if your drive needs service. And if you run into a problem that doesn't seem to be covered, please contact us. (See “Appendix B: Technical Support”... -
Page 8: Features Of The Plexwriter 40/12/40S
• Plug and Play: Supports Windows Plug and Play. • Flash memory: Allows upgrading the PlexWriter to the latest firmware revision (available from the Plextor web site) without opening the computer or physically accessing the drive. • OPC and ROPC: Optimum Power Control and Running Optimum Power Control, which adjust the laser power for the optimum write strategy. -
Page 9: What You Can Do With The Plexwriter 40/12/40S
• Master new software programs on CD. What's in the Box What you find in your Plextor box depends on what the company that sold you the box put in—or took out—while the Plextor drive was in their possession. NOTE: This applies to the Plextor retail box. Your box’s contents may be different. -
Page 10: Plexwriter Drive Features And Controls
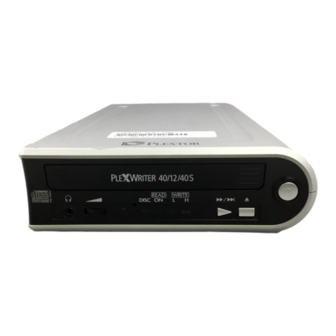
Section 1. Getting Started PlexWriter Drive Features and Controls Use these illustrations to become familiar with your drive’s controls and features. Front Panel—Internal SCSI Drive Figure 1: Front Panel of the PlexWriter 40/12/40S Internal Drive Front Panel—External SCSI Drive Figure 2: Front Panel of the PlexWriter 40/12/40S External Drive PlexWriter 40/12/40S Installation and Users Manual... - Page 11 • Tray front door: Attached to tray drawer. • Emergency eject hole: Insert emergency eject tool, paper clip, or other thin, rigid object to eject tray if automatic eject button does not work. Turn OFF power before using this feature. •...
-
Page 12: Rear Panel-Internal Scsi Drive
Section 1. Getting Started Rear Panel—Internal SCSI Drive Figure 3: Rear Panel of the PlexWriter 40/12/40S Internal Drive • Audio output connector: Outputs stereo analog signal. Use to connect to sound board or audio amplifier. Use standard MPC-3 type, 4-pin connector. •... -
Page 13: Rear Panel-External Scsi Drive
Rear Panel—External SCSI Drive Figure 4: Rear Panel of the PlexWriter 40/12/40S External SCSI Drive • AC power input: Use the power cord supplied with your drive. • SCSI ID dial: Use this dial to designate SCSI ID numbers. Rotate the dial to change the number. -
Page 14: About Software
A list of various software packages that you can use with your Plextor drive can be found in the Support/Compatibility section of www.plextor.com. -
Page 15: Installing Your Plexwriter
PCI slot in your computer. (Consult your board vendor’s installation instructions.) 5. If you have an internal model Plextor drive, mount the drive in an available bay inside the computer system. 6. Make all necessary cabling connections: SCSI cable, power cable, and audio cable. -
Page 16: Set Scsi Drive Jumpers
SCSI peripherals. To provide this flexibility, Plextor lets you specify the drive’s settings before it is installed. On an internal SCSI drive, you... - Page 17 SCSI ID. Leave it set to the original factory setting of 4. • You have a SCAM-compliant SCSI interface board: Your Plextor drive is also SCAM-compliant, so if you have Windows 95, 98, 2000, Me, or XP, you don’t have to worry about setting SCSI ID numbers.
-
Page 18: Do I Have To Change My Plexwriter's Scsi Termination Setting
Section 2. Installing Your PlexWriter Do I Have to Change My PlexWriter’s SCSI Termination Setting? The PlexWriter is shipped from the factory with its SCSI termination set ON. You can leave the PlexWriter’s SCSI termination setting to ON if: • Your PlexWriter drive is the only SCSI peripheral: In this case, don’t change the SCSI termination setting. -
Page 19: Do I Have To Change Other Plexwriter Scsi Settings
(This should not be confused with termination itself.) Termination power must be provided by at least one device attached to your SCSI interface board. Your Plextor drive automatically supplies termination power. Any additional devices supplying termination power will not cause any problems. -
Page 20: Setting Jumpers On A Plexwriter Internal Scsi Drive
Section 2. Installing Your PlexWriter Setting Jumpers on a PlexWriter Internal SCSI Drive Use this procedure to set jumpers on your PlexWriter internal SCSI drive. (However, if you already have a SCSI interface board installed, an internal PlexWriter is the only SCSI peripheral you will use with your computer, and you do not need to change any settings, skip now to “Install a PlexWriter Internal SCSI Drive”... - Page 21 To add a jumper, push it onto the jumper pins. In addition to the three jumpers already installed at the factory, extra jumpers are supplied with the PlexWriter drive. CAUTION: Install jumpers across each pin as shown (vertically). Do not install the jumpers lengthwise (horizontally).
- Page 22 Section 2. Installing Your PlexWriter Figure 8: Using the Termination Jumper If your drive is already installed in your computer, be sure to turn off your computer before removing (or reinstalling) the jumpers. We recommend that you retain the jumpers so you can reinsert them onto the termination pins if you later need to turn the drive’s SCSI termination ON.
-
Page 23: Setting Switches On A Plexwriter External Scsi Drive
Section 2. Installing Your PlexWriter Setting Switches on a PlexWriter External SCSI Drive Use this procedure if you have a PlexWriter external SCSI drive. (However, if you already have a SCSI board installed, an external PlexWriter is the only SCSI peripheral you will use with your computer, and you do not need to change any settings, skip now to “Install a PlexWriter External SCSI Drive”... -
Page 24: Install A Plexwriter Internal Scsi Drive
You can mount your internal PlexWriter drive in any available bay. You must remove the small panel that covers the bay that you want to use. CAUTION: Install your PlexWriter so it is oriented horizontally. Plextor does not recommend installing the drive so it is mounted vertically. - Page 25 There are also two optional cable connections: • A cable connection if you are using a sound board in your computer and plan to connect the PlexWriter’s audio output to the audio connector on the sound board. • A cable connection if the sound board is equipped with SPDIF and you wish to use the SPDIF digital audio output from your PlexWriter.
- Page 26 Section 2. Installing Your PlexWriter To mount the PlexWriter internal SCSI drive: 1. Make sure the power to your computer and any external peripherals is OFF and your computer is UNPLUGGED from its power source. 2. If you haven’t already removed your computer’s cover, remove it now, following the directions provided by your computer’s manufacturer.
- Page 27 Go to step 6. NOTE: Plextor does not provide rails. If you need rails, you can obtain them from the computer manufacturer or from a computer supply retail or mail-order store. Most rail kits are specific to a particular type of PC case.
- Page 28 Section 2. Installing Your PlexWriter 6. Now plug in the SCSI cable. If this is a new installation and your PlexWriter drive is the only SCSI peripheral, plug one end of the SCSI cable into the SCSI connector on the rear panel of the drive.
- Page 29 Figure 15 shows how the optional SPDIF cable is connected to the jumper panel. (The SPDIF cable is not supplied by Plextor.) Figure 15: Installing the Optional SPDIF Cable 11.
-
Page 30: Install A Plexwriter External Scsi Drive
Use only these screws. CAUTION: Do not mount your drive in your computer using screws other than those supplied by Plextor. You may damage the drive if you insert screws that are too long. Install a PlexWriter External SCSI Drive... -
Page 31: Connect A Single External Scsi Drive
Section 2. Installing Your PlexWriter Connect a Single External SCSI Drive If you are installing a single PlexWriter external SCSI drive, connect it as shown in Figure 17. Figure 17: Connecting a Single PlexWriter External SCSI Drive to a PC PlexWriter 40/12/40S Installation and Users Manual... -
Page 32: Connect Multiple External Scsi Drives
Section 2. Installing Your PlexWriter Connect Multiple External SCSI Drives If you are installing more than one PlexWriter external SCSI drive (or one PlexWriter and other external SCSI peripherals), connect them as shown in Figure 18. Figure 18: Connecting Multiple External SCSI Drives or Peripherals NOTE: Performance of SCSI devices may suffer if the total cable length in the SCSI chain exceeds 3 meters. -
Page 33: Starting An External Plexwriter
NOTE: Plextor strongly suggests you not use the SCSI connection on your sound board to control your PlexWriter. You may not be able to utilize high speed recording (40X) due to the performance of the board. -
Page 34: What Else Do I Need
Recording Software In order to use your Plextor drive to record on CD-R or CD-RW media, you’ll need to have mastering, packet writing, or duplication software installed on your computer system. If you purchased a retail kit from Plextor, you’ll get software packages that include this software. -
Page 35: Using Your Plexwriter
CD-R media that is rated for lower speeds. See “Recommended Media” on page 41 for a list of Plextor-approved media at the time this manual was printed, and see the Plextor web site at http://www.plextor.com for an updated list. -
Page 36: Tray Loading And Operation
Section 3. Using Your PlexWriter Tray Loading and Operation To load and unload the tray: 1. While the PlexWriter drive is powered up, push the stop/eject button on the front panel. The tray drawer slides out in 3–4 seconds. Figure 20: Loading the Tray 2. -
Page 37: Cleaning Discs
Cleaning Discs For proper read and write performance, your CD-R, CD-RW, and CD-ROM discs must be clean. Trying to record on a dirty disc may result in a failed session and ruin the disc. To clean the disc, wipe the disc using a clean, soft cotton cloth to remove surface dirt such as fingerprints. -
Page 38: Advantages Of Burn-Proof Technology
Advantages of VariRec Technology This drive is equipped with VariRec (Variable Recording) technology, a feature offered by Plextor that allows you to manually adjust the drive's laser power during the audio recording process. NOTE: In order for you to actually perform the adjustment, VariRec must be supported by the recording software you’re using. -
Page 39: Changing The Varirec Setting
3. When you insert a recordable disc into your drive, Plextor’s PoweRec technology automatically identifies the manufacturer, model, and special features of the media, then adjusts the laser power and writing speed so they’re at the optimum settings for that disc. - Page 40 Section 3. Using Your PlexWriter This page intentionally left blank. PlexWriter 40/12/40S Installation and Users Manual...
-
Page 41: Maintenance And Troubleshooting
PlexWriter drive. However, we advise that our customers always update drives with the latest available firmware. Before troubleshooting a possible problem with your drive please make sure to visit our web site at www.plextor.com to check if you have the latest firmware. -
Page 42: Using The Self-Test Diagnostics
• Tools to remove the computer’s cover • The spare jumpers shipped with your drive • A blank piece of Plextor-recommended CD-R media for the CD write/read test. (See “Recommended Media” on page 41, or visit our web site.) To perform the CD write/read test: 1. - Page 43 The tray ejects, the ON indicator is illuminated, and the WRITE H and WRITE L indicators blink alternately. 9. Insert a blank Plextor-recommended CD-R disc and press the stop/eject button to load the disc. Be sure to use only CD-R media of the type recommended by Plextor.
-
Page 44: Performing The Self-Test On An External Drive
This procedure details how to perform a self-test procedure on an external drive. What you’ll need: To perform the test you’ll need: • A blank piece of Plextor-recommended CD-R media for the CD write/read test. (See “Recommended Media” on page 41, or visit our web site.) To perform the CD write/read test: 1. - Page 45 ON indicator is illuminated, and the WRITE H and WRITE L indicators blink alternately. 7. Insert a blank Plextor-recommended CD-R disc and press the stop/eject button to load the disc. Be sure to use only CD-R media of the type recommended by Plextor.
-
Page 46: After The Self-Test
If you discover a problem with the PlexWriter drive, do not attempt to service the drive yourself. Contact us to get an RMA number and take steps to return the drive to Plextor. See page 48 for details. PlexWriter 40/12/40S Installation and Users Manual... -
Page 47: Appendix A: Plexwriter Specifications
(Verbatim), or Maxell. (With PoweRec, some discs may be recorded at 16X because of lower quality media.) NOTE: For the latest updated list of certified 40X media, see Plextor’s web site at: http://www.plextor.com CD-R: 32X Ricoh, Maxell, Taiyo Yuden, Mitsubishi Chemical (Verbatim) - Page 48 Appendix A: PlexWriter Specifications Usable Formats Logical CD Read/Write CD-DA, CD-Extra, CD-ROM Mode-1, Mix CD, CD-ROM XA, Photo-CD, Video-CD, CD-I, Multisession, CD TEXT, CD+G, UDF, MRW Write Methods TAO, DAO, Packet Write (variable and fixed), Multi- session, SAO Performance Specifications Read Speed, CD Speed Mode-1...
- Page 49 Front Panel Eject Methods Stop/eject button; manual emergency eject; software eject LED Indicators DISC indicator: Green: Disc load ON/READ indicator: Green: Power on Blinking green: Data access. Green during writing: BURN-Proof is active WRITE L indicator: Amber: Recording CD-R discs at 1X-24X speed, or CD-RW at 4X-10X speed WRITE H indicator: Amber: Recording CD-R discs at 32X or 40X speed, or...
- Page 50 Appendix A: PlexWriter Specifications Rear Panel—Internal Drive Power Supply Input Voltage: AC 100-240V (50/60Hz) AC 100V: Typically 15W during writing, 15W during reading. Peak (OPC and spinup) 27W. AC 240V: Typically 16W during writing, 16W during reading. Peak (OPC and spinup) 28W. Interface Connector SCSI bus, 50-pin flat ribbon type Audio Connector...
- Page 51 DIP switch to the “on” position SCAM SCAM Level-1 SCSI command Refer to Plextor SCSI command manual Inquiry string PLEXTOR sp CD-R sp sp sp PX-W4012S (where “sp” equals one space) Environmental Conditions Operating Temperature 5 to 35 degrees Celsius Performance Guarantee...
- Page 52 Appendix A: PlexWriter Specifications Dimensions and Weight Dimensions (W/H/D) Internal SCSI drive: 5.75" x 1.63" x 7.95" (excluding front panel) 146 mm x 41.3 mm x 202 mm External SCSI drive: 7.13” x 2.34” x 12.15” (181 mm x 59.4 mm x 308.5 mm) Weight Internal SCSI drive: 2.5 lbs.
-
Page 53: Appendix B: Technical Support
Appendix B: Technical Support Store Plextor’s e-mail, web site, phone, and fax numbers in a convenient location. Keep your drive’s serial number and a copy of your sales receipt handy as well. If you experience a problem while installing or operating your PlexWriter drive, please refer first to the relevant sections of this manual regarding setup and installation (Chapters 1–3). -
Page 54: Before You E-Mail/Log On/Fax/Call
CD-ROM that contains the device drivers.) Returns In the unlikely event that you need to return a drive to Plextor, you need an RMA (Returned Materials Authorization) number. You need this number before any Plextor drive can be returned for repair or replacement. Here’s how you get an RMA number and return your drive: 1. -
Page 55: Contacting Plextor's Rma Department
3. Plextor then returns the RMA form to you via e-mail, with the RMA number and shipping information included. 4. When you receive the RMA number, pack the Plextor drive securely in a box, and include the RMA form as a packing slip. - Page 56 Appendix B: Technical Support This page intentionally left blank. PlexWriter 40/12/40S Installation and Users Manual...
-
Page 57: Appendix C: Warranty
In the event this product is found to be defective within the warranty period, PLEXTOR will, at its option, repair or replace the defective unit. -
Page 58: If You're Outside The U.s. Or Canada
Appendix C: Warranty If You’re Outside the U.S. or Canada Note that the warranty and RMA policy only apply to the United States and Canada. If you are in South America, contact your dealer or reseller for all warranty and RMA claims. -
Page 59: Index
AC power input · 7 access time · 42 audio cable · 27 connecting to external drive · 28 audio cable connection · 23 audio output connector · 6, 7, 44 audio, playing · 5 blink rate · 31, 43 BLOCK external drive switch setting ·... - Page 60 Index firmware · 32 obtaining · 35 upgrading · 2, 35 flash memory · 2 formats · 42 front-panel controls · 4, 43 external drive · 4 hard disk size · 2, 41 headphone jack · 5, 43 headphone volume control · 43 high speed CD-RW media ·...
- Page 61 rails, mounting · 21 RAM, minimum · 2, 41 read formats · 2, 42 read specification · 42 reading speed · 1, 42 rear panel controls external drive · 7 rear-panel connectors and jumpers · 6, 44 recording · 5, 31, 43 software for ·...
- Page 62 Index tech support ticket number · 48 technical support · 47 temperature specification · 45 TERM external drive switch setting · 7 internal drive jumper setting · 6 setting · 13 termination · 45 setting · 12, 13 termination power · 13 TEST ·...
- Page 63 Notes PlexWriter 40/12/40S Installation and Users Manual...
- Page 64 LEXTOR 48383 Fremont Blvd. Suite 120 Fremont CA 94538-6509 www.plextor.com Phone: 510-440-2000 800-886-3935 Fax: 510-651-9755 E-mail: info@plextor.com...
Need help?
Do you have a question about the PX-W4012TSe and is the answer not in the manual?
Questions and answers