Midea i5C User Manual
Robot vacuum cleaner
Hide thumbs
Also See for i5C:
- Manual (76 pages) ,
- User manual (30 pages) ,
- Instruction manual (16 pages)
Table of Contents
Advertisement
Available languages
Available languages
Quick Links
MSmartHome
Download the app
& activate product
Warning notices: Before using this product, please read this manual carefully and keep it for future reference.
The design and specifications are subject to change without prior notice for product improvement.
Consult with your dealer or manufacturer for details.
The diagram above is just for reference. Please take the appearance of the actual product as the standard.
Robot Vacuum Cleaner
USER MANUAL
i5C
Advertisement
Table of Contents

Subscribe to Our Youtube Channel
Related Manuals for Midea i5C


Summary of Contents for Midea i5C
- Page 1 Robot Vacuum Cleaner USER MANUAL MSmartHome Download the app & activate product Warning notices: Before using this product, please read this manual carefully and keep it for future reference. The design and specifications are subject to change without prior notice for product improvement. Consult with your dealer or manufacturer for details.
-
Page 2: Table Of Contents
THANK YOU LETTER Warning for the machine Thank you for choosing Midea! Before using your new Midea product, please read this manual thoroughly to ensure that you know how to operate the features and This appliance can be used by children aged from 8 years and above and persons... - Page 3 [symbol ISO 7000-0790 read operator's manual Docking base is only applicable to the product i5C. (Battery pack type : Li-ion, DC ( 2004-01 )] 14.4 V, 2600 mAh) The Docking base will automatically start charging after Robot Vacuum Cleaner...
-
Page 4: Specifications
Add.: No.39 Caohu Avenue, Xiangcheng Economic Development Zone, unit and keep them in the immediate vicinity of the installation site or unit for later use! Suzhou, Jiangsu, China IMPORTATORE:Midea Italia S.r.l. a socio unico Add.: Viale Luigi Bodio 29/37 20158 Milano (MI) Italia... -
Page 5: Product Overview
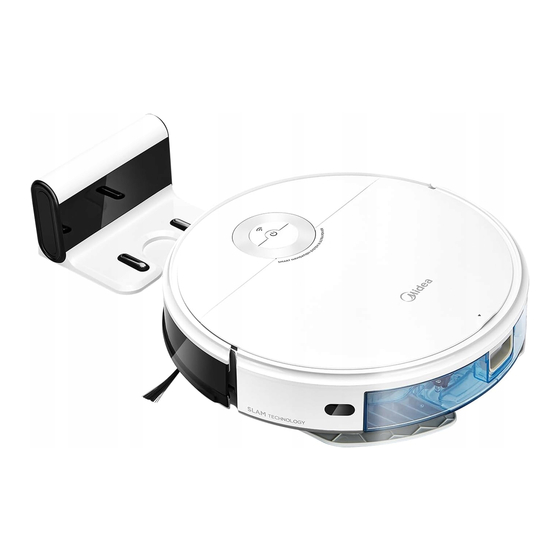
PRODUCT OVERVIEW Accessories Product Charging Base x1 Side Brush x4 Mop Cloth Holder x1 Bumper Start/Pause Cover Water Tank Release Button Power Cable x1 Filter x1 Mop Cloth x2 Water Tank Power Switch Dustbin Cleaning Brush x1 Remote Controller x1 Battery x2 Main Wheel Cover Plate of... -
Page 6: Quick Start Guide
QUICK START GUIDE APP & Voice Control First Use Step 1 Step 2 Wireless network MSmartHome Step 3 Step 4 Open the cover and slide power switch to Before first use, we recommend you turn on the robot. charge the robot for at least 6 hours. Press and hold for App connection. -
Page 7: Product Installation 1
PRODUCT INSTALLATION Installation of Charging Base Applicable to Google Assistant & Amazon Alexa: Make sure the power cable is connected into the charging base. Place the charging base flat against a wall and make sure there leaves enough space to the base, as shown in the figure below. Skill Name for Google Assistant Skill Name for Amazon Alexa Ensure the charging base is connected to a power supply. -
Page 8: Operation Instructions 1
OPERATION INSTRUCTIONS Remote Controller Function of Buttons NOTE Remote controller will work when within 16 feet of the robot. Recharging Direction Start/Pause Edge cleaning Start/Pause Spot cleaning Zig-zag cleaning Suction increase Power switch Suction decrease (under the cover) Direction Manually control the direction of the robot (forward, left, and right). Note that the robot does not vacuum when in manual mode. - Page 9 Charging Robot Vacuum Cleaning Open the cover and slide power switch to “I” position to turn on the robot. Please clean up the wires and sundries scattered on the ground and remove precious, fragile and dangerous items that are easy to fall before cleaning. Place the robot on the charging base to start charging.
-
Page 10: App Setup And Operation 1
Add your robot vacuum to your app. Press the “ + ” button on the main screen of the app and select i5C from the available list of products. Connect your robot to your wireless network. After assembling and powering on the robot, press and hold the “... -
Page 11: Cleaning And Maintenance 1
CLEANING AND MAINTENANCE Cleaning the Side Brush Pull to remove the side brushes. Remove any tangled hair, debris, and then reinstall them. Cleaning the Main Brush It is recommended to clean the side brushes every week and replace them every 6-12 months. With the vacuum turned upside down, place your thumb in the open slot between the Use the cleaning brush or scissors to clean the tangled hair or threads. - Page 12 The filter is on the side of the dustbin. Reinsert the dustbin back in Wipe dry the water tank. Exposure to sunlight is not recommended. Remove debris by tapping the filter the robot. against your garbage bin. It is recommended to clean the You can clean the filter with water, filter element every week and but remember to dry it...
-
Page 13: Troubleshooting
TROUBLESHOOTING Problem Possible reason Solution The ground is slippery. If the floor is waxed, dry it ● before use. Operation of your appliance can lead to errors and malfunctions. The following tables The appliance has contain possible causes and notes for resolving an error message or malfunction. It is missed sweeps, Wires, shoes and other Minimize ground items as... -
Page 14: Trademarks, Copyrights And Legal Statement
The wireless network After system start-up, long This manual is created by Midea and Midea reserves all copyrights thereof. No entity or ● password or network is press network pairing button individual may use, duplicate, modify, distribute in whole or in part this manual, or changed. -
Page 15: Data Protection Notice
Midea/eureka/Comfee type or model i5E, i5 Extra, i5 Extra FR, MR08, VCR08, MR09, MR07, i5 Lite, VCR09W, VCR09B, i5 SR, i5 Extra CR, i5 Advance, I5C, I5C-BR to which this declaration relates is in conformity with the essential requirements and... - Page 16 Midea hereby declares that the appliance with MSmartHome functionality meets the essential requirements and other relevant provisions of the Directive 2014/53/EU. A detailed RED Declaration of Conformity can be found online at www.midea.com among the additional documents on the 2.4 GHz band:100mW max.
- Page 17 LETTERA DI RINGRAZIAMENTO Avvertenza per la macchina Grazie per aver scelto Midea! Prima di utilizzare il prodotto Midea, leggere attentamente il presente manuale per assicurarsi di sapere come utilizzare in 1. Questo apparecchio può essere usato da bambini a partire da 8 anni e da persone con ridotte capacità...
- Page 18 4. Se il cavo di alimentazione è danneggiato deve essere sostituito con un cavo o un ( 2004-01 )] 5. La base di ricarica è applicabile solo al prodotto i5C. (Battery pack type : Li-ion, DC gruppo speciale disponi- bile presso il produttore o il suo agente di assistenza.
- Page 19 Add.: No.39 Caohu Avenue, Xiangcheng Economic Development Zone, istruzioni per l'uso e conservarle nelle immediate vicinanze del luogo di installazione o Suzhou, Jiangsu, China dell'apparecchio per un successivo utilizzo! IMPORTATORE:Midea Italia S.r.l. a socio unico Add.: Viale Luigi Bodio 29/37 20158 Milano (MI) Italia...
- Page 20 PANORAMICA DEL PRODOTTO Accessori Prodotto Base di ricarica x1 Spazzola laterale x4 Supporto panno x1 Paracolpi Avvio/Pausa Coperchio Serbatoio acqua Serbatoio Cavo di Filtro x1 Panno x2 pulsante acqua alimentazione x1 rilascio Interruttore Contenitore accensione polvere Spazzola di pulizia x1 Telecomando x1 Batteria x2 Pulsante di...
- Page 21 GUIDA RAPIDA APP e controllo vocale Scarica su Scarica su Primo utilizzo Fase 1 Fase 2 Rete wireless 2,4 GHZ MSmartHome Fase 3 Fase 4 Aprire il coperchio e far scorrere Prima del primo utilizzo, si consiglia di l'interruttore di alimentazione per caricare il robot per almeno 6 ore.
- Page 22 INSTALLAZIONE DEL PRODOTTO Installazione della base di ricarica 1. Assicurarsi che il cavo di alimentazione sia collegato alla base di ricarica. Applicabile a Google Assistant e Amazon Alexa: 2. Posizionare la base di ricarica in piano contro una parete e assicurarsi che vi sia 3.
- Page 23 ISTRUZIONI PER L'USO Telecomando Funzione dei pulsanti NOTA Il telecomando funziona entro un raggio di 15 metri dal robot. Ricarica Direzione Avvio/Pausa Pulizia angolo Avvio/Pausa Pulizia a punti Pulizia Zig-zag Aumento aspirazione Interruttore di Riduzione aspirazione alimentazione (sotto il coperchio) Direzione Controllare manualmente la direzione del robot (avanti, sinistra e destra).
- Page 24 Ricarica del robot aspirapolvere Pulizia 1. Aprire il coperchio e far scorrere l'interruttore di alimentazione in posizione "I" per Si prega di rimuovere fili e oggetti disseminati a terra e di rimuovere gli oggetti accendere il robot. preziosi, fragili e pericolosi che possono cadere prima della pulizia. 2.
- Page 25 3. Aggiungere il robot aspirapolvere all'app. DPremere il pulsante "+" nella schermata principale dell'app e selezion-. are i5C dalla lista dei prodotti disponibili. 4. Collegare il robot alla rete wireless. Dopo aver assemblato e acceso il robot, tenere premuto il pulsante finché...
- Page 26 PULIZIA E MANUTENZIONE Pulizia della spazzola laterale 1. Tirare per rimuovere le spazzole laterali. Rimuovere eventuali capelli aggrovigliati e detriti, quindi reinstallarle. Pulizia della spazzola principale 2. Si consiglia di pulire le spazzole laterali ogni settimana e di sostituirle ogni 6-12 mesi. 1.
- Page 27 3. Il filtro si trova sul lato del contenitore 4. Reinserire il contenitore nel 4. Asciugare il serbatoio dell'acqua. Si sconsiglia l'esposizione alla luce del sole. per la polvere. robot. Rimuovere i detriti battendo il filtro Si consiglia di pulire il filtro ogni contro il contenitore della polvere.
- Page 28 RISOLUZIONE DEI PROBLEMI Problema Causa Soluzione Il suolo è scivoloso. Se il pavimento è incerato, asciugarlo prima dell'uso. Il funzionamento dell'apparecchio può causare errori e malfunzionamenti. Le seguenti L'apparecchio ha tabelle contengono possibili cause e note per la risoluzione di un messaggio di errore saltato i controlli, Fili, scarpe e altri oggetti Ridurre il più...
- Page 29 Questo manuale è creato da Midea e Midea si riserva tutti i diritti d'autore. Nessun ente La password della rete wireless Dopo l'avvio del sistema, o individuo può utilizzare, duplicare, modificare, distribuire in tutto o in parte il o la rete è...
- Page 30 Tipo di modello: i5E, i5 Extra, i5 Extra FR, MR08, VCR08, MR09, MR07, i5 Lite, designati dalle autorità locali VCR09W, VCR09B, i5 SR, i5 Extra CR, i5 Advance, I5C, I5C-BR A cui si riferisce questa dichiarazione è conforme al requisito essenziale e agli altri requisiti pertinenti della direttiva: 2014/53/UE 2011/65/UE (CE) n.
Need help?
Do you have a question about the i5C and is the answer not in the manual?
Questions and answers