Table of Contents
Advertisement
Quick Links
ACCESS & INDUSTRIAL CONTROL
Contents
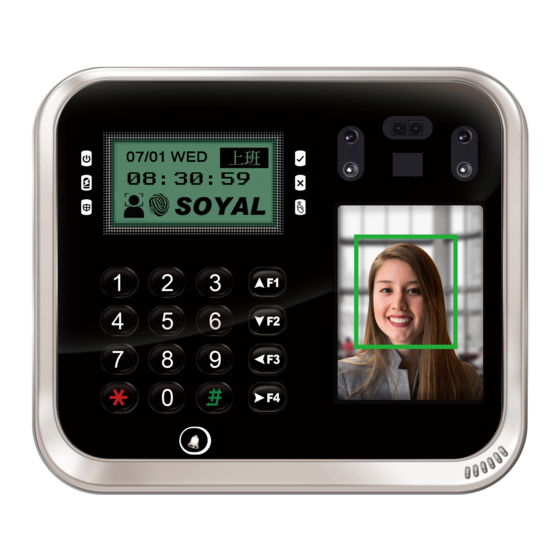
AR-837-EA: Face recognition
1
Products
Or
Installation
Installation Method
A-1.Surface Mounted
A-1.Surface Mounted: Use a screwdriver to screw the mounting plate to the wall.
A-2.Embedded: To dig a hole for 128mmx109mm; and then, use a screwdriver to screw the mounting plate
to the wall.
Pull cable ends through the access hole in the mounting plate.
Attach AR-837-EA to the mounting plate and install screws (supplied) into the holes at the bottom with the
allen key.
Apply power. LED (green) will light up with one beep.
Dimension (mm)
133.45 mm
128 mm
66.7 mm
64 mm
60.3 mm
19.8 mm
4- 6
4- 5.5
Surface mounting hole(Front View)
Flush mounting hole(Front View)
2
Terminal Cables
CN4
CN5
CN6
CN3
CN8
A-2.Embedded
或
48.9 mm
60 mm
25 mm
Surface mounting hole
Flush mounting hole
(Side view)
(Side view)
AR-837-EA
3
Tools
Screws
Water proof Strip
CN13
B.
1
Installation Guide
29.6 mm
40.3 mm
(Digging depth)
- 1 -
4
Optional
Ethernet : DMOD-NETMA10
(TCP/IP Module included RJ45 Connector)
or
DMOD-NETMA11
(TCP/IP Module with POE function)
Any Wiegand Output Module
(CN10)
AR-MDL-721V
(Voice Module)
AR-321L485-5V
(TTL to RS-485 Converter)
2
V230606
Advertisement
Table of Contents

Related Manuals for Soyal AR-837-EA


Summary of Contents for Soyal AR-837-EA
- Page 1 Pull cable ends through the access hole in the mounting plate. Attach AR-837-EA to the mounting plate and install screws (supplied) into the holes at the bottom with the allen key. Apply power. LED (green) will light up with one beep.
-
Page 2: Connector Table
Surface / Flush-mounted Multifunctional Face & RFID Recognition Controller V230606 Notice 1.Tubing: The communication wires and power line should NOT be bound in the same conduit or tubing. 2.Wire selection: Use AWG 22-24 Shielded Twist Pair to avoid star wiring, CAT 5 cable for TCP/IP connection 3.Power supply: Don’t equip reader and lock with the same power supply. -
Page 3: Wiring Diagram
AR-837-EA V230606 ACCESS & INDUSTRIAL CONTROL Wiring Diagram Connect to Electric Strike Connect to Electric Bolt Connect to Magnetic Lock N.O. POWER – 12VDC N.C. Magnetic Electric Strike Lock Main Port Main Port Main Port – POWER POWER 12VDC 12VDC Electric Bolt P.T.Exit... -
Page 4: Controller Mode
POWER 12VDC 1. AR-837-EA can be set up as WG26/WG34/WG64 while the Controller is in WG Mode. These Controller can also be paired with the Controller that has WG input function. 2. Networking Setting: Select E Series Controller Parameter Edit in 701Server,tick up the function “Ev5 WG out/Hv3 Lift out”... -
Page 5: Tag Information
AR-837-EA V230606 ACCESS & INDUSTRIAL CONTROL Function Description of Front Panel & Indicator System will automatically exit Programming Mode when inactivating for 30 seconds. (Green) LED status indicates controller’s mode and status. Error (Red) OK (green) – blinking constantly when operating in Programming Mode... - Page 6 H. Arming Password Arming PWD → Input 4-digit PIN (0001~9999; Default: 1234) → Succeeded Access programming mode → Parameters[1] → Or via 701Server and set it on AR-837-EA screen I. Arming Delay Time Access programming mode → Parameters[1] → ArmingDelayTm → Enter armed sta. Delay time(Sec), Range:000~255;...
-
Page 7: Anti-Pass-Back
Surface / Flush-mounted Multifunctional Face & RFID Recognition Controller V230606 Enable/Disable the arming status: Standby Mode Card only Card or PIN Card and PIN Open the door No open the door Input user address → Input Present the tag to reader → Input Present the tag to reader →... -
Page 8: Parameter Setting Menu
Surface / Flush-mounted Multifunctional Face & RFID Recognition Controller V230606 Q. OpenZone OnOff OpenZone → Main Controller Auto Open Zone (0:disable, 1:enable) → Access programming mode → Parameters[1] → Open Door lmm. During Open Zone (0:No, 1:Yes) → WG1 Port Auto Open Zone(0:disable,1:enable) → Open Door Imm.During Open Zone(0:No, 1:Yes) →... - Page 9 AR-837-EA V230606 ACCESS & INDUSTRIAL CONTROL F a ce E nrol lm en t Ti p s When registering for facial recognition, it is recommended to place the face close to the camera and try to fill the frame as much as possible by moving the face forward. This can increase the chances of a successful registration.
- Page 10 AR-837-EA V230606 ACCESS & INDUSTRIAL CONTROL Not es a n d Tip s fo r R e g i s t r a ti o n and Re c o gnit i on of We a ring Fa c e Ma s k...
- Page 11 AR-837-EA V230606 ACCESS & INDUSTRIAL CONTROL Full Function Command Menu Table Entering Input 123456 PPPPPP Down [e.g.] The Default Value= 123456. If already changed the Master Code= 876112, input 876112 → Access programming mode Esc/Quit Enter/OK P.S.If no instruction is entered within 30 sec., it will automatically leave the programming mode.
- Page 12 AR-837-EA V230606 ACCESS & INDUSTRIAL CONTROL Full Function Command Menu Table 3. Parameters [1] 3-1. Node ID 3-2. OnOff OpenZone 3-1-1 3-1-3 3-1-5 3-1-7 3-2-1 Input New NodeID Enable DHCP Main Controller WG1 Door Number Net Mask (IPv4) Range: 001~254...
- Page 13 AR-837-EA V230606 ACCESS & INDUSTRIAL CONTROL Full Function Command Menu Table 4. Parameters [2] 4-3. Miscellaneous 4-4. Force Open .. 4-5. Close & Stop 4-6. Anti-passback 4-3-10 4-3-12 4-3-14 (837EF) 4-4-1 4-5-1 4-6-1 Main Controller Lock Door Relay Main Controller...
Need help?
Do you have a question about the AR-837-EA and is the answer not in the manual?
Questions and answers