
Related Manuals for Kleenmaid ICT9030


Summary of Contents for Kleenmaid ICT9030
- Page 1 Instructions for use and warranty details To register your warranty or make a warranty claim, scan this QR code: Induction Cooktop Model No.: ICT9030...
- Page 2 Once installation is complete, please read this instruction manual carefully and get to know the controls and the features of your new Kleenmaid appliance. These simple instructions will enable you to achieve excellent results from the very first time you use it.
-
Page 3: Table Of Contents
Content Safety Warnings ......................... 4 Installation ........................4 Electrical Shock Hazard ................4 Cut Hazard ....................4 Important safety instructions ............... 4 Operation and maintenance ..................5 Electrical Shock Hazard ................5 Health Hazard ....................5 Hot Surface Hazard .................. 5 Cut Hazard .................... -
Page 4: Safety Warnings
Please read this User Manual in order to fully understand how to install and operate your cooktop correctly. For installation, please read the installation section. Read all the safety instructions carefully before use, and keep this User Manual for future reference. -
Page 5: Operation And Maintenance
OPERATION & MAINTENANCE Electrical Shock Hazard • Do not cook on a broken or cracked cooktop. If the cooktop surface should break or crack, switch the appliance off immediately at the mains power supply (wall switch) and contact a qualified technician. •... - Page 6 • Do not leave children alone or unattended in the area where the appliance is in use. • This appliance is not intended for use by persons (including children) with reduced physical, sensory or mental capabilities, or lack of experience and knowledge, unless they have been given supervision or instruction concerning use of the appliance by a person responsible for their safety.
-
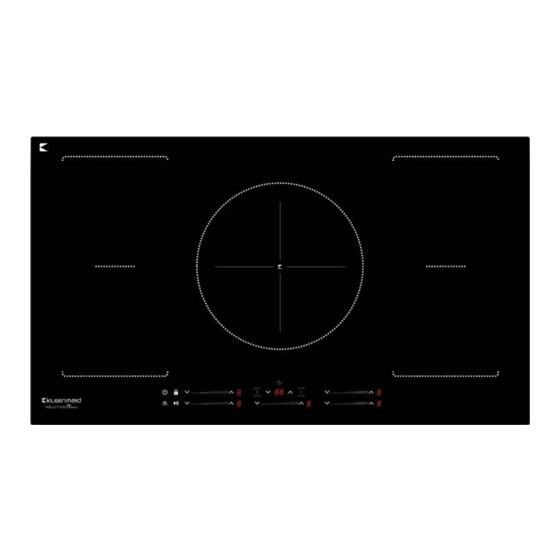
Page 7: Product Overview
Product Overview Top View Model:ICT9030 Induction cooker max. 2000 W Boost 2600W Left Front zone Induction cooker max. 1500 W Boost 2000W Left Rear zone Induction cooker max. 2300 W Boost 3000W Centre zone Induction cooker max. 2000 W Boost 2600W Right Rear zone Induction cooker max. -
Page 8: Control Panel
Control Panel Cooking zone/Power level selection control Timer control Flex Zone & BBQ Function control Keep warm function control Pause/Resume function control Lock control On/Off control An Introduction To Induction Cooking Induction cooking is a safe, advanced, efficient, and economical cooking technology . It works by electromagnetic vibrations generating heat directly in the pan, rather than indirectly through heating the glass surface. - Page 9 Before using your New Induction Cooktop • Read this user manual, taking special note of the ‘Safety Warnings’ section. • When unpacking the cooktop please ensure that all contents of the carton are removed prior to disposing of the packaging. These articles should be retained for the installer.
-
Page 10: Choosing The Right Cookware
Choosing the Right Cookware Only use cookware with a base suitable for induction cooking. Look for the induction symbol on the packaging or on the bottom of the pan. You can check whether your cookware is suitable by carrying out a magnet test. Move a magnet towards the base of the pan. -
Page 11: Using Your Induction Cooktop
Using your Induction Cooktop To start cooking After power on, the buzzer sounds once, all the displays light up for 1 second then go out, indicating that the cooker has entered the state of standby mode. 1. T ouch the ON/OFF control all the displays show “-“... -
Page 12: When You Have Finished Cooking
When you have finished cooking 1. Touch the cooking zone selection control that you wish to switch off. Turn the cooking zone off by touching the “v” and slide along the selection control to the left point,and then hold "v" for 1 second. Ensure the power display shows "0", then shows "H"... - Page 13 The power display will show “P” to indicate that the Boost function is operating on that zone. Boost power will operate for 5 minutes and then the zone will go back to the power level which was set before Boost. To cancel the Boost function during the 5 minute duration, touch the cooking zone selection control, and an indicator next to the control will flash.
- Page 14 Using the Flex Zone as two independent zones. To use the flexible area as two different zones with different power settings, press the slider of the heating zone again, then touch the Flex Zone control, indicator next to the Flex Zone control will disappear and the zones will return into their previous settings.
-
Page 15: Safety Features
Safety Features Locking the Controls The cooktop controls may be locked to prevent unintended use (for example children accidentally turning a cooking zone on). When the controls are locked, all the controls except the On/Off control are disabled. To lock the controls Touch the keylock control (see 5 on the Control Panel diagram page 8) and hold for 3 seconds. -
Page 16: Using The Timer
Detection of Small/Unsuitable Articles When an unsuitable size or non-magnetic pan (e.g. aluminium) or some other unsuitable item (e.g. key, knife, fork) has been left on the induction cooktop, the cooktop automatically goes to standby after 1 minute. The cooling fan will operate for a further 1 minute. - Page 17 If the setting time exceeds 99 minutes, the timer will automatically return to 00 minute. When the set time expires a buzzer will sound for seconds and the timer display will show “—“. Setting the timer to turn off one cooking zone 1.Touch the cooking zone selection control for the cooking zone to be timed.
- Page 18 Setting the timer to turn off multiple cooking zones 1. If this function is used for more than one cooking zone, the timer indicator will show the shortest time. (e.g. if a zone has a set time of 3 minutes, and another zone has a set time of 6 minutes, the timer indicator shows “3”.) NOTE: The flashing red dot next to the power level indicator means the timer indicator is showing the time remaining for that cooking zone.
-
Page 19: Cooking Guidelines
Cooking Guidelines Take care when frying as the oil and fat heat up very quickly, particularly if you’re using the Boost function of the induction cooktop. At extremely high temperatures, oil and fat will ignite spontaneously and this presents a serious fire risk. Cooking Tips •... -
Page 20: Stir-Frying
For stir-frying 1. Choose an induction compatible flat-based wok or a large frying pan. 2. Have all the ingredients and equipment ready. Stir-frying should be quick. If cooking large quantities, cook the food in several smaller batches. 3. Preheat the pan briefly and add two tablespoons of oil. 4. -
Page 21: Care And Cleaning
Care and Cleaning What? How? Important! Everyday soiling on glass 1. Switch the power to the • When the power to the cooktop is (fingerprints, marks, cooktop off. switched off, there will be no ‘hot stains left by food or 2. -
Page 22: Hints And Tips
Hints and Tips Problem Possible causes What to do The cooktop No power. Make sure the cooktop is connected cannot be turned to the power supply and that it is switched on. Check whether there is a power outage in your home or area. If you’ve checked everything and the problem persists, call a qualified technician. -
Page 23: Failure Display And Inspection
(see back cover of this manual for details). When booking a service please provide your Model No: ICT9030 and the individual Serial Number of your appliance. This is found on the rating label... -
Page 24: Technical Specification
Installation NOTE: Before making preparations for or commencing installation, the installer should refer to the current online version of the User Manual, which is available on the Kleenmaid website (see back cover for details). Selection of installation equipment Cut out the work surface according to the sizes shown in the drawing. - Page 25 Before installing the cooktop, ensure that • the work surface is square and level, and no structural members interfere with space requirements • the work surface is made of a heat-resistant material • if the cooktop is installed above an oven, the oven has a built-in cooling fan •...
-
Page 26: Locating The Fixing Brackets
Attaching the seal to the cooktop The seal should be attached to the cooktop by following the instructions below before the cooktop is installed into the benchtop cut out. • The unit should be placed on a stable, smooth surface (eg. -
Page 27: Connecting The Cooktop To The Mains Power Supply
3. The cooktop should be installed such that sufficient heat radiation can be ensured to enhance its reliability. 4. The wall and induced heating zone above the work surface should be heat-resistant. 5. To avoid any damage, the sandwich layer and adhesive must be resistant to heat. 6. -
Page 28: Understanding Power Limitation
Understanding Power Limitation 1. When all cooking zones are turned on together the maximum power level of the - Left front zone (cooking zone #1) is 9 - Left rear zone (cooking zone #2) is 9 - Middle zone (cooking zone #3) is 7 - Right rear zone (cooking zone #4) is 7 - Right front zone (cooking zone #5) is 7. - Page 29 This appliance is labeled in compliance with European directive 2012/19/EU for Waste Electrical and Electronic Equipment (WEEE). By ensuring that this appliance is disposed of correctly, you will help prevent any possible damage to the environment and to human health, which might otherwise be caused if it were disposed of in the wrong way.
- Page 30 Kleenmaid Warranty, however, if repair is needed because of Product failure during normal Domestic Use, Kleenmaid has the option to repair or replace the defective Product or part of the Product with a product or part of like kind and quality.
- Page 31 Service under this warranty may be limited by the area in which you live. Service to remote and regional areas may incur additional travel costs which will be payable by you. You will be advised of this at the time you make a claim and Kleenmaid arranges to attend your premises.
- Page 32 Other products available in the Kleenmaid range of appliances Washing machines Clothes dryers Dishwashers Ovens Cooktops Steam ovens Microwave ovens Built in espresso coffee machines Rangehoods Freestanding ovens Refrigerators & Freezers Beverage Serving Cabinets Water Dispensers Vacuum Cleaners Compass Capital Services Pty Limited...
Need help?
Do you have a question about the ICT9030 and is the answer not in the manual?
Questions and answers