Table of Contents
Advertisement
Quick Links
Advertisement
Table of Contents

Related Manuals for Kleenmaid ICT6020


Summary of Contents for Kleenmaid ICT6020
- Page 1 Instructions for use and warranty details Induction ICT6020...
- Page 2 Once installation is complete, please read this instruction manual carefully and get to know the controls and the features of your new Kleenmaid appliance. These simple instructions will enable you to achieve excellent results from the very first time you use it.
-
Page 3: Safety Warnings
Safety Warnings Your safety is important to us. Please read this information before using your cooktop. Installation Electrical Shock Hazard • Disconnect the appliance from the mains electricity supply before carrying out any work or maintenance on • Connection to a good earth wiring system is essential and mandatory. -
Page 4: Health Hazard
• This appliance is to be properly installed and earthed only by a suitably qualified person. • This appliance should be connected to a circuit which incorporates an isolating switch providing full disconnection from the power supply in accordance with the wiring rules. •... - Page 5 • Metallic objects such as knives, forks, spoons and lids should not be placed on the hob surface since they can get hot. • Keep children away from the hob when in use. • Handles of saucepans may be hot to touch. Check that saucepan handles do not overhang other active cooking zones.
- Page 6 • Do not allow children to play with the appliance or sit, stand, or climb on it. • Do not store items of interest to children in cabinets above the appliance. Children climbing on the cooktop could be seriously injured. •...
- Page 7 •This appliance is intended to be used in household and similar applications such as: -staff kitchen areas in shops, offices and other working environments; -farm houses; -by clients in hotels, motels and other residential type environments; -bed and breakfast type environments. •WARNING: The appliance and its accessible parts become hot during use.
- Page 8 •WARNING: Danger of fire: do not store items on the cooking surfaces. •WARNING: For hob surfaces of glass-ceramic or similar material which protect live parts, if the surface is cracked, switch off the appliance to avoid the possibility of electric shock. •A steam cleaner is not to be used.
-
Page 9: Product Overview
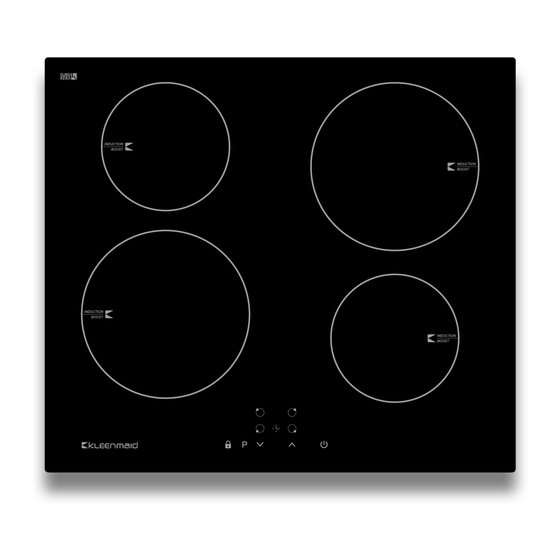
Read all the safety instructions carefully before use and keep this User Manual for future reference. Product Overview Top View 1. 2000/2600 W zone 2. 1500/1800 W zone 3. 2000/2600 W zone 4. 1500/1800 W zone 5. Glass plate 6. Control panel Control Panel 1. -
Page 10: Before Using Your New Hob
An Introduction to Induction Hobs • Induction cooking is a safe, advanced, efficient, and economical cooking technology. It works by electromagnetic vibrations generating heat directly in the pan, rather than indirectly through heating the glass surface. The glass becomes hot only because the pan eventually warms it up. Iron pot Magnetic circuit Ceramic glass plate... -
Page 11: Using The Touch Controls
the same size as the cooking zone. Always centre your pan on the cooking zone. • Always lift pans off the hob – do not slide, or they may scratch the glass. Using the Touch Controls • The controls respond to touch, so you don’t need to apply any pressure. •... - Page 12 1. Touch the ON/OFF control. After power on, the buzzer beeps once, with all displays showing “ – “ or “ – – “, indicating that the induction hob has entered the state of standby mode. 2. Place a suitable pan on the cooking zone that you intend to use. Make sure the bottom of the pan and the surface of the cooking zone are clean and dry.
-
Page 13: When You Have Finished Cooking
• the pan you’re using is not suitable for induction cooking or, • the pan is too small or not properly centred on the cooking zone. No heating takes place unless there is a suitable pan on the cooking zone. The display will automatically turn off after 1 minute if no suitable pan is placed on it. -
Page 14: Using The Boost Function
Using the Boost Function The Boost function is a function that maximizes power to a selected cooking zone. When activated the function lasts for 5 minutes and provides more powerful, faster cooking eg to heat a large pot of water to cook rice or pasta. -
Page 15: Locking The Controls
Locking the Controls • You can lock the controls to prevent unintended use (for example children accidentally turning the cooking zones on). • When the controls are locked, all the controls except the ON/OFF control are disabled. To lock the controls Touch the child lock control. -
Page 16: Using The Timer
Power level Default working timer (hour) Using the Timer You can use the timer in two different ways: • You can use it as a minute minder. In this case, the timer will not turn any cooking zone off when the set time expires. •... -
Page 17: Setting The Timer To Turn One Cooking Zone Off
If the setting time exceeds 99 minutes, the timer will automatically return to 0 minutes. 4. Touch the ‘Timer’, the timer is cancelled, and the “00” will show in the minute display. 5. When the time is set, it will begin to count down immediately. The display will show the remaining time and the timer indicator will flash for 5 seconds. - Page 18 2. Touch timer control, the minder indicator will start flashing and “30” will show in the timer display 3. Set the time by touching the control of the timer. Hint: Touching the “v” or “^” control of the timer once will decrease or increase by 1 minute.
- Page 19 NOTE: The red dot next to power level indicator will illuminate indicating that zone is selected. 6. When cooking time expires, the corresponding cooking zone will be switched off automatically. Note: Other cooking zones turned on previously will keep operating. Setting the timer to turn more than one cooking zone 1.
-
Page 20: Cooking Guidelines
NOTE: If you want to change the time after the timer is set, start again from step Cooking Guidelines Take care when frying as the oil and fat heat up very quickly, particularly if you’re using the Boost function of the induction hob. At extremely high temperatures, oil and fat will ignite spontaneously and this presents a serious fire risk. -
Page 21: Heat Settings
and become tender before serving. For stir-frying 1. Choose an ceramic compatible flat-based wok or a large frying pan. 2. Have all the ingredients and equipment ready. Stir-frying should be quick. If cooking large quantities, cook the food in several smaller batches. 3. -
Page 22: Care And Cleaning
Care and Cleaning What? How? Important! Everyday soiling on glass 1. Switch the power to the • When the power to the cooktop is (fingerprints, marks, cooktop off. switched off, there will be no ‘hot stains left by food or 2. -
Page 23: Hints And Tips
Hints and Tips Problem Possible causes What to do The cooktop No power. Make sure the cooktop is connected cannot be turned to the power supply and that it is switched on. Check whether there is a power outage in your home or area. If you’ve checked everything and the problem persists, call a qualified technician. -
Page 24: Failure Display And Inspection
The induction hob or a Technical fault. Please note down the error cooking zone has letters and numbers, switch turned itself off the power to the induction hob unexpectedly, a tone off at the wall, and contact a sounds and an error qualified technician. -
Page 25: Technical Specification
Technical Specification Cooking Zones 4 Zones Supply Voltage 220-240V~,50-60Hz Total Power 6600-7200W Product Size 590*520*55 L×W×H(mm) Building-in Dimensions A×B 560*490 (mm) Weight and Dimensions are approximate. Because we continually strive to improve our products we may change specifications and designs without prior notice. - Page 26 Under all circumstances, make sure the induction hob is well ventilated and the air inlet and outlet are not blocked. Ensure the induction hob is positioned correctly as shown below. Note: The safety gap between the hob and the cupboard above the hob should be at least 760mm.
- Page 27 Cautions 1. The cooktop must be installed by qualified personnel or technicians. If necessary, please see the "Support" section on our website for suitably qualified installers. Unqualified persons should not attempt to install this appliance. 2. The cooktop should not be mounted to cooling equipment, dishwashers or rotary dryers.
- Page 28 1. If the supply cord is damaged, it must be replaced by the manufacturer, its service agent or similarly qualified persons in order to avoid a hazard. 2. If the appliance is being connected directly to the mains supply, an omnipolar circuit breaker must be installed with a minimum gap of 3mm between the contacts.
- Page 29 This appliance is labeled in compliance with European directive 2002/96/EC for Waste Electrical and Electronic Equipment (WEEE). By ensuring that this appliance is disposed of correctly, you will help prevent any possible damage to the environment and to human health, which might otherwise be caused if it were disposed of in the wrong way.
- Page 30 Australian Consumer Law. c. In the event that a request for repair is made against this Kleenmaid Warranty where the serial number for the Product cannot be verified or you cannot produce for verification a proof of purchase for the Product (including but not limited to the original invoice), the repairer will not carry out any repairs on the Product and you will be charged a service call-out fee.
- Page 31 13. Kleenmaid accepts no liability for items that are lost, damaged, or stolen as a result of freight, transport or storage. If you are required to transport the Product to an authorised service centre, you must ensure that it is securely packed and insured.
Need help?
Do you have a question about the ICT6020 and is the answer not in the manual?
Questions and answers